October 31, 2021

How to Transfer Contacts from iPhone to PC without iTunes or iCloud

 Contacts play an essential role in our lives.  In today’s digital life, you have many activities that are associated with contacts. For example, Facebook will recommend your friends, according to your iPhone contacts.  Thus, it is highly recommended to export all contacts from iPhone to your PC.  In this article, we will share with you the details about how to transfer contacts from iPhone to PC.

transfer contacts from iPhone to pc

Way 1: Backup Contacts from iPhone to PC via iTunes

 iTunes is well known to all Apple users as it offers a convenient way to sync iPhone data to the computer. But to backup iPhone contacts from iPhone to Windows PC, you need to backup all the iPhone data as iTunes does not allow you to backup only contacts to the computer.

Step 1: Update your iTunes on the computer and then plug the iPhone into your computer. iTunes will detect the iPhone and sync the data.

Step 2: You need to tick the iPhone icon and click on the Summary option. After that, you can see the Backups part in the right panel.

Step 3: Choose This Computer option under Automatically backup part and then click on Back Up Now option under Manually Back Up and Restore section.

backup iPhone to this computer

Step 4:  The iPhone data is backed up.  Contacts are saved on your computer. You can restore it to your iPhone when it is needed.

the iPhone is backed up

Way 2: Export iPhone Contacts from iPhone to PC without iTunes

 If iTunes fails to sync your iPhone data but only offers the restore option, you can use iCloud to export iPhone contacts from iPhone to PC.

Step 1: First of all, you should enable Contacts to sync on iCloud on your iPhone.  Just go to Settings > iCloud > Contacts and then turn it on.

Step 2: Sign in to the iCloud official website and then click on the Contacts option.

sign in iCloud and choose Contact

Step 3: Then all contacts on the iPhone will be loaded. You just need to click on the setting icon on the bottom-left corner and then choose Export vCard. In no time, the contacts will be downloaded on your PC.

export contact to your PC


Way 3: Transfer iPhone Contacts to PC without iTunes and iCloud

 When your iCloud is out of storage and iTunes fails to back up the iPhone data, how could you backup contacts to the Windows computer? iSunshare iSyncGenius offers you a much easier way to transfer only contacts from iPhone to PC.  You can keep multiple contact files on the computer.

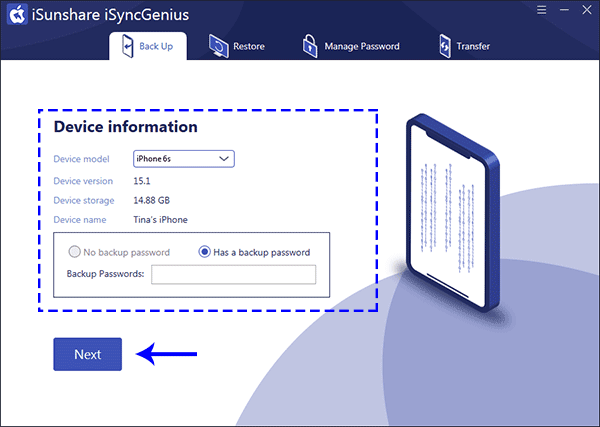
Step 1: Build the connection between the iPhone and your PC via the USB cable. After that, open the application. At the same time, unlock your iPhone and click Trust in the pop-out box that asks for your permission.  In no time, iSyncGenius will recognize your iPhone.  If the iPhone is set with the backup password, enter the password and click on the Next button.


load iPhone in iSyncGenius

Step 2: Click on the Classified backup option and then iSyncGenius will load the iPhone data. Now tick the Contacts option and set the path to save the contacts backup file.  Afterward, click the Start button.

select Contact option to backup

Step 3: When the process ends, you can go to view the contacts on your Windows computer. They are saved as XML file. 


Related Articles:

  1. How to Backup iPhone to Windows Computer with or without iTunes 
  2. How to Transfer Photos from iPhone to Laptop on Windows 10
  3. How to Restore Contacts on My iPhone from Backup 
  4. How to Sync iPhone to iTunes after Passcode Forgot  

September 27, 2021

How Can I Edit A Secured PDF without Password

 “I got a PDF from my teammate and I was going to edit some of the content. But when I entered the password, it says the permission password is wrong. Now I failed to contact my teammate as he was on holiday. So, how can I edit a secured PDF without a password?” 

Generally, when we secure the PDF with a permissions password, we do not want others to copy, edit or print the content. But when you forgot the PDF permission password, how to edit a secured PDF without a password? In this article, we summed up three common methods for you. 

Method 1: Official Method from Adobe Acrobat 

Method 2: Manually Remove Edit Restriction of PDF via Google Chrome 

Method 3: Easy to Edit a Secured PDF with Professional PDF Permissions Remover 

Method 1: Official Method from Adobe Acrobat 

We found a solution from the Adobe help center, which enables users to make the secured PDF editable. But this method can only apply to the situation that you are the PDF owner.

Step 1: Open the secured PDF with Acrobat DC.

Step 2: Access File >Print. 

Step 3: In the pop-out prompt, select Adobe PDF as the printer and then hit the Print option. 

Step 4: Enter a new name for the PDF file and then click on the Save button. After that, you can get a new PDF file without the limitation. You can open and edit it freely in Acrobat. 

print option

Method 2: Manually Remove Edit Restriction of PDF via Google Chrome 

There is a built-in PDF reader in Google Chrome. You can take advantage of it to unsecure a secured PDF file. But you must make sure that the PDF print function is not restricted. Otherwise, you will not succeed in removing the PDF permission password so as to edit the PDF. 

Step 1: Launch Google Chrome and then drag & drop the protected PDF into Google Chrome browser. 

Step 2: Click on the Print icon once you access the PDF. If there is a document open password, you need to enter the password to get the PDF viewed. 

Step 3: Check the Save as PDF option and hit the Save button. 

Step 4: After that, you can open the PDF in Adobe Acrobat again and edit the content in your way. 


Method 3: Easy to Edit a Secured PDF with Professional PDF Permissions Remover 

There is a much easier way to remove the limitation on PDF content. You can try the professional PDF password permission remover tool—iSunshare PDF Unprotect Genius to regain the ability to edit, copy and print. This tool deserves your trust as it would never do harm to the PDF content. If you forgot the PDF permissions password, this program will help to remove the restriction of PDF in minutes. What a time-saving tool! 

iSunshare PDF Unprotect Genius gives you the option to open the unprotected PDF directly without entering any password. Moreover, it supports you to remove the secured PDF with the known document open password. 

Step 1: Download and install the application on your Windows computer. 

install iSunshare PDF Unprotect Genius

Step 2: Click the folder icon on the first section to import the secured PDF. 

import secured PDF

Step 3: The default destination location is on your computer desktop. You can change the location to save your unprotected PDF.

set PDF destination path

Step 4: Click the Start button to remove the PDF restriction. In the end, a message box will pop up to notify you that “Successfully Removed! Open it now?” You can click on the OK button to view and edit the content. 

successfully removed PDF restriction


March 20, 2021

How to Fix My iPhone Keeps Turning Off Randomly

 Do you encounter your iPhone keeps turning off randomly by itself? It must be very frustrating. Take it easy! This post is specially prepared for this situation. In this post, we will explain why your iPhone keeps turning off randomly and show you five effective methods to fix this issue in ease.

  • What causes an iPhone to keep shutting down randomly?
  • Method 1: Force restart your iPhone
  • Method 2: Update iOS version to the latest
  • Method 3: Fix with iOS repair tool without data loss
  • Method 4: Restore with iTunes in Recovery Mode (loss data)
  • Method 5: Contact Apple Support
  • Conclusion

What causes an iPhone to keep shutting down randomly?

There are various kinds of reasons why an iPhone keeps shutting down randomly. Some main causes are listed as follows.

Unstable iOS update. The process of iOS updating is interrupted for various reasons causing there is something wrong with iOS. As a result, iPhone keeps shutting down suddenly.

Hardware Problem. If iOS is stable, it is very likely that there is something wrong with hardware like screen or motherboard. A broken hardware component could be the culprit of iPhone turns off randomly.

Unstable driver: If a driver on the iPhone is unstable because of damage to the internal system of the iPhone, it may also cause the iPhone keeps turning off randomly.

Method 1: Force restart your iPhone

Restarting your iPhone is a simple and worth trying way to fix any issue of iPhone. If a normal restart cannot work, you can try to force restart it. The ways to force restart iPhone vary depending on iPhone model.

iPhone 8 and later

Press and release the Volume Up button. Then press and release the Volume Down button. Finally, press and hold the Side button and then release when the Apple logo appears.

iPhone 7/7 Plus

Press and hold the Volume Down button and the Power button at the same time and then release both when the Apple logo appears.

iPhone 6 and earlier

Press and hold the Home button and Power button at the same time and then release both when the Apple logo appears.

how to force restart iphone

Method 2: Update iOS version to the latest

A new iOS version can fix some software issues and system bugs. If the iOS version of your device is outdated, you can follow the steps below to update iOS version to the latest to fix this issue of iPhone keeps turning off randomly.

Steps: Go to Settings > General > Software Update. If a new iOS update is available, a notification will be displayed. Then tap Download and Install. Wait for a moment and the iPhone will reboot up when the update is finished.

update ios version

Method 3: Fix with iOS repair tool without data loss

System errors could be the culprit of iPhone keeps turning off by itself. In this case, repairing iOS is the way out. iSunshare iOS Repair Genius is recommended here to fix the issue of iPhone keeps turning off randomly. As a powerful iOS repair tool, iSunshare iOS Repair Genius can fix various types of iOS problems without further ado. Such as tiktok app keeps crashing on iPhoneiPhone stuck on Apple Logo, update screen and so on.

Preparations:

1.     Download and install this tool on your Windows computer.

2.     Make sure that your iPhone is connected to computer.

3.     Install iTunes to make this tool run more smoothly.

Step 1: Firstly, launch this tool and click Standard Mode on the left side. Then click Start button on the next page. If your iPhone is well connected with computer, click Next to move on.

select repair mmode

Step 2: Then the tool will detect your device and show you the available firmware package. Click Download button to download it.

download firmware package

Step 3: Once downloaded, it will be verified automatically. Then click Repair button to start fixing your device. After a while, a popup dialog tells you it has been repaired successfully. Finally, you will get a new iPhone that can work normally.

repair iphone

Method 4: Restore with iTunes in Recovery Mode (loss data)

If you don’t care about the data on your iPhone, you can try to restore it to factory settings with iTunes. Detailed steps are listed as follows.

Preparations:

1.     Download and install iTunes of latest version on your computer.

2.     Connect iPhone to computer and put it into Recovery Mode. If a message box pops up asking if trust this computer, click Trust to continue.

Steps: Open iTunes and it can detect your iPhone automatically. Select your device when it appears on iTunes screen. Then Click Restore [your device]. On a popup window, click Restore again to confirm. It will take some time to erase your device and install iOS of new version. Once finished, your device will be factory reset and reboot up automatically.

restore iphone with itunes

Method 5: Contact Apple Support

If all the methods above don’t apply to you, there is a high probability that the hardware of device is broken such as motherboard or battery. In this case, you need to send it to Apple store to get it repaired. They can offer the best support options to help you solve all kinds of hardware issues.

Conclusion

No matter what causes your iPhone to turn off by itself, as long as you read this guide and follow the detailed steps above, your device can get back to normal in most cases. If your iPhone or iPad always encounters with system problems like stuck in spinning wheel, white screen of death or lagging and freezing, it is highly recommended to use iSunshare iOS Repair Genius to fix these issues. It can enable you to easily fix most common iOS system problems like an expert.

February 24, 2021

How to Recover Deleted Videos from PC in Windows 10

 If you unintentionally delete videos in Windows 10, is there any way to recover them? The answer is YES! You can recover the deleted videos from your computer in a high success rate as long as you get a right way. In this post, we will introduce to you three effective ways to recover videos from PC in Windows 10.

  • Way 1: Recover deleted videos from Recycle Bin
  • Way 2: Recover deleted videos with data recovery tool
  • Way 3: Recover deleted videos by Windows 10 Backup

recover deleted videos from pc in windows 10

Way 1: Recover deleted videos from Recycle Bin

Recycle Bin in Windows 10 is used to store the deleted files or folders temporarily before they are permanently deleted by user. When you delete video by accident or find that the video is lost from your computer, the first choice that you should consider is to recover it from Recycle Bin. Here is how to do.

Step 1: Double-click the icon of Recycle Bin on the desktop to open it.

Step 2: Type .mp4 in the search box in the top right corner of interface.

Step 3: The deleted videos of mp4 format will be shown on the screen. Right-click the video that you want to restore and select Restore option. Finally, the deleted videos will be restored to the original location.

recover deleted videos from recycle bin

Way 2: Recover deleted videos with data recovery tool

If you can’t find out the deleted videos in Recycle Bin, it may be deleted permanently from your computer. In this case, you can use data recovery tool to recover the deleted videos. iSunshare BitGenius is a powerful and trustworthy data recovery tool that can recover lost data from NTFS&FAT32 partition or drives in Windows computer. It can also help you easily recover the deleted videos in Windows 10. Here are detailed steps.

Step 1: Download and install iSunshare BitGenius on your Windows 10 computer.

Step 2: Launch it and click the hard drive that the deleted video located in the Hard Disk Drives section. If you remember the detailed location of deleted video, you can choose to customize a location to find it more quickly. Then click Start button.

select hard drive

Step 3: The tool will take some time to scan the deleted files. Once completed, all the lost files including videos will be displayed on the interface. Then click Filter button. In the new popup window, check the checkbox of Videos and then click Apply button. Then all the deleted videos will be shown on the right pane. Select the videos that you want to recover and click Recover button.

filter videos from the scanning results

Step 4: Select a location for the deleted videos.

select location

Step 5: At last, the deleted videos are restored to your computer. Then a tips box pops up to ask you if open the recovery folder. Click Yes button and you will see all the deleted ppt files are recovered successfully.

click yes

Way 3: Recover deleted videos by Windows Backup

There is a feature named Windows Backup in Windows 10 that allows you to back up the partition as you want. If you turn on this feature, the system will automatically back up your partition on schedule. So, if this feature is turned on in your Windows 10 computer, you can try to restore the partition to get the deleted videos back.

Step 1: Open Control Panel and click Backup and Restore option.

click backup and restore

Step 2: Click Restore my files button.

click restore files

Step 3: In the new popup window, click Search button.

search

Step 4: In the search box, type .mp4 and click Search button. Then all the video files are displayed on the screen. Check the checkbox of the video that you want to restore and click OK button.

select the videos that you want to restore

Step 5: Click Next button.

next

Step 6: Select a location and click Restore button.

restore

Step 7: Finally, the deleted video is restored successfully. However, the downside of this way is that you just can restore one video file at one time.

finished

January 20, 2021

How to Fix iPhone Grey Screen

 My iPhone 7 screen suddenly goes gray. No matter what I do, it does not make responding. How can  I do to get iPhone 7 out of grey screen?”

The iPhone grey screen can lead to the death of an iPhone so it is also called the iPhone grey screen of death. When your iPhone screen turns gray, what you can do to get out of the grey mode? Read this article and you can get the answer.

how to fix iPhone grey screen

Way 1: Force Restart iPhone

When the iPhone fails to turn on and displays a grey screen, the first action you should do is to force restart the iPhone to check whether it works or not:

For the iPhone 8 and above users, you can press and quickly release the volume up button and then do the same to the volume down button. After that, press and hold the side button until you see the Apple logo.

If you are using iPhone 7, you can press and hold both the volume down button and the Sleep/Wake button at the same time until you see the Apple logo. After that, release the buttons.

For iPhone 6 and earlier iPhones, you can press and hold the Sleep/Wake button and Home button until the Apple logo appears.

force restart iPhone

Way 2: Try to restore iPhone in iTunes

When your iPhone screen is gray, you can take iTunes into considering solving the issue. It should be notice that all information and settings on iTunes will be deleted if you choose to restore the iPhone in iTunes with the following procedure:

Step 1: Launch iTunes on your computer and then connect the iPhone with grey screen to the computer.

Step 2: After iTunes detects the iPhone, you can click the icon near the top left of the iTunes to enter your iPhone interface. After that, click Summary on the left panel.

Step 3: On the right panel, click Restore iPhone and then it will pop out a box that asks for your confirmation again. Click Restore to continue.

Step 4: Then, you just need to wait for iTunes to download the software firmware for your iPhone and then restore it to factory settings so that the iPhone grey screen can be fixed.


restore iPhone in iTunes

Way 3: Fix iPhone Grey Screen with iSunshare iOS Repair Genius

If your iPhone is stuck on the grey screen and you cannot turn it on by all possible means, there could be an error in the iOS system. You can use iOS system recovery software, such as iSunshare iOS Repair Genius, to fix the iPhone grey screen and then get iPhone back to normal.

Step 1: Download and install iSunshare iOS Repair Genius on your Windows computer. To enjoy the full functionality of this software, you need to purchase the full version.

Step 2: Launch the software and then choose the Standard Mode.

choose the Standard Mode

Step 3: Next, click the Start button and then connect the iPhone to your computer.

click the Start button

Step 4: After that, click the Next button.

click the Next button

Step 5: Check your iPhone iOS version and the model version in this interface and then click the Download button to get the firmware package for the iPhone. After downloading, the software will start o verify the firmware.

download the firmware package

Step 6: When the firmware has been verified successfully, you will go to the repair window. By clicking the Repair button, iSunshare iOS Repair Genius will automatically fix your iPhone and you should make the iPhone connected during this process.

click the Repair button

In the end, your iPhone will be repaired and there will not be data loss. You can check the iPhone is rebooted and enter the screen lock interface if you have set the screen password.

Related Articles:

  1. 5 Effective Solutions to Fix iPhone White Screen of Death
  2. How to Fix iPhone Screen Goes Black Randomly
  3. Fixed: iTunes Stuck on Waiting for iPhone
  4. 8 Easy Methods to Fix iPhone Keeps Restarting Itself