If there are many photos on your iPhone and you want to transfer photos from iPhone to PC, how to do that in the fastest way? There are many ways for you to import photos from iPhone to a Windows computer. You can choose the one you preferred to import iPhone photos.

Way 1: Connect iPhone
to PC and directly copy iPhone photos
You can connect the iPhone to the PC with the original USB cable. After that, allow the computer to access photos and videos on the iPhone. Then, go to open This PC and choose Apple iPhone ( the device name), and access Internal Storage> DCIM. Here you can find different folders with images and videos. You can directly copy the photos and then paste them on your PC.

Way 2: Import Photos
from iPhone to PC via iCloud
You can enable the iCloud backup on your iPhone so that the
photos will be automatically backed up to iCloud when iPhone is connected to a WiFi network. After that, you can import photos from iPhone to PC on the iCloud
website or iCloud app.
Step 1: Sign in to icloud.com with the Apple ID linked to your iPhone.

Step 2: After entering the iCloud home interface, you can go to click the Photos option.

Step 3: In no time, it will load all the photos which are backed up from your iPhone. You can select the photos and then click the Download button. Instantly, the photos will be downloaded on your Windows PC.

Finally, you can move the download zip to any folder of your
computer and decompress it. You will see
photos from iPhone soon.
Way 3: Transfer
photos from iPhone to PC via iSunshare iDevice Genius
iSunshare iDevice Genius is a useful iPhone cleaning
software that can help to delete iPhone junk files. But it can also help
users to export photos, videos, documents, and other large files to your PC. Before
that, you are able to preview photos one by one and choose the needed photos to
export. It is also possible for you to
classify photos by Year, Month, or Day.
Step 1: Connect the iPhone to your computer and then open the iSunshare iDevice Genius program.
Step 2: Fast Cleanup option is selected by default. Then you can click the Scan button to get more details.

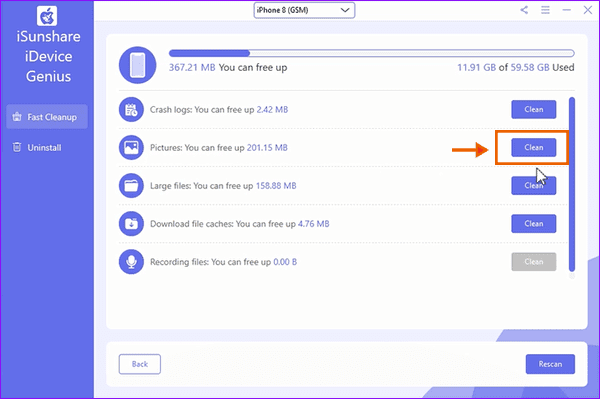
Step 3: After the scanning, you can directly go to the Pictures section and click the Clean button.
Step 4: In this interface, you can double-click to preview the photo. And then you can choose the picture one by one. If you want to transfer all photos from iPhone to PC, you can check the Check all option on the upper left corner.

Step 5: Click the Export button and then choose the folder to save these photos. After that, the software will start exporting photos to your PC automatically.

Step 6: The files are successfully transferred to your PC.
You can go to the destination folder to have a check.

Related Articles:
- How to Transfer Contacts from iPhone to PC without iTunes or iCloud
- Fixed--Can't Import Photos from iPhone to Windows PC
- How to Delete Photos from iPhone on Windows 10 PC
- How to Transfer Photos from one iPhone to another without iCloud