February 26, 2019

Fixed USB Thumb Drive is not Readable by This Computer on MacBook

“When I inserted my SanDisk 4GB USB thumb drive into my MacBook, it tells me that there is an error: the disk you inserted was not readable by this computer. I did not know what happened. I did not want to initialize it as I have important data on it. Is there any solution for this issue? What makes the error happen?”

the disk you inserted was not readable by this computer


When you get the error message “the disk you inserted was not readable by this computer” on MacBook, don’t worry. Firstly, we should know the reasons for this error and find out the solutions. Here, we will discuss both of them together.

Case 1: Reconnect the USB thumb drive

For most of the people, the reason for the unreadable USB thumb drive may be the faulty USB port or cable. So the first thing you should do is to check whether there is a faulty connection or not. Just make the USB thumb drive connected to MacBook in another USB port or cable. If you do not get such message, you can make sure that the error is caused by the faulty USB port/cable.

Case 2: Check the error with Mac in-built repair tool

If there is no faulty in your USB port, you can check the error with Mac in-built repair error: Disk Utility. You need to find and click Applications > Utilities > Disk Utility. After that, choose your own SanDisk USB thumb drive and hit First Aid. The First Aid option will help you check the minor error and repair it.

Case 3: The USB thumb drive is encrypted with BitLocker password.

If your USB thumb drive is still unreadable even after First Aid, in this case, the drive might be encrypted with BitLocker password before in Windows computer. And we are unable to open and read the BitLocker protected USB thumb drive on MacBook directly. In order to solve this issue, you can make good use of the small utility—BitLocker Genius to unlock the drive on MacBook with password or recovery key file.


Step 1: Download, install and register the software on your MacBook. It will cost you a few minutes to do it.

Step 2: Open the software and you can see that your USB thumb drive appears on its interface with “bitlocker” label. Hit the drive and click the Unlock button.

click BitLocker drive and the Unlock button


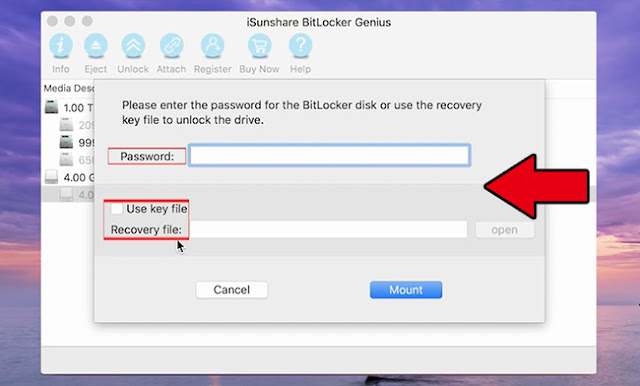
Step 3: Here, you can either enter the password or add the recovery key file to unlock the BitLocker USB thumb drive. And you can get the USB thumb drive readable on MacBook after clicking Mount button.

Unlock BitLocker drive with password or recovery key


Step 4: Your USB thumb drive is displayed on the MacBook desktop. And now you can open, read and write the drive easily. When you want to disconnect it, just click the Eject button on the software.

Case 4: Format the USB thumb drive

If your USB thumb drive is not protected by BitLocker or you lost the password and recovery key file, the only way you can do it is to format the drive at the cost of data loss. But you can recover the data from unreadable drive firstly on MacBook. How can we get the data from an unreadable USB thumb drive? You will find the Mac data recovery software useful. Search online and find the one that meets your requirement.

After you recover data from the USB thumb drive, you can enter Applications > Utilities > Disk Utility. Then choose your USB drive and click the Erase button. 

Related Articles:


February 18, 2019

3 Methods to Unlock BitLocker USB drive when Password is Lost

Failed to enter the correct password of BitLocker USB? Microsoft has taken this situation into consideration so that it developed the recovery key feature for the BitLocker function. When the password is lost or forgotten, users can use the back-up recovery key or recovery key file to unlock the BitLocker USB drive. Here we summed up 3 methods for users to open the BitLocker USB drive with recovery key.

unlock BitLocker without password


Method 1: Unlock BitLocker USB Drive with Recovery Key Directly in Windows


In Windows default settings, when you insert the BitLocker USB drive and are going to open it, there will be more than one option. If you lost the password, you should get BitLocker recovery key firstly. Then click the drive and choose fewer options to get Enter recovery key option. Next, you need to find the 48-digit recovery key from your backup file and enter it to unlock BitLocker USB drive.

Unlock BitLocker USB drive


Method 2: Open BitLocker USB Drive with Recovery Key File on Mac

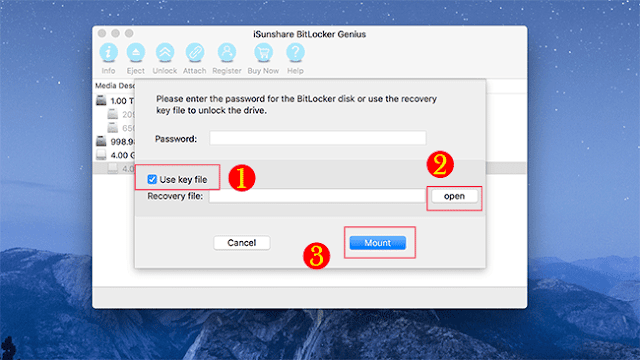
If you have no Windows laptop for working and have no BitLocker password, how could you an open BitLocker USB drive with recovery key file on Mac? You only need a helper: iSunshare BitLocker Genius. With iSunshare BitLocker Genius and the recovery key files, you can unlock the BitLocker USB drive with following steps: Launch the software, choose the disk and click Unlock button, add the recovery key file and click Mount Button. Within minutes, you can see that the drive is shown on the Mac desktop.

Open BitLocker drive on Mac with recovery key file


Method 3: Access BitLocker USB with Recovery Key through Command Prompt

If you are a computer professional worker, there is another way for you to unlock the BitLocker USB drive. This way is only for Windows users. You can run the command prompt as an administrator and type the commands: manage-bde -unlock F: -RecoveryPassword YOUR-BITLOCKER-RECOVERY-KEY , press Enter and the drive will get unlocked at last. 

unlock BitLocker drive via command prompt


Related Articles:

February 14, 2019

Read a Windows 7 BitLocker Drive in OSX—Solved

“My brother sent me a MacBook Pro arriving in a few days. And I already backed up my documents on Windows 7 laptop to an external HDD with BitLocker encryption. I did not know that he would buy me OSX laptop and I thought it would be a Windows Notebook which I only need to enter the password to transfer the documents. Now my issue is that how can I make the BitLocker external HDD readable in OSX. My MacBook is big enough to store the documents. Is there any tool out there that will allow me to use this drive with the Windows encryption in OSX?


Do you think is it possible to open and read the HDD drive with Windows 7 BitLocker on MacBook Pro? Yes, now Mac users can unlock the BitLocker encryption external hard drive on Mac with iSunshare BitLocker Genius—the software which opens a door to reach the BitLocker contents safely.

Of course, you can choose to transfer the documents through the network if your Windows 7 computer is alongside. But With iSunshare BitLocker Genius, you can read a Windows 7 BitLocker drive in OSX in minutes with following tutorials.


First of all, you should download and install iSunshare BitLocker Genius on your MacBook Pro. It will take you minutes. Also, you need to register the software to be the paid users so that you can enjoy the intelligent functions.

read BitLocker drive on Macbook

Then, you should connect the external HDD with your Macbook and run iSunshare BitLocker Genius. The software will detect your drive and mark it with a BitLocker text under Encrypt category. Click the drive and choose the Unlock button on the top toolbar interface.


detect BitLocker drive in OSX to unlock


On the continue interface, you will be given two methods to read the Windows 7 BitLocker drive in OSX. The first one is to type the BitLocker password to mount the HDD. It is perfect for the above user to use the drive. The other method is to import the BitLocker recovery key file and unlock the drive. For those who back up the recovery key on the cloud, they can download it on Mac OSX and utilize it to unlock the drive.


mount the Windows 7 BitLocker drive with password


After the important steps, your external HDD will be unlocked and appear on Macbook desktop and you can freely transfer the documents into your Mac. After you finish the transformation, you can click the Eject button to disconnect the external HDD and enjoy your Macbook using experience.