July 1, 2022

Fixed: Windows 10 Mount ISO Missing

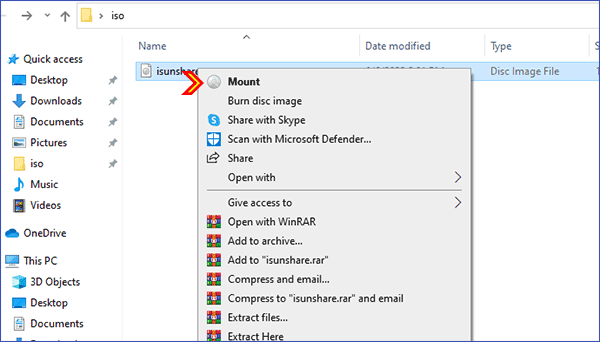
In Windows 10, the Mount ISO option is available by default, just right-click on the ISO file and click on Mount, or you can double-click on the ISO file. But if the Mount option disappears on the context menu, how do you fix it on your Windows 10. In this step-by-step tutorial, we show you how to fix Windows 10 mount ISO missing.

  • Part 1: Fix Windows 10 Mount ISO Missing without software
  • Part 2: Alternative way to Mount ISO in Windows 10 with Freeware iSunshare ISO Genius


Part 1: Fix Windows 10 Mount ISO Missing without software

  • Option 1: Fix Windows 10 Mount ISO Missing from Settings
  • Option 2: Fix Windows 10 Mount ISO Missing Using Control Panel
  • Option 3: Fix Windows 10 Mount ISO Missing from Properties

Option 1: Fix Windows 10 Mount ISO Missing from Settings

Click on the Start menu, then negative to Settings>Apps>Default apps>Set defaults by app, and then scroll down and click the Windows Disc Image Burner option. 

click on Windows Disc Image Burner

In the Windows Disc Image Burner window, make sure you've chosen Windows Explorer as default app. 

Windows Explorer is default app


Option 2: Fix Windows 10 Mount ISO Missing Using Control Panel

Step 1: Search for Control Panel from the Search box on the Taskbar and open it.

open Control Panel

Step 2: Click on the Programs option.

select Programs

Step 3: Click on the Default Programs option.

select Default Programs

Step 4: Continue to click on the Set your default programs option.

select Set your default programs

Step 5: You will then go to the Settings page, all the next steps are the same as Option 1.


Option 3: Fix Windows 10 Mount ISO Missing from Properties

Step 1: Right-click the ISO file and select Properties from the context menu.

Step 2: Click Change to choose how to open the ISO file.

Step 3: Choose Windows Explorer to open ISO files.

choose Windows Explorer

   Step 4: After that, please click Apply and click OK.

click Apply and OK


Part 2: Alternative way to Mount ISO in Windows 10 with Freeware iSunshare ISO Genius 

If these methods mentioned above still cannot help you fix Windows 10 mount ISO missing, you can try it with free third-party applications such as iSunshare ISO Genius. It is a powerful and time-tested ISO image tool that can help you extract ISO images. With it, you can easily mount an ISO image to open and view the files and folders stored in it. Heres how to fix Windows 10 mount ISO missing with iSunshare ISO Genius for free:

Step 1: Free download and install iSunshare ISO Genius on your computer.

Step 2: Click on the Extract button from the main interface.

click on the Extract button

Step 3: Click on the Folder icon at the top-right corner to select the ISO file. Then check all the files and folders that loaded by default. After that, click on the Export button to decompress files.

select ISO file to decompress

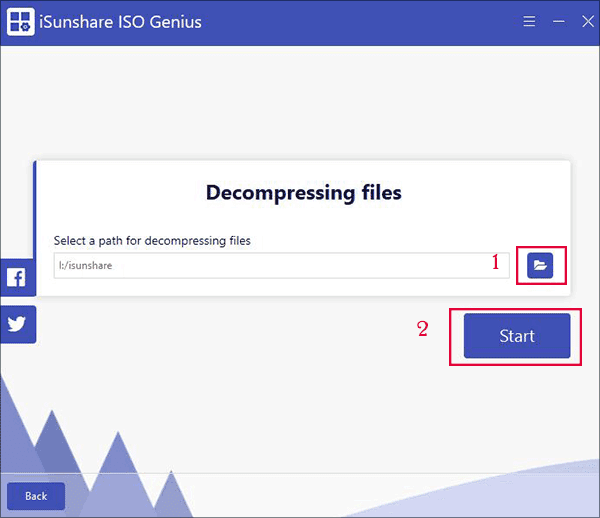
Step 4: Continue to click the "Folder" icon to select a path for decompressing files and click on the Start button to execute.

select a path for decompressing

Step 5: After that, you need to wait for exporting the contents of the ISO file.

exporting the contacts of ISO file

Step 6: After a few minutes, the ISO file will be exported successfully, then you can click View Files to view the contents of the ISO file.

successfully exported the ISO file

Conclusion:

If the Windows 10 mount ISO is missing, there are several ways to help you mount the ISO successfully in Windows 10, you can fix it from Settings, Control Panel, and Properties. Also, if you cannot fix Windows 10 mount ISO missing, iSunshare ISO Genius is the best alternative to help you mount ISO easily to view and open ISO files. iSunshare ISO Genius is a simple and easy-to-use tool for Windows users. It can not only extract ISO files, but also make bootable USB sticks, create ISO files from local files/folders, and convert CD/DVD data to ISO files.

With the tutorial video, yu will see: How to Fix Windows 10 Mount ISO Missing


Related articles


June 8, 2022

How to Open and Extract ISO Files on Windows 10

 An ISO image file is an archived document that contains all kinds of content: applications, music, videos, installation files, and so on. You can easily create ISO files from files, folders, and CD/DVDs.  But if you get an ISO file from others, how can you view the contents without burning it to a disk or a drive?  You can get multiple ways to open and extract ISO files on Windows 10 computer.

  • Way 1: Double-click to mount ISO files to view contents
  • Way 2: Mount ISO image from the context menu
  • Way 3: Mount ISO Image from the ribbon menu
  • Way 4: Extract ISO files via WinRAR
  • Way 5: View ISO files contents with iSunshare ISO Genius
extract ISO files on Windows 10


Way 1: Double-click to mount ISO files to view contents

There is a built-in disk image tool in Windows 10 computers so that you can easily mount the ISO image file to a virtual disk. You can easily open the virtual disk to see all contents extracted from the ISO file.

Step 1: Navigate to the folder where the ISO image file is located.

Step 2: Double click on the ISO image file to mount it.

double click ISO file

Step 3: Once mounted, you will be directly guided to a DVD drive under This PC. Here you can view all the files and folders that are stored in the ISO image.  You can directly open the files or folders to get what you want.

ISO image file is mounted


Way 2: Mount ISO image from the context menu

 Alternatively, you can mount an ISO image from the context menu.

Step 1: Go to where your ISO image file is stored. Right-click it and then you can choose the Mount option from the context menu.

Step 2: In no time, you can see all data extracted in a virtual drive. Here, you can easily manage the contents the same as you are on the real disk in Windows 10.

choose Mount option


Way 3: Mount ISO Image from the ribbon menu

You can also open and view the contents of the ISO image from the ribbon menu.

Step 1: Reach the ISO image file on your computer and then choose it.

Step 2: Click the Disc Image Tools on the ribbon menu.

click Disc Image Tools

Step 3: Choose the Mount option. Immediately you can get all contents from the ISO mounted to a virtual disk.

click Mount option


Way 4: Extract ISO files via WinRAR

WinRAR is a popular compression tool as well as an archiver extractor, which needs to pay for usage. But you can enjoy a free trial period to compress and extract the files. This tool can also help to extract files from disk images on Windows 10.

Step 1: Download and install WinRAR on your computer.

Step 2: Navigate to your ISO file. Right-click on it and choose Extract to “filename”.

choose Extract to option

Step 3: Soon, all contents of the ISO image are extracted to a folder with the same name.

ISO image file is extracting


Way 5: View ISO files contents with iSunshare ISO Genius

 iSunshare ISO Genius is the free ISO file extractor for PC that can help you to extract all contents from the ISO file. You can also burn the ISO file to a USB drive and create a unique ISO file with this free utility. If you are running Windows 7 or the lower version, the Windows disk image tool is not available for you. You can free download this software to extract and view ISO file contents. ISO Genius is compatible with all Windows operating systems.

Step 1: Download and install iSunshare ISO Genius on your Windows 10 computer.

Step 2: Run the software and then choose the Extract module.

choose Extract module

Step 3: Click the folder icon to select the ISO file to extract.

choose ISO file to extract

Step 4: Instantly, you can check the files and folders from the ISO file. Until now, it is unavailable for you to open the files. You need to choose the files or folders to export.  After you make the selection, click the Export button on the bottom right corner.

select files to export

Step 5: Select a folder on your Windows 10 computer to save the extracted content.

set the save path

Next, click the Start button to export the extracted contents to your computer.

click the Start button

Step 6: Successfully exported the extracted contents from the ISO image. You can click View Files to open and view the contents. 

click View files

Related Articles:

  1. How to Make Windows 10 Bootable USB from ISO Image 
  2. How to Burn ISO to USB File on Windows 11/10/8/7 Computer
  3. How to Create ISO Files in Windows 10 Computer 

May 5, 2022

How to Factory Reset iPhone without Passcode or iTunes

 There are many reasons you want to factory reset your iPhone: you forgot the iPhone passcode, the iPhone is disabled, and you got a second-hand iPhone and the iPhone screen passcode does not work, and so on. If you do not have the iPhone passcode, is it possible to factory reset the iPhone without the passcode or iTunes? You can learn effective ways in this post.

factory reset iPhone without passcode or iTunes

Way 1: Directly tap Erase iPhone to reset iPhone when forgetting the passcode

When you forgot your iPhone and tried several wrong passcodes, you can see the iPhone unavailable message. And if you keep trying, the Security Lockout message will come. At that time, you can see two options below: Emergency and Erase iPhone. Then you can reset the iPhone to factory settings with the Apple ID password. But this option can only apply to iOS 15.2 and later iPhone. Also, the unavailable iPhone should be connected to a cellular or WiFi network.

Step 1: Keep entering the wrong passcode until you see the Erase iPhone option on the bottom right corner. This process might last for a long time as the iPhone will ask you to try again in 15 minutes or 1 hour once you enter too many wrong passwords.

Step 2: Tap Erase iPhone option and then it will ask you to enter the Apple ID password for the account which is used on the iPhone. After the Apple ID password is entered, your iPhone will be erased instantly. After minutes, all data are destroyed. And you can set it up as a new iPhone.


click Erase iPhone option to reset iPhone


Way 2: Factory reset iPhone without passcode using iTunes

You can factory reset your iPhone without a password using iTunes. But it requires you have synced your iPhone with iTunes before.  Before resetting the iPhone to factory settings, you can use iSyncGenius to back up the locked iPhone data in advance.

Step 1: Connect the iPhone to your computer and then launch iTunes.

Step 2: Go to tap the Summary option and you can check the Restore iPhone option on the right. Click Restore iPhone option and then the Restore button on the confirmation pop-out.

Step 3: After minutes, you can access the iPhone and then finish the iPhone setup according to your needs.


restore iPhone in iTunes

Way 3: Factory reset iPhone without passcode or iTunes via iCloud

If you have enabled Find My iPhone on the locked iPhone, you can factory reset locked iPhone without passcode or iTunes via iCloud. In addition, you need the Apple ID and its password to access iCloud website.

Step 1: Sign into iCloud.com on any device or computer. Then enter the Apple ID and password which is used on the locked iPhone to sign into iCloud website.

Step 2: Hit on Find iPhone option and then go to All Devices page.


hit on Find iPhone option

Step 3: Choose your locked iPhone from the drop-down menu of All Devices.


choose locked iPhone

Step 4: Hit on Erase iPhone option and then the Erase button. In no time, your iPhone will be factory reset automatically.


click Erase iPhone on iCloud

Way 4: Factory reset iPhone without passcode or iTunes or iCloud via iPhone Passcode Genius

If the Erase iPhone option does not appear on your iPhone, or the iTunes cannot recognize your iPhone, you can use iSunshare iPhone Passcode Genius to remove iPhone unavailable screen without passcode or iTunes. 

Step 1: First, launch iSunshare iPhone Passcode Genius and then choose Unlock Lock Screen option.


choose Unlock lock screen

Step 2: Click Start and then connect your locked iPhone to the computer.


click Start

If the software cannot detect your iPhone, go to put the iPhone into recovery mode by following the on-screen instructions.

Step 3: On this interface, you can customize the firmware package save path and then click the Download button.  After that, the software will download the firmware package for you.


set Save path and click Download

Step 4: Minutes later, you will go to the unlock interface.  Click the Unlock button and then the iPhone screen lock will be removed in seconds.  You can go to check your iPhone and set it up again. 

click Unlock

Related Articles:

  1. Forgot iPhone Passcode—Unlock It without Restore 
  2. How to Hard Reset iPhone with or without Passcode
  3. Simple 2 Ways to Factory Reset iPhone without Apple ID Password 
  4. How to Reset iPhone/iPad without Screen Time Passcode

March 7, 2022

How to Clone Existing Windows to USB and Make it Bootable

 Is it possible to copy Windows 10 to USB and make it bootable? Yes, you can clone existing Windows OS to a USB drive and then take it to anywhere. If needed, you can boot from the USB and then work in the familiar Windows OS.  How to do that? iSunshare WinToGo Genius can help you clone everything in your working OS to the USB drive and make it bootable. It is easy to do the cloning with WinToGo Genius.

clone existing Windows to USB


Preparation to clone Windows to USB drive

When your Windows computer fails to boot or crashes, the bootable USB with the Windows system can help you back to work quickly. So, in order to make Windows OS successfully clone to the USB drive, what should you prepare?

The reliable Windows to Go Creator.

Yes, you need the help of professional Windows To Go Creator –iSunshare WinToGo Genius. If you just copy and paste the Windows files and data to the USB drive, it is difficult to make the Windows bootable from USB. But for iSunshare WinToGo Genius, it can clone the configurations, settings, and data of the Windows OS to your USB drive. And this process is made in PE mode, in which there is no app running in Windows OS, to ensure 100% cloning. 

Get a larger USB drive

The USB drive should be large enough to store all data from the system drive. It should be larger than the used space on your system drive. You can choose the USB flash drive or the external hard drive that can be connected with the USB-to-SATA adapter. Also, it is better to choose the empty USB drive as this cloning will destroy all the data on the USB.

How to Clone Existing Windows to USB

iSunshare WinToGo Genius can work in any edition of Windows 7/8/10/11, which makes it easy for users to copy the Windows to USB. Besides, you can also create portable Windows on USB without installing from ISOimage file.

Step 1: Install iSunshare WinToGo Genius on your computer. At the same time, plug the USB drive into your computer.

install iSunshare WinToGo Genius

Step 2: Select the USB drive to store everything about your Windows OS.

select the USB drive

Step 3: Choose the first option Use the native system and then you can check two options to make PE:  Use the PE file on your computer or Use the PE file you downloaded. You can choose either one to proceed with.  As there is the built-in PE file on the computer, you can directly choose to Use the PE file on your computer and click the Start button.

use the PE file on your computer to make PE

Step 4: Here comes the warning—this operation will format the USB drive. You can click Yes to continue if you have backed up the data on your USB drive.

format USB warning

Step 5: The software will start to make PE in the USB drive with your built-in PE file. You just need to wait for the ending. With the accomplishment of the PE, you can click OK and then close the software.

finish PE production

Step 6: Restart the computer and then press F12 or other keys to enter the BIOS boot settings. After that, choose to boot the computer from a USB drive.

boot from USB drive

Step 7: In no time, iSunshare WinToGo Genius will begin cloning the existing Windows OS to your USB automatically. You just need to wait for the ending.


copying Windows to USB

After that, you successfully clone the existing Windows to USB. You can take the USB to any Windows computer and boot from it to get into the identical Windows working environment.

Related Articles:

  1. How to Clone External Hard Drive to another External Hard Drive in Windows
  2. How to Clone USB to another USB in Windows 10/8/7
  3. How to Create A Windows To Go USB Drive without the Enterprise Edition
  4. How to Run Windows 10 from USB without Installing 


February 16, 2022

How to Import Photos from iPhone to PC

 If there are many photos on your iPhone and you want to transfer photos from iPhone to PC, how to do that in the fastest way? There are many ways for you to import photos from iPhone to a Windows computer. You can choose the one you preferred to import iPhone photos.


import photos from iPhone to PC

Way 1: Connect iPhone to PC and directly copy iPhone photos

You can connect the iPhone to the PC with the original USB cable. After that, allow the computer to access photos and videos on the iPhone. Then, go to open This PC and choose Apple iPhone ( the device name), and access Internal Storage> DCIM. Here you can find different folders with images and videos. You can directly copy the photos and then paste them on your PC.

import photos directly from iPhone to PC

Way 2: Import Photos from iPhone to PC via iCloud

You can enable the iCloud backup on your iPhone so that the photos will be automatically backed up to iCloud when iPhone is connected to a WiFi network. After that, you can import photos from iPhone to PC on the iCloud website or iCloud app.

Step 1: Sign in to icloud.com with the Apple ID linked to your iPhone.

sign into iCloud

Step 2: After entering the iCloud home interface, you can go to click the Photos option.

click Photos

Step 3: In no time, it will load all the photos which are backed up from your iPhone. You can select the photos and then click the Download button.  Instantly, the photos will be downloaded on your Windows PC.

select photos to download from iCloud

Finally, you can move the download zip to any folder of your computer and decompress it.  You will see photos from iPhone soon.

Way 3: Transfer photos from iPhone to PC via iSunshare iDevice Genius

iSunshare iDevice Genius is a useful iPhone cleaning software that can help to delete iPhone junk files. But it can also help users to export photos, videos, documents, and other large files to your PC. Before that, you are able to preview photos one by one and choose the needed photos to export.  It is also possible for you to classify photos by Year, Month, or Day.

Step 1: Connect the iPhone to your computer and then open the iSunshare iDevice Genius program.

Step 2: Fast Cleanup option is selected by default. Then you can click the Scan button to get more details.

click Scan to scan iPhone

Step 3: After the scanning, you can directly go to the Pictures section and click the Clean button.

click Clean in Pictures section

Step 4: In this interface, you can double-click to preview the photo. And then you can choose the picture one by one. If you want to transfer all photos from iPhone to PC, you can check the Check all option on the upper left corner.

Check all photos

Step 5: Click the Export button and then choose the folder to save these photos. After that, the software will start exporting photos to your PC automatically.

click Export

Step 6: The files are successfully transferred to your PC. You can go to the destination folder to have a check. 

Photos are transferred successfully

Related Articles:

  1. How to Transfer Contacts from iPhone to PC without iTunes or iCloud
  2. Fixed--Can't Import Photos from iPhone to Windows PC
  3. How to Delete Photos from iPhone on Windows 10 PC
  4. How to Transfer Photos from one iPhone to another without iCloud