September 23, 2018

The Ultimate Guide to Create New Virtual Machine in Hyper-V Manager

Since Windows 8 released, Microsoft lets us create new virtual machine in Hyper-V manager to run multiple operating systems. Hyper-V is a virtualization production that based on hypervisor technology. After a long period of confusion, I discover the easiest way to set up VM in Hyper-V Windows 10.

How to Create New Virtual Machine in Hyper-V Manager Windows 10


Different from VirtualBox and VMware Workstation, Hyper-V is a Windows built-in feature that requires your computer supports virtualization technology. Besides, Hyper-V is suitable for all 64-bits versions in Windows 8 and later except for Windows Home edition.

Step 1: Enable virtualization in BIOS.


1. Hit hotkey, for instance, Delete to access BIOS settings;
2. Go to Security > System Security > Virtualization Technology and select Enable.


Step 2: Enable Hyper-V in Control Panel.


1. Type Turn Windows features on or off in the Windows search bar and hit Enter on the result;


2. Check the box of Hyper-V and tap on OK. Restart your computer to take effect.


Step 3: Create New Virtual Machine in Hyper-V Manager


1. Type Hyper-V in the search bar and select from the result.


2. Click on Action > New > Virtual Machine;


2. Follow the New Virtual Machine Wizard to create new VM in Hyper-V Manager. When asked about Installation Options, select Install an operating system from a bootable CD/DVD-ROM then locate to the ISO file.


If you want to create virtual machine with PowerShell, you can refer to How to Create a Virtual Machine with Hyper-V/ PowerShell in Windows 10.

September 17, 2018

3 Ways to Find Back Your Lost iTunes Password Easily


With so many accounts and passwords online, are you able to figure out the signing up iTunes password and the related details? We both will feel confused when we failed in the login page as if the password is bound to be right in our mind. Thus, there is no doubt that many people search for the password recovery methods to get back their iTunes account or reset its password.

3 Ways to Find Back Your Lost iTunes Password Easily


Here we will share the 3 ways to find back your lost or forgotten iTunes password. After reading this article, you will know how easy it is to reset iTunes password and access your account as well as recover your original account.

Top 1: Reset forgotten iTunes password with Apple online service

Apple website (https://appleid.apple.com/) offers the after-sales services for you to reset the forgotten password. You can quickly get back your account with the Gmail or a set of security question.

i.              Go to the Apple ID account page and find the option of “forgot Apple ID or password.”

forget iTunes password


ii.              Enter your iTunes account and click Continue to go ahead.

forget iTunes password


iii.              Select the way you want to unlock account. You can choose the email method or security questions.

unlock iTunes


iv.              Reset your iTunes password :

1.      If you choose to unlock your account via the email, you will get an email with the directions to reset the iTunes password. You just need to check the email account and click the “Reset your Apple ID” link in the email to access the reset page. You just need to follow the steps to set the new password to update your account.

reset iTunes password


2.      If you prefer to reset the password through the security question, the website will ask you to give answers to a series of questions. When all of your answers accord with the account details, it will lead you to reset the new password.

reset iTunes password


Top 2: Take advantage of Apple’s Two-step Verification to get back your account

This method only suits to the people who have set up the two-step verification in this website: http://iforgot.apple.com/ . You just need to visit the website and enter the Recovery key which is provided when you enabled two-step verification. Then, you can choose a reliable device which Apple will send it the verification code. And you need to enter the verification code on the website and click “Next”. Finally, you will be brought to set a new password for your account.

reset iTunes password


Top 3: Ask Apple Support for help

If you failed to reset the password because your email is invalid and the answers to the security question are uncorrected, as well as you did not set the Two-Step verification, what can you do to find back your account? To recover iTunes Passcode, the most direct way in this situation is ask for Apple customer support to help you. You just need to visit this page: https://support.apple.com/en-us/HT204169  and choose your country to retrieve the contact number of Apple support. In this way, you can reflect your problems to their CS agent which will help you to solve the issues until your get back your account.

reset iTunes password


Useful tip: how do I find out my iTunes backup password?

What do we mean by iTunes backup password? It is the password you set up to protect the iTunes backup data. When you lost iTunes backuppassword, you can access iTunes center but unable to recover the backup data. iSunshare iTunes Password Genius is highly recommend to you as it can help you to recover iTunes backup password without data loss and helps you to restore contacts, calendars, notes and etc., with iTunes backup.

l  Free download the software and launch it after installation. Click “Open” button to add the encrypted iTunes backup file.
l  Select the password recovery method: Brute-force, Mask, Dictionary and Smart.
l  Set the corresponding recovery details
l  Click “Start” to begin the recovery process. And you will get the password after few minutes.

recover iTunes backup password

So, do you know how to unlock iTunes account and recover iTunes backup password now? It is easy if you make efforts to find out the solutions. Hope you are out of the problems now!

Related articles: 


September 7, 2018

Locked out of Laptop Windows 10, What is the Best Way to Reset Login Password?

"Help! I locked myself out of my laptop, how can I re-access it without deleting my photos or movies? " Even though we can see many walkarounds written on the internet for such questions, but for computer newbies, Such questions still sticky. So let's see, what is the best way to reset login password after locked out of laptop Windows 10?

Option 1: Fix "Locked out of Laptop Windows 10" with Reset Disk 


The reset disk, which must create when laptop is accessible Windows 10. If you have one, it must be the most convenient way to get into laptop after locked out of Windows 10.

Step 1: Click the "Reset password" link.


Step 2: Then the Password Reset Wizard window would pop up, follow the wizard to create a new password for the locked laptop Windows 10.


Option 2: Repair "Locked out of Laptop Windows 10" by Installation Disc


Go to Microsoft website to download Windows USB DVD Download Tool to another accessible PC.

Step 1: After copy the Windows 10 ISO file to a blank USB/ DVD drive, you can plug it into your locked laptop.

Step 2: Set it to boot from the installation disc in the BIOS.

Step 3: In the installation screen, hit Shift + F10. The command prompt window will show you.

Step 4: Type the following commands to copy utilman.exe and replace utilman.exe with cmd.exe.

  • move d:\windows\system32\utilman.exe d:\
  • copy d:\windows\system32\cmd.exe d:\windows\system32\utilman.exe

Step 5: Input "wpeutil reboot" to restart.
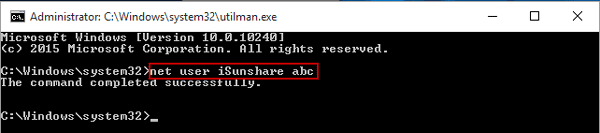
Step 6: Click the ease of access icon and run "net user <username> <password>". Now your password has reset.

Step 7: Reboot laptop from Windows 10 installation disc again. Execute "copy c:\utilman.exe c:\windows\system32\utilman.exe" to put the cmd.exe back.


Option 3: Utilize Recovery Tool to Reset Password after Locked out of Laptop Windows 10


Here comes the third option, a super easy and comprehensive software that can reset user's password or create a new local admin account with new password after locked out of laptop in Windows 10. That is iSunshare Windows Password Genius, it can reset forgotten passwords for Windows 10/8/7/Vista/XP, and Windows Server 2016/2012/2008/2003. What's more, it allows users to create a password reset disk on Windows computer, Mac, or an Android phone. Just take it easy, it won't damage your files.

Step 1: Download iSunshare Windows Password Genius to a Windows PC, Mac, or Android and create a Windows password reset disk.

Step 2: Start or restart your laptop and get into BIOS settings. Set the Windows password reset disk as the first boot option.

Step 3: You will see a screen like the image below. Select the Windows and users that you want to reset your password. Tap on Reset password to reset it. Click on Reboot to re-access your laptop.

Summary


The reset disk is the easiest way to reset login password; however, it must be pre-created when laptop is accessible. Furthermore, most people don't realize the importance of the reset disk. When it comes to installation disc, it is a little bit complicated, especially for newbies. Even though you are familiar with computers, you still have to know the location of utilman.exe and cmd.exe to run the commands. On the whole, reset password with iSunshare Windows password is the best way after locked out of laptop. There would be a version suitable for you.

September 5, 2018

How to Restore Lenovo ThinkPad to Factory Settings without CD - Guide for Windows 7, 8, 10

Lenovo ThinkPad is the most widely used laptop in business. The same as other computers, it provides some easy ways for users to wipe system operation if you get a blank/blue screen. So, there is no need to reinstall Windows or send ThinkPad back to the factory. Here are two way to restore Lenovo ThinkPad to factory settings without CD in Windows 7, 8, 10.

Note: Backup everything you can to other places especially drive C to avoid data loss.

Restore Lenovo ThinkPad to Factory Settings without CD by OneKey Recovery


When Lenovo ThinkPad laptop is not accessible, you can restore it with OneKey Recovery.

Step 1: Shut down Lenovo ThinkPad laptop then click on Novo button. Generally, the Novo button may near the power-button or in the left side of the laptop.


Step 2: In the Novo Boot Menu dialog, select System Recovery.


Step 3: When the OneKey Recovery window appears on the screen, select restore from initial backup or user's backup. Wait until it restores to factory reset completely, you can re-configure the settings.


Restore Lenovo ThinkPad to Factory Settings if it is accessible


If you can still access the desktop normally, you can restore Lenovo ThinkPad to factory settings via
Windows built-in features if without CD.

Reset Lenovo ThinkPad to Factory Settings without CD Windows 7


Step 1: Boot or reboot Lenovo ThinkPad laptop, hit F8 in the meantime to get into the Advanced Boot Options.

Step 2: Select Repair Your Computer. In the System Recovery Options window, click on System Restore and then follow the wizard to restore Lenovo ThinkPad to factory settings.

Reset Lenovo ThinkPad to Factory Settings without CD Windows 8


Step 1: Move your mouse to the right margin and click on Settings > Change PC Settings.


Step 2: Under the General tab, click on Get started.


Step 3: In the Reset your PC window, click Next to restore Lenovo ThinkPad to factory settings.

Reset Lenovo ThinkPad to Factory Settings without CD Windows 10


Step 1: Click on Start > Settings> Update & Security > Recovery > Get started.

Step 2: Select Fully clean the drive.


September 4, 2018

What Are Some Ways to Reset Dell Laptop Password without Reset Disk or USB Drive

Have you set up a Windows password for your Dell laptop? Then no small number of us may lose or forget the login password. Worse still, we don't have a pre-created reset disk or USB drive at all. In this occasion,  the first response of most people is asking help for after-sale service. However, it very troublesome. Don't worry, as the saying goes, relying upon oneself is better than relying upon others. Just follow the ways we describe below you can reset Dell laptop password without reset disk or USB drive.

How to Reset Dell Laptop Password without Reset Disk or USB Drive 


Here are some fixes that work fine with Windows 7, 8, 10.

Way 1: Reset Dell laptop password with installation CD if forgot 


Step 1: Go to Microsoft official website to download Windows USB DVD Download Tool and Windows ISO file to an available computer and follow the wizard to set up an installation CD.

Step 2: Start or restart Dell laptop and hit F12 to access BIOS settings. Set Dell laptop to boot from installation CD.

Step 3: Reset Dell laptop password by Command Prompt in the install screen in Windows 7/8/10.

In Windows 7

1. Press F8 to open Boot Menu while Dell laptop boots up;

2. Select Safe Mode with Command Prompt;

3. Input "net user" to see the existing account;

4. Run "net user <username> <password>" to reset Dell forgotten Windows password.


In Windows 8/10

1. Press Shift + F10 combination key to open Command Prompt window.

2. Type "copy d:\windows\system32\utilman.exe d:\" to copy Ultilman.exe;


3. Run "copy d:\windows\system32\cmd.exe d:\windows\system32\utilman.exe" to replace cmd.exe with Ultiman.exe;

Note: If it asks to overwrite, type Yes to continue.


4. Input "wpeutil reboot" to restart Dell laptop;


5. Click on the ease access icon to open Ultiman.exe window;


6. Type "net user <username> <password>" to reset Dell laptop password after forgot;


7. Run "move d:\utilman.exe d:\windows\system32\utilman.exe" then type Yes to restore utility manager.


Way 2: Reset Dell laptop password with Recovery tool after forgot

Step 1: Get iSunshare Windows Password Genius and run it on an accessible Windows computer.

Step 2: Insert your CD into the computer and select CD/DVD as media type. Click on Begin burning to burn reset disc.


Step 3: Set Dell laptop boot from CD in BIOS settings.

Step 4: If everything doesn't go wrong, you can select a Windows, a user then click on Reset password to reset Dell laptop password. Click on Restart to re-access Dell laptop.