February 13, 2015

How to Recover Files from Broken Toshiba External Hard Drive

Toshiba hard drive has become broken suddenly without any warning. Unfortunately, precious files on it lost at the same time. So terrible it is. Is there any way effective for Toshiba external hard drive file recovery?

Believe many people would think of backup. Surely restoring from backup is the most effective and safe way to get back Toshiba hard drive lost files. However, this way requires a previous backup for broken Toshiba external hard drive and the backup has to be saved on another location. But not everyone could backup hard drive data and save it safely. Therefore, looking for another way or tool to recover files from Toshiba external hard drive is an urgent thing. Now, Data Genius can give a help.

Recover Files from Broken Toshiba External Hard Drive with Data Recovery Tool


Data Genius is a free data recovery tool, which can solve several data loss issues because of various reasons, such as careless deletion, hard drive format and partition, hard drive virus attacked. When Toshiba external hard drive is broken, we have to make sure the there is a computer accessible; otherwise we can’t recover lost files from Toshiba external hard drive.

Step 1: Download Data Genius and install it on your computer. Then run it.

When Data Genius can be installed and run on Toshiba computer, it means there would be no problem to Toshiba external hard drive data recovery.

Step 2: Select data recovery type from provided four data recovery options. If you are not sure, select Deleted Recovery.

choose file recovery type for Toshiba external hard drive

Step 3: Choose external hard drive and scan. You will see the scan process and until it is finished, lost files will be listed in the window.

scan Toshiba external hard drive

Step 4: Select files to preview and make sure whether recovering them. Or if you think all of them need to be recovered, check them all and click Recover button to choose a folder to save recovered Toshiba files on another external hard drive or compute hard drive.

Toshiba external hard drive file recovery

Tips:
If external hard drive is broken, it is necessary to save recovered data on another hard drive or external hard drive. So before recovering Toshiba hard drive files, please get an external hard drive, such as Toshiba external hard drive.

Step 5: Now believe you have gotten a message "Recovery is finished". Click OK and you can see the lost Toshiba hard drive files.

Related Articles:

Western Digital External Hard Drive Lost Data Recovery

Nowadays, Western digital external hard drive is used popularly to backup data because its mini size as well as huge data storage capability. So when lost Western external hard drive data, it is necessary to find the reason first in order to get appropriate data recovery method.

Why Western digital external hard drive data lost?


From various cases of data loss from internal or external hard drive, there are mainly these reasons.

1. External Hard Drive Format

This happens usually, because when external hard drive is connected to computer, a message popping up and asking whether you want to format external hard drive. Once we couldn't see it clearly, external hard drive is probably to be formatted by us. In result, all of data on this external hard drive are lost.

2. Virus Infections

When WD external hard drive is connected to other devices, such as computer, virus on this computer will probably infect the data on external hard drive. Once your computer is attacked with virus, not only system performance would slow down, but also devices connected to computer would be infected. So data lost because of virus often happens too.

3. Accidental Files Deletion

While we are operating data on WD external hard drive, such as copy and paste using right-click menu, sometimes data would probably be deleted accidentally too if we don’t pay much attention to what we have done. Unfortunately, data deleted from external hard drive cannot be found in Recycle Bin. Therefore, accident data deletion from external storage devices will lead to data loss too.

How to choose data recovery tool for Western digital external hard drive data recovery?


Even though it seems to be terrible after Western digital external hard drive data loss, there is nothing we cannot do. For example, iSunshare Data Genius can help to free recover lost data from WD external hard drive.

western digital external hard drive data recovery

Steps:
  1. Connect Western digital external hard drive to computer.
  2. Download, install and run Data Genius.
  3. Select data recovery option and click Next.
  4. Choose Western digital external hard drive and click Scan button.
  5. After all the files are scanned successfully, preview them on window, check them and click Recover button to save them on computer hard drive after WD external hard drive data recovery
Related Articles:

February 12, 2015

Recover Data from a Damaged Seagate External Hard Drive

I just found that data has been lost after transferring data from Seagate external hard drive to computer. And now Seagate external hard drive seems to be damaged. It has become inaccessible.  

If you are in such situation and in search to find how to recover data from damaged Seagate external hard drive, it is important to clarify why data lost after transaction.

Technical Errors: Sometimes, lots of data always lose after we accidently delete or copy, but not paste them at right location.

Hard Disk Errors: Seagate external hard drive has been used for a long time. And now it becomes broken, so data lost.

Software Errors: When transferring data from external hard drive to computer, Seagate external hard drive is attacked by virus software on computer.

No matter which reason, Seagate external hard drive damaged is inevitable now. But don’t panic. There is still chance to recover Seagate external hard drive data, as long as the external hard drive has not been written with new data.

How to recover Seagate external hard drive lost data?


Data Genius is a powerful and free Seagate hard drive data recovery tool, no matter hard drive is formatted, virus-attacked, partition or any other reasons.

Seagate external hard drive data recovery with tool

Steps for data recovery from Seagate damaged external hard drive:
  1. Connect damaged Seagate external hard drive to accessible computer.
  2. Download and install iSunshare Data Genius on this computer.
  3. Run data recovery tool and choose data recovery option. If you are not sure, choose Deleted Recovery. Click Next.
  4. Choose external hard drive and click Scan button.
  5. When hard drive scan process completes, lost data or files can be seen in the left pane of Data Genius new window.
    You can select the files and preview them in the right pane to see whether they are the lost data you want to recover from damaged Seagate external hard drive.
  6. Check files you are sure to recover and click Recover button.
  7. At the following pop-up window, choose a location on computer to save recovered data.
  8. Until "Recovery is finished" message appears, lost data is recovered successfully from Seagate external hard drive. Click OK and you will turn to the recovered data. 
Related Articles:

January 29, 2015

How to Check Hard Drive Errors and Fix Them in Windows 7/8

We may encounter file or physical errors on hard drive more or less. How can we fix the problems easily and safely? Check and fix errors on hard drive is an effective way for you to solve it. Now let's see how to check errors on Windows 7 or Windows 8 hard drive, and then you can decide to fix them or not.  

How to Check Windows 7 Hard Drive Errors


You can solve some computer problems by checking a drive or drives for errors. For example, you can check your computer's primary hard disk to fix some performance issues, or you can check an external hard drive if it's not working properly.

1. Click Start button and Computer to open Computer.

open Windows 7 computer

2. Choose the hard drive you want to check, and right click it to choose Properties.

3. Click the Tools tab in Properties window, and under Error checking, click Check now.


4. There are two options available for you to choose before starting checking disk.

choose check disk options

  • Automatically fix file system errors: automatically repair problems with files and folders that the scan detects.
  • Scan for and attempt recovery of bad sectors: perform thorough check, this scan attempts to find and repair physical errors on the drive itself, and it can take much longer to complete.

       If you want to check both file errors and physical errors, select both of them.

5. Click Start.

The process of hard drive checking may take several minutes, and this depends on the size of hard drive and which type of option you choose to check hard drive.

Tips: Please don’t do anything on the hard drive you are checking. And while hard drive is in use, Windows cannot check the disk. 

check hard disk errors on Windows 7

At this time, if you cancel "Force a dismount", Windows will prompt you that if you want to check for hard disk errors the next time you start your computer. If you are sure, click "Schedule disk check". If not, click Cancel.
schedule next disk check


How to Check Windows 8 Hard Drive


Windows 8 can enable you to scan PC’s hard drive for potential problems. And generally, Windows 8 automatically scans each hard drive on your system on a regular basis. But you can manually scan a drive at any time. Now the following steps will guide you to scan and check hard drive errors on Windows 8 by yourself.

Step 1: Start Windows 8 and click Desktop in Start screen.

Step 2: Move your mouse to the upper right side of desktop. And type "Computer" in Search box.

search and open computer in Windows 8

Step 3: Click Computer in the left result to open Computer. 
                    
Step 4: Right click the hard drive you want to scan or check. And click Properties.

open Windows 8 hard drive properties

Step 5: Tab Tools, and under Error checking, click Check.

choose to check Windows 8 hard drive

If there is no errors on this drive, you will be prompted with a message "You don't need to scan this drive". Surely you can cancel hard drive check at this moment, or continuously scan hard drive.

scan Windows 8 hard drive or not

When you choose to scan disk, about few minutes later, you would see whether there are errors on hard disk and you should fix them.

successfully check errors for Windows 8 hard drive


Related Articles:


January 22, 2015

How to Create a New PDF Document with Word/Excel/PowerPoint or Other Files

As a popular document read mode, PDF format is used usually on computer, mobile phone and other digital devices. So many other files types are converted to PDF document for reading more conveniently. Now let's see how can we create a new PDF document from other files?

Three Methods to Create a PDF document from Word/Excel/PowerPoint or other files:

Method 1: Save Word/Excel/PowerPoint as PDF format document


Step 1: Open Word, Excel, or PowerPoint 2007 or newer versions, and click File – Save As.

choose Word save as option

Step 2: In the pop-up Save As window, set a name. Browse Save as type, and choose PDF. Click Save.

save Word document as PDF document

Method 2: Create PDF with Word/Excel/PowerPoint by Adobe Acrobat Menu


After you install Adobe Acrobat, there will be a new menu "Acrobat" in Word/Excel/PowerPoint menu. Several options are provided in Acrobat, such as "Create PDF".

Step 1: Open Word, Excel, or PowerPoint 2007 or newer versions file.

Step 2: Click Acrobat menu and choose Create PDF option under it.

create PDF document from Word with Acrobat menu

Method 3: Create PDF with any files by combining files in Acrobat


After you install Adobe Acrobat XI Pro, one new option "Combine files in Acrobat" is added to right-click menu. No matter which kind of file you want to create as a PDF file, just combine them and save it is OK. Then a new PDF file will be created, which includes all of the content of files you add.

Step 1: Right click one file you want to add to the new PDF. And choose "Combine files in Acrobat" in right-click menu.

choose Combine files in Acrobat option

Step 2: In Combine Files window, you can see the file you just clicked. Now click Add Files – Add Files button.

create Add Files button in Combine Files window

Or you can open a PDF file first, and then click File – Create – Combine Files into a Single PDF.

choose Combine Files into a Single PDF

Then "Combine Files" window also appears.

Combine Files window appears

Step 3: Select the files you want to add to the new PDF, and click Open.

open files to combine into PDF

If there are still files you want to add, repeat above two steps.

Step 4: When all of files have been added, arrange the files and make them listed as you like.

arrange added files list

Step 5: Confirm and click Combine Files.

combine files into PDF document

Step 6: After they are added into new PDF file and open, press Ctrl + S to save it.

save as a new PDF document

Related Articles:

January 14, 2015

How to Secure and Edit a Secured PDF Document

Why we should have to secure PDF file?
  1. PDF (Portable document format) is popular document sharing format over the Internet. PDF file are usually used in formal or informal occasions.
  2. Because of various advantages offered by the portable document format, lots of confidential documents are transferred by people via Internet, e-mail etc.
  3. If PDF file is not protected with password or permissions, any persons can open even change PDF document contents, which will lead to PDF crack and receivers cannot get the right one.

Part 1: How to Secure a PDF File


If you are the creator and owner of PDF file, you can protect PDF file with password and permissions by yourself now.

The following article in this part will mainly talk about how to secure PDF files with password and permissions.

Step 1: When PDF file is prepared and open, navigate to Protection – Encrypt – Encrypt with Password in Tool pane at the right side of PDF file window. Or in tool bar, click Encrypt button and select "Encrypt with Password".

choose Encrypt with Password option for PDF file

Step 2: In pop-up Password Security Settings window, document open password and permissions can be set.

set open and permissions password for PDF file

  • Check Require a password to open the document, and type a secure password in Document Open Password box.
  • Check box under Permissions, and type a different complex password in Change Permissions Password box. Click OK.
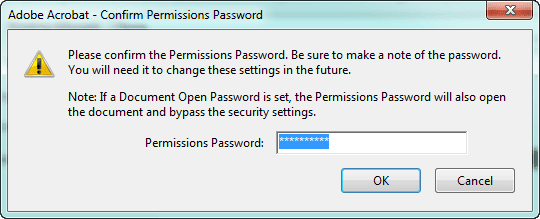
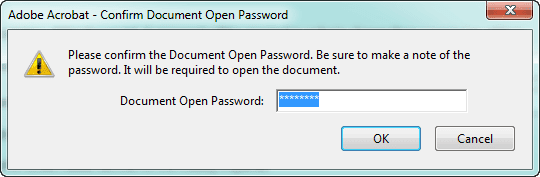
Step 3: Then password confirmation dialog pops up. Type document open and permissions password again in dialogs and click OK.

confirm PDF document open password

confirm PDF document permissions password

Step 4: The last step is to save changes on this PDF file, otherwise, PDF file will not be secured really with password and permissions.

Part 2: How to Edit a Secured PDF Document


When PDF document is secured with open password and edit permissions, open password should be known to open secured PDF document, then remove permissions, PDF document can be edited.

Step 1: Open secured PDF document.


If you have PDF open password, open PDF document instantly, otherwise, PDF document open password should be found first. For example, take effective PDF Password Genius to find PDF open password.

1. Get, install and run PDF Password Genius on your computer.

2. Import protected PDF document by clicking Open button in tool bar of PDF Password Genius.

3. Choose password recovery type and make settings for it in order to find PDF password with as short time as possible. 

 4. Begin to recover PDF document password after Start button clicked.

find secured PDF document open password

5. Copy password in window appearing following and open secured PDF document with it.

open PDF document with recovered password

Step 2: Remove PDF Edit Permissions.

cannot edit PDF document
1. Turn to "Encrypt" button in tool bar, click it to choose Remove Security.

choose Remove Security option for PDF document

2. Enter permissions password you have in pop up password box. Click OK. Then you can see the Restrict Editing button become available, that means PDF security password has been removed.

remove PDF edit permissions

Step 3: Edit PDF document without any restrictions.


Above steps are intended to remove secured PDF document security, so if you want to protect PDF after editing, you should set document open password and permissions again.

Related Articles:
January 3, 2015

How to Restore Deleted Sound Driver after Failed Update

With the Windows update, the updater will automatically find newer device/driver for your computer, surely including sound driver. However, not all of new drivers work better than the old one or adapt to computer. So sometimes when we probably encounter problems, such as audio plays wrongly or you can’t hear music or any sound, restoring sound driver to original state will be an easy and effective way to this problem.

The following steps will introduce how to restore sound driver to original state after failed updating sound driver. (Eg. Windows 7 computer)

Step 1: Click Start in Windows 7 computer and type "Device Manager" in Windows search box.

Step 2: Press Enter to run Device Manager.

There is another way to open Device Manager.

1. Click Start and open Control Panel.

2. Choose "System and Security".

3. Under "System" option, choose "Device Manager" and open it.

open Device Manager to manage sound driver

Step 3: Look for "Sound, video and game controllers", and expand its device list by clicking on the arrow next to it.

Or double-click "Sound, video and game controllers" to expand its device list. Then you can see the sound card your computer is using.

choose sound card in Device Manager

Step 4: Double-click the sound card to open its "Properties" window.

Or right click sound card, and select "Properties" option.

Step 5: Choose "Driver" and select "Roll Back Driver".

restore sound driver to previous state

Remember to agree that restore back to previously installed driver when prompted.

Tips: Updating driver is the general way to solve problem when sound driver doesn’t work properly. No matter updating sound driver if there is no sound in Windows, or roll back to early state after failed update, they are intended to solve sound driver problem. 

Related Articles: