June 10, 2015

How to Upgrade to iOS 8 without Losing Data

Under normal circumstances, after upgrading iPhone/iPad/iPod Touch to iOS new version, such as iOS 8, data on iOS device would be lost. This is not what we want really.

So which measures can we take to prevent data loss after iOS upgrade?

Measure 1: Create a iTunes backup for iOS device


Once you connect your iOS device to computer installed with iTunes, before iOS upgrade, you will have two choices to back up data on iOS data.

Choice 1: Back up iOS data manually with iTunes
  1. Open iTunes, and your iOS device (e.g. iPhone) is shown on the right bottom side of iTunes interface.
  2. Click it and go to its main interface.
  3. Under Summary option, click Back Up Now in Backups part.
Then back up message and progress can be seen at the top of iTunes window. The iTunes backup file is usually saved in these folders. You can go to check them.
  • Windows 7: C:\Users\isunshare\AppData\Roaming\Apple Computer\MobileSync\Backup
  • Windows 8/8.1: Users>USERNAME>AppData>Roaming>Apple Computer>MobileSync>Backup
  • Windows XP: C:\Documents and Settings\user\Application Data\Apple Computer\MobileSync\Backup

Choice 2: Sync your iOS device to iTunes automatically once connected

If you would like to back up iOS device like this, you should set your iOS device automatically synced to iTunes when iOS device is connected to computer. 

The iTunes backup also saved in the same location as manually back up iOS device with iTunes.

Measure 2: Make a iCloud backup for iOS device


Before you back up your iOS device data to iCloud, please make sure iCloud Backup is turned on , and Wi-Fi and Apple ID are available. Your iOS device is not locked because of passcode forgot.

Navigate to Settings - iCloud - Restore & Backup - Back Up Now, while you have signed to iCloud with Apple ID. If not, sign in to iCloud when you are prompted.

With backup in hand after iOS upgrade, if we want the previous data on iOS device are still on it now, we have to restore iOS device data from backup.

However, how can we restore iOS device data after iOS upgrade from backup?
  1. Restore iOS from iTunes backup or iCloud backup is OK.
  2. But are there any other more effective ways to recover iOS data?
    Surely there are. For example, iOS Data Genius gives users privileges to scan iTunes backup file first to see what are saved in it, so users can choose what they want to recover, or recover all the data from iTunes backup file. This way prevents iOS device from restoring from wrong iTunes backup file and saves time.
Related Articles:

May 17, 2015

How to Find RAR Password after Forgot or Lost It

  • I just downloaded a RAR file from Internet. However, when I began to open it, I found it is encrypted.
  • I have ever encrypted my RAR file, but I forgot its password when I want to open it.
  • RAR file is protected with password and saved in my computer safely, also the RAR file password. But it is strange that, I cannot find RAR file password on where I have ever saved. RAR file password lost
From the above cases, we can see that RAR file cannot be opened because of password forgot or lost. So how can we find RAR forgotten or lost password?

First, try to find RAR password in RAR archive or from where you got.


If your RAR archive is gotten from Internet, turn back to where you got it, probably password is provided there, but you have never noticed. Or RAR password is saved in a text document of the folder you downloaded. It is there all the time but never opened. So why not first check the RAR archive carefully or website you receive the RAR file?

If RAR password cannot be found with above tries, then it should be found with other more effective ways or tools, such as RAR Password Genius. You won’t have to consider anything, just need to prepare RAR archive and RAR Password Genius. And follow steps below to do.

Second, find RAR password after forgot or lost with effective RAR Password Genius.


Step 1: Run RAR Password Genius after successful installation on computer.


When you take cost into consideration, you had better choose trial or full version according to the possible RAR password. Trial version is free, and it supports no more than 3-characters password. Full version should be paid, but it supports any forgotten RAR password find regardless of password length or complexity.

run rar password finder to find rar password

Step 2: Add encrypted RAR archive to RAR password finder tool.


With Open button on toolbar, or File - Open File menu, you can easily browse all your computer hard drive and look for RAR archive you want to open. When you see it, select it and add it to rar password finder, RAR Password Genius. If there is no problem, it should be in Encrypted File box.

add encrypted rar archive to rar password finder

Step 3: Choose recovery method to find RAR password.


In RAR Password Genius, there are four password recovery methods in all. Everyone has its features. Therefore, before you make password recovery settings for recovery method you choose, think about which one is better for finding RAR archive password. Select it from drop-down list of "Type of attack".

password recovery settings to find rar password

At last, click "Start" button to find forgotten RAR password.

find rar password after forgot or lost

Related Articles:

May 5, 2015

How to Bypass WinZip Password after Forgot or Lost

After WinZip password forgot or lost, the first step may be to get WinZip password. Then bypass WinZip password can be come true.
  • Step 1: Get WinZip password with zip password recovery freeware or shareware
  • Step 2: Bypass WinZip file simple or complex password

Now see how to use freeware or shareware to bypass WinZip forgotten or lost password.

Method 1: Bypass WinZip password with free zip password recovery tools


If you have no freeware for winzip password recovery, in the following passage several freeware are introduced. You can choose one from them.


According to the detailed introductions about zip password recovery tools, choose one that is suitable for your WinZip file. After getting password with free zip password recovery tools, check whether the software you choose can help you to recover your winzip file password. If not, you should turn to Method 2.

Method 2: Bypass WinZip file password with shareware ZIP Password Genius


This shareware would be your saver when you cannot extract WinZip file without password. It helps you easily find WinZip password.

1. Prepare ZIP Password Genius and install it on your computer where WinZip file is stored.

2. Run it after complete installation. Then import WinZip file with Open button. Also, you can click File - Open File tab to open WinZip file in ZIP Password Genius.

run zip password genius for winzip password bypass

import winzip file to bypass password

3. It’s time to set password recovery attack method.

Under Type of attack, Brute-force, Mask, Dictionary and Smart, these four password attack types are provided for you to recover WinZip password powerfully. According to the possible WinZip password features, Brute-force and Dictionary are best choices. Brute-force can recover WinZip password forcibly. And Mask makes full use of password possible features to recover WinZip password.


4. When all of things have been prepared, click Start button to recover WinZip password. In the pop-up window, you can copy the WinZip password to save or open WinZip file directly.

recover winzip password successfully

5. Extract WinZip file with recovered password in WinRAR.

extract winzip file with recovered password

6. Create new WinZip file with contents in previous WinZip file. Remember don’t set a password to protect the new WinZip file.

bypass password to create new winzip file

Now do you have any questions about how to bypass WinZip password after forgot or lost? If you have, you can learn more about freeware or shareware for WinZip password recovery. 

April 22, 2015

How to ZIP a File with a Password

In order to make file or folder smaller and safer, zip it and add a password to a zip file is a common choice. Surely the easy way to do this is making full use of archive program. Now in this passage, we will introduce how to zip and password protect a file or folder with two archive programs.

Choice 1: How to zip and password protect a folder with WinRAR


WinRAR has supported both rar and zip archive format. Follow steps below, and you can use WinRAR to zip a file or folder and add a password to zipped file.

1. Run WinRAR in your computer.

2. In the main interface of WinRAR, you can browse computer to select the file or folder you want to zip and encrypt in your computer.

3. After file or folder selected, click Add button in the tool bar.

select file or folder to zip

4. In Archive name and parameters window, select ZIP as Archive format. Name the archive or let archive name default in Archive name box.

choose zipped file format

5. Click Browse button to choose a location to save zipped file. The zipped file directory would be shown under "Archive name" box.

select location to save zip file

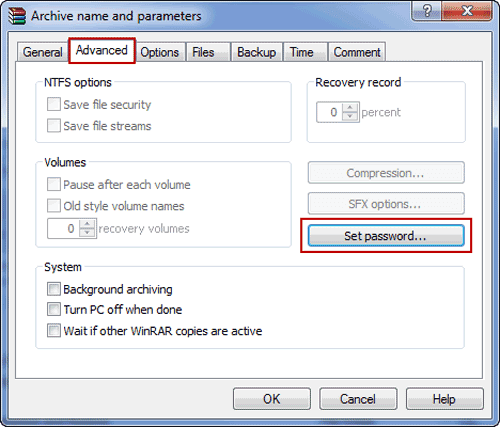
6. Turn to window top side and choose Advanced tab.

choose to set password for zip file

7. Click Set password and a new window Enter password appears.

8. Type a password in Enter password box, and Reenter password for verification.
Don’t check "Show password" and click OK.

set password for zip file

9. Click OK twice to finish zip file password protection.

successfully zip a file with a password

Choice 2: How to add password to zip file with 7-ZIP


7-zip is a common program that is used to compress file or folder as zip archive and add password to it. In the process of file encryption with 7-ZIP, the file you selected can be zipped at the same time.

 1. After 7-ZIP is installed in your computer, right click the file or folder you want to zip and add password to. Select 7-ZIP and click "Add to archive".

2. When "Add to archive" window appears, name the zip archive at the top box. Enter password and reenter it to confirm under "Encryption" option. Click OK at last.

Detailed introductions in: How to Encrypt a ZIP File with 7-ZIP

Related Articles:

April 16, 2015

What Errors Lead to Access Data Import from Excel or Export Failure


Even though data transfer between Access and Excel is usual now, errors are still occurring during data import or export. If you have tried to import data into Access from Excel or export data from Access database, believe you can understand it.

Now the following are some errors probably you would encounter during Access data import or export. Hope the solutions can give you a hand when you really meet Access import or export errors.

Error 1: Excel XLS cell data is over maximum limits

  • Import Error: The wizard is unable to access information in the file '<filename>'. Please check that the file exists and is in correct format.
  • Export Error: External table is not in the expected format.
This is an error during Access import/export to Excel XLS. Actually, the reason is that the Excel XLS file has cells containing more than 8224 bytes of data.

So, how to correct errors if you still want to import data from excel xls to Access or export data from Access to excel xls?

1. Use the *.xlsx format instead of *.xls.
2. Restrict any memo/long text fields to a length less than 8224 bytes.
3. When exporting, delete the existing .xls file before performing the export using the same file name.
4. Open the .xls file in Excel before performing the import/export from Access.

Error 2: Imported Excel file field is out of range 

                                    
When I try to import data into a table of Access database, I am getting "Field "F42" Doesn't Exist in Destination Table" error. I have a "client lists" table, and I am trying to add additional records to it.
If you see this error, it is because your excel file field is out of range and the extra fields cannot be imported into Access database table.

Now you would have to give up something, so you can import Excel data into Access successfully. Here are some suggestions for you.

Solution 1: Go to Excel file and hit Ctrl + End to see whether it is much further than you expect. If it is, delete all extra rows and columns, save, and try again.

Solution 2: Name the range in Excel that you wish to import into Access. Then, as you are importing the file into Access, you can elect to import that named range instead of the whole sheet. That should ensure that you are only going to import what you want.

Solution 3: Delete all the extra columns and a lone variable in a distant cell. Then you can import data into Access.

Error 3: Too much rows are in Excel spreadsheet


When you are using Access data import wizard to import data from Excel spreadsheet, you receive this prompting message:

Not all of your data was successfully imported into Access. Errors descriptions with associated row numbers of bad records can be found in the Microsoft Access table <>.

Actually, this is far from unique. When you open ImportErrors table, you would find it is Type Conversion Failure. When Access scans the data in spreadsheet, row value in spreadsheet cannot be confirmed.
Whether we can make row value verified correctly? The answer is surely yes.

Because the value is stored in registry, so it can be easily changed. Then it can be confirmed when import spreadsheet into Access.

Now see how to change the registry key?

1. In Windows desktop computer or laptop, click Start and type regedit in search or Run box. Press Enter to display Registry Editor.

2. In the registry tree, select HKEY_LOCAL_MACHINE - Software - Microsoft - Office - 15.0* - Access Connectivity Engine - Engines.

Or if your Access is not the latest version, you would not navigate to HKEY_LOCAL_MACHINE - Software - Microsoft - Office - 15.0*, it would probably be Office - 14.

correct access data import errors by changing registry key

3. Double-click the Excel node.
4. In the right panel, double-click the TypeGuessRows entry.
5. Change the value data to be 0.
6. Click OK.
7. Select File - Exit to exit the Registry Editor window.

After setting the registry key to 0, Access will now scan the entire spreadsheet. This registry change works effectively especially when you frequently import huge spreadsheets into Access databases. But not all of spreadsheet row value should be changed. You can obviously set this value to whatever number of rows makes sense for you.

Tips:
When importing data into an MS Access database, sometimes there are errors in the formatting of the data source. When this happens, MS Access will put the offending row into a separate table. In Access 2010, the file is called <name of import file>_ImportErrors. For example, importing try.txt, it would give try_ImportErrors.

Related Articles:

April 7, 2015

Access Database Password Reset with Access Password Recovery Tool

How is access password recovery tool? Is it really available for Access database password reset? When encountering access password problem, this tool is always mentioned. So we should have to realize and understand it eventually if we wish the problem solved effectively.

As soon as you search the Internet, you would find there are so many access password recovery tools, seeming to be available all. But we can’t promise all of them are powerful or safe just by looking at them. So, which one is really effective tool for access password reset?

Now let’s see two popular ones, Access Password Genius and Office Password Genius and use them for access password reset.

Access Database Password Reset with Access Password Genius


See the detailed steps to reset Access database password with Access Password Genius, you would know whether it is or not.

access database password reset

Step 1: After running Access Password Genius, click "Open" button and you can browse access database file and import it into password tool. See the image.

Conclusion: You can import access database file into Access Password Genius successfully.

Step 2: In "Type of attack", select one of password attack types and set password range, length, dictionary etc for it.

Conclusion: You can choose password reset method for access database file.

Step 3: Click "Start" button and instantly access database password pops up in a window.

Conclusion: Access password reset program is so easily to be startup only needing to click one button.
Even though the above three steps looks simple, they are enough to reset access database file password.

Access Database Password Reset with Office Password Genius


After you run Office Password Genius, you would find its interface is similar to Access Password Genius.
Actually, the steps to reset Access password with Office Password Genius is similar to with Access Password Genius too. The only difference is that Office Password Genius could import more kinds of files, such as Word, Excel, PowerPoint and Outlook file. Moreover, these files password can be reset like access database file.

reset access database password with password recovery tool

With more functionality but the same cost, I think Office Password Genius is more worthwhile than Access Password Genius at this angle.

Summary:

Access Password Genius is surely effective tool for access password reset. But compared with Office Password Genius, Office Password Genius seems to be better because more file password can be reset.

Related Articles:


April 3, 2015

How to Encrypt Files or Folders in Windows 10 Computer

Encrypt files, such as Office files, archives, PDF document, is surely not so strange for computer user. They are usually encrypted with file creation tools, Microsoft Office, WinRAR, or Adobe Acrobat etc. So how is encrypting general files or folders not created with special file tools in Windows 10 computer?

When you have no idea to encrypt files or folders in new Windows 10 computer, please search "encrypt file" in Windows 10 Search box, there will be two options for you to choose. One is "Encrypt your offline files", the other is "Manage file encryption certificates". Believe these two options are the most appropriate options for us to choose now on computer if no password encryption tools available.

search how to encrypt files in windows 10

Therefore, if you have Windows 10 files or folders to encrypt, please follow several parts below to go.

Part 1: Manage file encryption certificates in Windows 10


Once you choose "Manage file encryption certificates" after search, a new window would pop up and ask you to select or create a file encryption certificate.

If you have one created before, now check "Use this certificate" on interface and click "Select certificate" button to select one in pop-up dialog. Then it will be shown in "Certificate details".

choose to create a new file encryption certificate

However, if you have no file encryption certificate, please check "Create a new certificate" and click Next button to create a new one for Windows 10 first.

1. Select an option to automatically create and store a file encryption certificate.

Now we choose A self-signed certificate stored on my computer, because we have no smart card or certification authority. Click Next button.

choose certificate type to create on windows 10

2. Back up the certificate and key, or we can back up the certificate and key later. Click Next.

go on file certificate creation without back up now

3. If there have been encrypted files, select previous encrypted files and update them with new certificate and key. Or update them later is also permitted. Click Next.

update encrypted files later

Certificate and key have been set successfully. Click View certificate and certificate detailed information will be shown in new dialog. Now you can click Close button to finish creating file encryption certificate. If file encryption certificates have not been back up, please read more about file encryption certificates backup for Windows 10 below.

view file encryption certificate information

Backup file encryption certificates

After creating file encryption certificate and it has not been back up, there will be a message prompting you to back up it on Windows interface. Choose "Back up now".

begin to back up windows 10 file encryption certificate

1. Click Next on Welcome to the Certificate Export Wizard window.

start export file encryption certificate

2. Select file format for certificate when it is exported. Click Next.

select export certificate file format

3. Set a password for certificate to protect the private key. Click Next.

set password for certificate file for file encryption

4. Select a file you want to export certificate to. Click Next.

name export certificate file

5. When you see certificate export settings in new window, click Finish to complete the Certificate Export Wizard.

complete backing up file encryption certificate


Part 2: How to encrypt Windows 10 offline files


1. Once you choose Encrypt your offline files, a new dialog Offline Files will appear.

2. Choose Encryption on menu, and click Encrypt tab. Click OK.
If you want to decrypt it later, just click "Unencrypt" tab next to "Encrypt". Then click OK.

encrypt windows 10 offline filesdecrypt windows 10 encrypted offline files


Part 3: How to encrypt contents in file or folder to secure Windows 10 data


This way is intended to encrypt contents in file or folder with default file encryption certificates.

1. Right click the folder you want to encrypt contents. And click Properties.

open folder properties

For example, you want to encrypt folder "Music". Now Music Properties dialog has appeared.

2. Under General tab, click Advanced option in Attributes.

3. Check Encrypt contents to secure data in Advanced Attributes dialog. Click OK.

choose to encrypt contents to secure data

4. Click Apply in Music Properties. Then click OK to Confirm Attribute Changes.

apply encryption changes to related windows 10 folders

Wait for few seconds to apply changes to folder you choose.

5. Now click Advanced on Music Properties again. Click Details after Encrypt contents to secure data, you would see this folder is only available for user who make the changes to the folder.

view contents encryption details for data security

windows 10 folder encryption details

So even though your computer is used by other computer users, this folder would not be accessed with permission.

Part 4: Encrypt Windows 10 files by preventing specific user from files or folders


On folder Properties, you also can make specific permissions for specific user. Surely, you can deny access and editing on the folder.

1. Tab Security in Music Properties dialog. Select user who you want to change permissions. Then click Edit under Group or user names.

choose to change user permissions to folder

2. Confirm user in user group, and check all of permissions boxes under Deny in "Permissions for clara". Click Apply.

constraint user permissions to windows 10 folder

3. When a prompting message from Windows Security, click Yes.

confirm deny permissions entry to windows 10 folder

4. Click OK and turn back to Music Properties dialog, and you would see in Permissions for clara. All of permissions have been denied. Click OK.

view user deny permissions in folder security option

Now no one could access this folder, unless who have made these changes removes all of permission protection from this folder.

no available access to windows 10 folder


Part 5: Encrypt Windows 10 files or folders with a third-party tool

You can also encrypt files or folders in Windows 10 computer with a third-party tool, such as iSunshare SafeFile Genius. iSunshare SafeFile Genius is the professional folder encryption software for Windows users to password-protect the content. It is super easy to do that.

1. Launch the program and hit on Encrypt button on the left module.

hit on Encrypt

2. Click the folder icon and choose the file or folder to encrypt.  Click the Next button to go ahead.

select file or folder to encrypt

3. Input the password for the chosen files/folder. When it is finished, click the Encrypt button, and then you can get all contents encrypted soon. 

set your password

Note: This software will create a new file in XEP formate that cannot be accessed or opened. So, it is better for you to delete the original content. 

Above passage has introduced how to encrypt Windows 10 files or folders or protect them with permissions from different points of view. If you still have any questions about encrypting specific files, such as encrypting Office files, PDF documents, or archives, see the articles below.

Related Articles: