December 21, 2015

How to Change Windows 10 Microsoft Account Password after Lost

After Windows 10 Microsoft account lost password for computer logon, whether we can reset or change Microsoft account password and then sign in Windows 10 computer with new password?
Surely we can. Just like the passage, it has introduced how to change Windows 10 Microsoft account password with Microsoft service.

Change Windows 10 Lost Password on Microsoft Account Password Reset Page

Step 1: Open Microsoft account password reset page.

Step 2: Choose the reason why you cannot sign in Windows 10 computer, such as "I forgot my password". Click Next.

reason for change Windows 10 Microsoft account password

Step 3: Enter your Microsoft account (email or phone number) used for Windows 10 login and type verification code. Click Next.

enter Windows 10 Microsoft account

Step 4: Choose the way how you would like to get security code, generally the email. Click on "Send code" button.

choose way to get security code

Step 5: Enter e-mail you use to receive security code.  And you would see a email from Microsoft. Browse the email to get code.

check security code in email

Tips: If you don’t recognize the Microsoft account you typed, you can remove email address from that account.

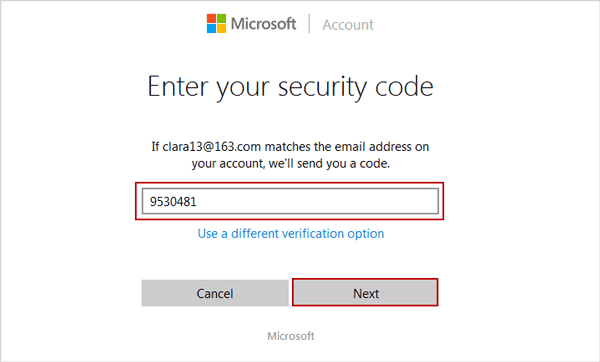
Step 6: Go to Microsoft account verification page, and enter security code you get, and click Next button.

enter security code to verify Microsoft account

Step 7: Type a new password and confirm it to use for Windows 10 Microsoft account logon. Tap next.

reset Windows 10 Microsoft account password free

Step 8: Your Microsoft account password has been changed. You can now use new password to login into Microsoft account or login Windows 10 with Microsoft account and new password. 

successfully change Windows 10 Microsoft account password

Or enable two-step verification and then sign in Microsoft account with new password.

Related Articles:

October 23, 2015

Hide or Show Search Box on Taskbar using Registry Editor

How do you hide or show search box on taskbar in Windows 10 computer? In this article, you’ll learn how to make it through changing the related value data in Registry Editor.

Step 1: Access Registry Editor.

Sub-step 1: Press Windows+R to launch Run, type regedit and tap OK.


Sub-step 2: Choose Yes in the User Account Control dialog.


Step 2: Open the value named SearchboxTaskbarMode.

In detail, it is located in HKEY_CURRENT_USER/SOFTWARE/Microsoft/Windows/CurrentVersion/Search.


Step 3: Change the value data.

1.    To hide search box, input 0 in the value data box and click OK.


2.    To display search box, type 2 in the value data box and hit OK.


Step 4: Restart the computer.

Tap the bottom-left Start button on the desktop, click Power and select Restart.


Related Articles:


September 14, 2015

Forgot Windows 10 Microsoft Account Password No Reset Disk

Microsoft account (MSN account) has been set to login Windows 10 computer. However, I forgot Microsoft account password and it could not sign in Windows 10 now, and there is no reset disk available to reset Windows 10 local user password. So how can I do to login into Windows 10 again without reset disk?

No reset disk for resetting Windows 10 Microsoft account password? Please follow the way below to sign in Windows 10 again.

Reset Win 10 Microsoft account password on Microsoft account password reset page


On Microsoft account password reset page, you could easily reset forgotten Microsoft account password without any other help.  What you need to do is to follow the wizards on the password reset page to do step by step.

1. Open Microsoft account password reset page, and choose the reason "I forgot my password". Click Next.

choose Windows 10 Microsoft account password reset reason

2.  Type Microsoft account you want to reset its password, and verification code, and click Next.

enter Microsoft account to reset password

3. Choose the way you want to get security code, e-mail, text messages or call. Usually, the e-mail is used commonly to receive security code to verify your identity. So type the email you want to get security code and click "Send code".

choose the way to get security code

4. Sign into your e-mail and you can see the security code in e-mail Microsoft has sent to you.

get Microsoft account password reset code

5. Enter security code you get in Code box, and click Next.

enter security code to verify Microsoft account

6. Now you can reset the Microsoft account password. Type a new password twice for Microsoft account and click Next.

reset windows 10 Microsoft account forgotten password

You will be prompted that "Your account has been recovered", and "Your password was changed". Now you can click Next to sign in Microsoft with the account and new password. Or use it to login in your Windows 8/10 computer that has been set to sign in with Microsoft account.

successfully recover Microsoft account and change password

Surely, if your Windows 10 computer is set to login with local user account automatically, only you reset Windows 10 local user password, can you sign in Windows 10 computer again with local account and new password or without password.

Related Articles: 

September 13, 2015

2 Ways to Disable Delete Confirmation Dialog in Windows 10

Do you feel bothered if a confirmation dialog always displays when you delete files on your Windows 10 PC? If your answer is affirmative, you can disable the dialog using the two methods illustrated below.

Way 1: Disable delete confirmation dialog in Local Group Policy Editor.

Step 1: Press Windows+R to open Run, type gpedit.msc and click OK to turn on Local Group Policy Editor.


Step 2: Open User Configuration/Administrative Templates/Windows Components/File Explorer/Display confirmation dialog when deleting files.


Step 3: Choose Disabled and tap OK to disable the setting.


Tip: If the setting is not configured, the same goal can be achieved.

Way 2: Disable delete confirmation dialog in Recycle Bin Properties.

Step 1: Right-click Recycle Bin and choose Properties on the menu.


Step 2: Deselect Display delete confirmation dialog and hit OK in the Recycle Bin Properties window.


Related Articles:

September 7, 2015

A Brand New Way to Open Settings in Windows 10

How do you open Settings (referring to the following picture) in Windows 10 computer? In this article, you may learn a brand new method. Just read on.


On the desktop, click the Action Center icon on the taskbar, and then select All settings in the panel, as exhibited in the following screen shot.


Related Articles:


September 5, 2015

Windows 8 File Recovery - How to Recover Deleted Files in Windows 8

How can you do to recover Windows 8 files when Windows 8 data lost or deleted?

As is known, while Windows 8 is refreshed, reset, formatted, or attacked by virus etc, there is a great possibility that, Windows 8 data would be lost or deleted. It also seems that lost Windows 8 data could not be recovered longer.

But is it real? I don’t think so. Data recovery tool I have used to recover my Windows 7 computer has ever easily restore Windows 7 deleted data back. I think this tool would also apply to Windows 8 file recovery. Now let’s see how does it recover Windows 8 deleted files?

Step 1: Download and install data recovery tool Data Genius on computer.

Step 2: Run it and choose Window 8 data recovery mode.

choose windows 8 file recovery mode

Deleted Recovery mode is the default data recovery mode that is intended to deleted files from computer, removable data storage, such as USB device or CD/DVD-ROM. If you think it is OK for you, just need to click “Next” button to go on.

If you want to make data recovery address in more detail, you can choose another data recovery mode, such as Format Recovery, Raw File Recovery and Partition Recovery.

Step 3: Select the driver where Windows 8 lost data, such as C:/ and click Scan button to browse Windows driver.


About few seconds or minutes later, Windows 8 deleted data are found and shown in new screen.  

Step 4: Preview Windows 8 deleted data one by one folder and check the Windows 8 lost data you want to recover.


Step 5: Click Recover button to restore and save Windows 8 deleted data on computer.

When you have checked all of lost Windows 8 data you want to recover, just click "Recover" button and choose a folder in pop-up dialog to save the data that will be recovered. Instantly, Data Genius will prompt you that "Recovery is finished". Now click "OK" and finish Windows 8 file recovery.

Related Articles:

August 12, 2015

Six Options to Sign in Locked Windows 10 PC/Laptop/Tablet

When windows 10 login password forgot or lost, how can you sign in Windows 10? Now the article summarizes six options you can choose to login Windows 10 before or after resetting Windows 10 login password?

Before resetting Windows 10 password, three sign-in options are available if you have them before locked out of Windows 10 computer.
  1. PIN code or picture password for Windows 10 login user.
  2. Another local admin account. If there is, it should appear at the bottom of Windows 10 logon screen. Just choose it and type password to enter Windows 10.
  3. Built-in Administrator. Unless you have enabled it, it would not be available for Windows 10 logon.
sign in windows 10 before windows password reset

After resetting Windows 10 password, you would get more three options to sign in Windows 10 PC/laptop/tablet.
  1. Sign in Windows 10 without password.
  2. Access Windows 10 with login user and new password.
  3. Login Windows 10 with new administrator.
Believe it's easy for everyone to sign in Windows 10 before resetting Windows 10 password, because all of the sign-in options are shown in Windows 10 logon screen for you to choose.

But how can we create new Windows 10 sign-in options and how to login into Windows 10 after password reset? This is a question worth to considering sincerely, especially while Windows user has no PIN code or picture password, and another administrator, and built-in administrator has not been enabled.

Now the follow three ways would answer this question about creating new Windows 10 sign-in options. And while you have no choices without resetting windows 10 password, you could only use ways below if you want to sign in Windows 10.
                                                                                                               
1. Password Reset Wizard. If password reset disk has been created, you can click "Reset Password" on Windows logon screen after typing wrong password, to run Password Reset Wizard to reset Windows 10 forgotten password. Then sign in Windows 10 without password or new password.

sign in windows 10 by resetting windows 10 password with reset disk

2. Windows password recovery tool, which can create reset disk and remove forgotten password, create new administrator, so you can sign in windows 10 without password, with new administrator after using windows password recovery tool.

sign in windows 10 after removing password with tool

3. Windows 10 installation CD and command prompt also could reset windows 10 password.
While you reboot windows 10 computer from installation cd, and replace utilman.exe with cmd.exe, you could restart windows 10 and run command prompt to reset windows 10 user password, even though windows 10 computer is locked at that time.

sign in windows 10 by resetting password with installation cd

With command, you can remove windows 10 password, reset windows 10 password, create new administrator. So with this way, you can sign in windows 10 without password, new user password or new administrator.

Topics you may be interested:


July 24, 2015

How to Restore Locked iPhone Lost Data without Passcode

While iPhone is locked because of passcode forgot, how can I restore iPhone lost data?

After connecting iPhone to computer and trying our best to restore iPhone data from iTunes backup, the iTunes prompts that I have to type in passcode to unlock iPhone first, otherwise I cannot restore iPhone data from backup in iTunes.

How should I do for iPhone data recovery when there is iTunes backup in hand?

Maybe you need an iPhone data recovery tool. What you should do is to get such data recovery software, and prepare to install and run it on your computer. If you could not find a powerful one for restoring iPhone data, please follow the steps below to restore locked iPhone lost data with iOS Data Genius.

Step 1: Search and get iOS Data Genius on Windows computer.

You can search iSunshare iOS Data Genius directly in Google to open its webpage. Learn about its detailed information and download trial version to have a try. Then install it on Windows computer.

Step 2: Choose iPhone data recovery mode.

When iSunshare iOS Data Genius runs on computer, please click Recover from iTunes Backup File and select this data recovery mode. Then choose right backup file in backup list for your iPhone.

prepare to recover iPhone lost data from iTunes backup

Step 3: Scan iPhone iTunes backup file to preview data.

Tap Start Scan button after selecting iTunes backup file for iPhone.  About few seconds later, iPhone iTunes backup scanning is finished. Now in new interface, you can preview data in backup file one by one.

preview iPhone lost data in iTunes backup

Step 4: Restore iPhone data from iTunes backup file.

While you can confirm which data you want to restore, check the data and click Recover button. Then these backup data would be restored and saved on computer. At this moment, you have successfully recover iPhone data from iTunes backup file with iOS Data Genius. You can view lost iPhone data on computer now. Or transfer data from computer to iPhone. 

save restored iPhone lost data in computer

recover iPhone data from iTunes backup successfully

Summary:

Without passcode, how to restore iPhone lost data?
  1. Restore iPhone to factory settings and then recover data from iCloud backup.
  2. Recover iPhone data from iTunes backup file with iOS Data Genius.
Related Articles:

July 6, 2015

How to Recover iPad Deleted Files | iPad File Recovery

If your iPad files are deleted or lost because of iPad damage, iPad factory reset, iPad iOS upgrade etc, how can you effectively recover iPad deleted files?

I think this article could help you a lot if there are no other methods for you. Two powerful ways below would tell you how to retrieve iPad lost files from iTunes backup or your iPad.

Way 1: Restore iPad Deleted Files from iTunes Backup


With iTunes backup in hand, you could not only restore iPhone/iPad/iPod data directly from backup, but also only extract the data you want from iTunes backup with iOS Data Genius. When you have decided to recover iPad files from iTunes backup, please choose to directly make full use of iTunes backup or take iOS Data Genius with more efficiency.

Choice 1: Directly restore iPad deleted files from backup with iTunes


Step 1: Connect your iPad to computer and run iTunes.

Step 2: Click iPad on iTunes top right side to open iPad main window.

Step 3: In Backups part, click Restore Backup and choose a backup in pop-up dialog. Then click Restore to restore iPad from backup.

restore iPad deleted files from iTunes backup directly

After backup data restored to your connected iPad, would know what have been recovered when you open your iPad to see. So selecting a right iTunes backup for iPad file recovery becomes important for you.

Choice 2: Recover iPad deleted files from iTunes backup with iOS Data Genius


Step 1: Install and run iSunshare iOS Data Genius on Windows computer.

Step 2: Choose Recover from iTunes Backup File recovery mode and tap Start Scan button.

choose iPad iTunes backup in iOS Data Genius

Step 3: Preview iPad files from iTunes backup in new screen.

preview and recover iPad deleted files from iTunes backup

Step 4: Select the iPad files on the left side and click Recover button.

Then browse a folder on computer to save iPad deleted files. Until a message prompts you iPad files recovery successfully, tap OK to exit iOS Data Genius and see iPad deleted files on computer.

Compared to the first choice, believe you have realized that you could choose iTunes backup file and recover iPad data more appropriately. At the same time, you could exit iPad file recovery process and does no influence on your iPad.

Way 2: Recover Deleted Files from iPad with iOS Data Genius


iOS Data Genius will not only recover iPhone/iPad/iPod lost deleted data from iTunes backup, but also recover iOS data from iPhone/iPad/iPod. Surely, you can run iOS Data Genius to recover iPad deleted files without iTunes backup.

Step 1: Run iOS Data Genius on your computer and connect iPad to computer.

Step 2: Check "I have backed up my device with iTunes" and tap Start Scan to look through your iPad.

scan iPad with iSunshare iOS Data Genius

Step 3: Preview data after scanning iPad, and choose data on the left pane to recover.

preview and recover deleted files from iPad

Step 4: Save iPad data on computer and get Recover successfully message.

successfully recover iPad deleted files with iOS Data Genius

Undoubtedly, this way gives iPhone/iPad/iPod users hope to recover lost or deleted data, especially when they are worried or anxious about iOS data recovery.

Related Articles:

June 25, 2015

How to Sync iPhone to iTunes after Passcode Forgot

When you forgot iPhone passcode,or iPhone is disabled, how can you sync iPhone to iTunes?
This is a representative problem below about syncing iPhone with iTunes after passcode forgot.

iTunes won’t let me sync my iPhone without entering that passcode, but I’ve forgotten my passcode. How can I get access to my iPhone and then sync to my phone with iTunes?

We know that when passcode is available, we could easily type passcode and sync iPhone with iTunes on computer. However, if passcode forgot, how can we sync iPhone to iTunes to make a backup in case of need? According to situation you face, select one of the following options to do.
sync iPhone with iTunes after passcode forgot

Option 1: Restore iPhone with iTunes and Sync iPhone to iTunes again


Syncing locked iPhone with iTunes seems more difficult for people to do. But you may be able to reset the passcode by restoring the locked iPhone.

1. Connect the device to the computer with which you normally sync and open iTunes.
Note: If iTunes prompts you to enter the passcode, try another computer that you have synced with. Otherwise, go to "If you have never synced your device with iTunes", below.

2. Right-click the device in the left column and select Back up.
3. When the backup is complete, select Restore.
4. When finished, restore from your most recent backup.

restore iPhone then sync iPhone to iTunes

If that doesn’t work, you will need to perform a factory restore to remove it. But you should consider whether you have backup for restoring iPhone data after factory reset.

The best scenario is that you have ever backed up your iPhone with iTunes every time it is connected to computer. So forming a habit of backing up iOS device at any time can prevent iOS data loss.

Option 2: Erase iPhone with "Find My iPhone" and Sync iPhone to iTunes


Make full use of "Find My iPhone" feature for iPhone to erase iPhone. iPhone forgotten passcode and data would be erased at the same time. Surely sync iPhone with iTunes would become available.
erase iPhone with Find My iPhone then sync iPhone to iTunes
If you enabled Find My iPhone through iCloud, follow steps to erase your iPhone.

1. Go to icloud.com/find and sign in with your iCloud Apple ID.
2. Click All Devices at the top of your browser window and choose iPhone you want to erase.
3. Click "Erase [device]" to erase your iPhone and its passcode.
4. Follow the Setup Assistant on your iPhone to restore the most recent backup.

Now you can reset passcode for your iPhone and sync iPhone to iTunes later as you like.

Option 3: Put iPhone in Recovery Mode to Restore and Sync iPhone with iTunes


If you have never synced your iPhone with iTunes, or haven’t set up Find My iPhone for your device, you can put your device in recovery mode, to restore iPhone as new one or from a backup.
restore iPhone in recovery mode then sync iPhone with iTunes
1. Hold down the Power button, then slide to power off to turn off your iPhone.
2. Hold the Home button and plug iPhone into computer, then turn it on.
Don’t loosen Home button until you see the Connect to iTunes screen on your iPhone.
3. In iTunes, you will be alerted that iPhone is in recovery mode. Click OK, and restore the device.

If iPhone cannot successfully go into recovery mode, try it again with above steps, or run free iOSBoot Genius to help put iPhone in recovery mode with one click.

enter recovery mode to restore iPhone for sync iPhone data to iTunes

After restoring iPhone from a backup in recovery mode, sync iPhone to iTunes would be no problem.

Related Articles:

June 10, 2015

How to Upgrade to iOS 8 without Losing Data

Under normal circumstances, after upgrading iPhone/iPad/iPod Touch to iOS new version, such as iOS 8, data on iOS device would be lost. This is not what we want really.

So which measures can we take to prevent data loss after iOS upgrade?

Measure 1: Create a iTunes backup for iOS device


Once you connect your iOS device to computer installed with iTunes, before iOS upgrade, you will have two choices to back up data on iOS data.

Choice 1: Back up iOS data manually with iTunes
  1. Open iTunes, and your iOS device (e.g. iPhone) is shown on the right bottom side of iTunes interface.
  2. Click it and go to its main interface.
  3. Under Summary option, click Back Up Now in Backups part.
Then back up message and progress can be seen at the top of iTunes window. The iTunes backup file is usually saved in these folders. You can go to check them.
  • Windows 7: C:\Users\isunshare\AppData\Roaming\Apple Computer\MobileSync\Backup
  • Windows 8/8.1: Users>USERNAME>AppData>Roaming>Apple Computer>MobileSync>Backup
  • Windows XP: C:\Documents and Settings\user\Application Data\Apple Computer\MobileSync\Backup

Choice 2: Sync your iOS device to iTunes automatically once connected

If you would like to back up iOS device like this, you should set your iOS device automatically synced to iTunes when iOS device is connected to computer. 

The iTunes backup also saved in the same location as manually back up iOS device with iTunes.

Measure 2: Make a iCloud backup for iOS device


Before you back up your iOS device data to iCloud, please make sure iCloud Backup is turned on , and Wi-Fi and Apple ID are available. Your iOS device is not locked because of passcode forgot.

Navigate to Settings - iCloud - Restore & Backup - Back Up Now, while you have signed to iCloud with Apple ID. If not, sign in to iCloud when you are prompted.

With backup in hand after iOS upgrade, if we want the previous data on iOS device are still on it now, we have to restore iOS device data from backup.

However, how can we restore iOS device data after iOS upgrade from backup?
  1. Restore iOS from iTunes backup or iCloud backup is OK.
  2. But are there any other more effective ways to recover iOS data?
    Surely there are. For example, iOS Data Genius gives users privileges to scan iTunes backup file first to see what are saved in it, so users can choose what they want to recover, or recover all the data from iTunes backup file. This way prevents iOS device from restoring from wrong iTunes backup file and saves time.
Related Articles:

May 17, 2015

How to Find RAR Password after Forgot or Lost It

  • I just downloaded a RAR file from Internet. However, when I began to open it, I found it is encrypted.
  • I have ever encrypted my RAR file, but I forgot its password when I want to open it.
  • RAR file is protected with password and saved in my computer safely, also the RAR file password. But it is strange that, I cannot find RAR file password on where I have ever saved. RAR file password lost
From the above cases, we can see that RAR file cannot be opened because of password forgot or lost. So how can we find RAR forgotten or lost password?

First, try to find RAR password in RAR archive or from where you got.


If your RAR archive is gotten from Internet, turn back to where you got it, probably password is provided there, but you have never noticed. Or RAR password is saved in a text document of the folder you downloaded. It is there all the time but never opened. So why not first check the RAR archive carefully or website you receive the RAR file?

If RAR password cannot be found with above tries, then it should be found with other more effective ways or tools, such as RAR Password Genius. You won’t have to consider anything, just need to prepare RAR archive and RAR Password Genius. And follow steps below to do.

Second, find RAR password after forgot or lost with effective RAR Password Genius.


Step 1: Run RAR Password Genius after successful installation on computer.


When you take cost into consideration, you had better choose trial or full version according to the possible RAR password. Trial version is free, and it supports no more than 3-characters password. Full version should be paid, but it supports any forgotten RAR password find regardless of password length or complexity.

run rar password finder to find rar password

Step 2: Add encrypted RAR archive to RAR password finder tool.


With Open button on toolbar, or File - Open File menu, you can easily browse all your computer hard drive and look for RAR archive you want to open. When you see it, select it and add it to rar password finder, RAR Password Genius. If there is no problem, it should be in Encrypted File box.

add encrypted rar archive to rar password finder

Step 3: Choose recovery method to find RAR password.


In RAR Password Genius, there are four password recovery methods in all. Everyone has its features. Therefore, before you make password recovery settings for recovery method you choose, think about which one is better for finding RAR archive password. Select it from drop-down list of "Type of attack".

password recovery settings to find rar password

At last, click "Start" button to find forgotten RAR password.

find rar password after forgot or lost

Related Articles: