January 19, 2014

How to Login into Windows Computer with Default Administrator

This following passage is intended to introduce simple ways to access Windows XP/Vista/7/8/8.1 with admin privileges and rights when you have password protected login user accounts or you have forgotten Windows login password.

One: How to login into Windows XP with default blank administrator password


Steps to access Windows XP with default administrator
  1. Restart your computer
  2. Press F8 before the Windows boot screen appears. Do not press F5 as used on the NT/9x versions of Windows. You will be prompted with a boot options menu.
  3. Select the “Start Windows in Safe Mode” option.Windows “Welcome” screen appears only with 640x480 resolution.
    You will not be able to change this mode even in Display options, while Windows is running in Safe Mode.
  4. Find the icon for the administrator user.
  5. The Safe Mode Windows screen will display some other users on your system.
    Login as the administrator.
  6. Press Yes at the prompt asking if you would like to continue using Safe Mode.
  7. Open command prompt. Click Start – Run, and type in “cmd” and press Enter. Command Prompt window appears and it allows you to manage files and change settings on your computer without restricts.
  8. Change the password for administrator.
  9. Type command: net user <user name> <user password>.
  10. Press Enter and administrator <user name> password would be changed to be <user password>.
  11. Exit command shell and locked out of the administrative account. Reboot computer and login into Windows XP again with it, now type in new password you just set and press Enter.

Two: How to login into Windows 7/Vista with default administrator password?


Windows 7 built-in administrator has unrestricted access right on computer. But it is not prompted by UAC by default to provide confirmation before allowed to make any changes that require elevated administrator permissions since it is an elevated account. So you have to enable Windows 7 built-in administrator  first in Local Users and Groups or Command Prompt, Local Security Policy, System Recovery (WinRE) at Boot.

1. Remove all floppy disk, CDs, and DVDs from your computer and restart your computer.
Click the Start button, click the arrow next to the Shut Down/Lock (Windows Vista) button, and then click Restart.

2. Do one of the following:
  • If your computer has a single operating system installed, press and hold the F8 key as your computer restarts. You need to press F8 before the Windows logo appears. If the Windows logo appears, you'll need to try again by waiting until the Windows logon prompt appears, and then shutting down and restarting your computer.
  • If your computer has more than one operating system, use the arrow keys to highlight the operating system you want to start in safe mode, and then press F8.
3.  On the Advanced Boot Options screen, use the arrow keys to highlight the safe mode option you want, and then press Enter. For more information about options, see Advanced startup options (including safe mode).

4.  Log on to your computer with a user account that has administrator rights.
When your computer is in safe mode, you'll see the words Safe Mode in the corners of your monitor. To exit safe mode, restart your computer and let Windows start normally.

Three: How to login into Windows 8/8.1 with default admin password


By default, the local administrator in Windows 8 is disabled. So if you want to login into Windows 8/8.1 computers with default administrator account, you have to enable Windows 8/8.1 built-in administrator in Command Prompt, Command Prompt at Boot, Local Users and Groups, Local Security Policy etc.
  1. Restart Windows 8/8.1 computer.
  2. On Windows logon screen, if you couldn’t see administrator, click “back arrow” button to select another user account. Administrator can be found there.
  3. Click it to choose administrator and login with it.
Once if you have set password for default administrator and forgotten or lost its password, the above ways would not help you to access Windows computer. You need other ways to bypass Windows password to login or reset Windows password before logon Windows.


Related passages or videos:

January 15, 2014

How to Recover Different Kinds of Deleted or Damaged Data


There are different kinds of data stored on computer or other devices. Because of incorrect or careless operation on computer, or device damage, or floppy disk and optical disk unable to read and write, these data probably would lose or be damaged or deleted. How to recover deleted or damaged data on computer and different kinds of devices?

Situation 1: Recover damaged system partition table 


Sometimes MBR in hard disk or partition table would be destroyed because of virus or wrong computer operation. System partition table damage leads to that Windows couldn't boot from hard disk, even couldn't access hard disk after computer boot from floppy disk.

The way to solve this partition table damage problem is so many, now suggest you how to rebuilt system partition table with KV3000.

Boot computer from floppy disk with KV3000 and check whether hard disk partition is normal.
And then do following prompting messages after it checks out problems.

Situation 2: Recover file or data deleted accidently 


As soon as we find we have deleted file or data on computer accidentally, and we deleted them with "Delete" button, we still could restore them to original location from recycle bin.

If we have deleted them with "Shift + Delete" button, or we find file deleted after recycle bin is cleared, only program or software could help us to recover them.

Why software could recover deleted file?
This is because Windows system just only makes a mark for deleted files but not deletes them actually. So they are still saved in hard disk until they are covered with new files.


Situation 3: Recover file or data formatted carelessly 


Format is usually used in computer operation. But sometimes because choose the wrong drive letter, and format other disk partition, but actual data on computer hard disk has not been cleared, only FAT table rewritten. Most of file data are not destroyed, so lots of hard disk data still could be recovered.
The easiest method is to turn your computer to run in DOS, and type in "unformat x:". This command would recover formatted disk partition.

But even though this command could recover all of files, the hierarchical structure of the directory would lose. And not all of computer users are familiar with the command. So now suggest you using EasyRecovery Pro to recover data for formatted disk partition.

Situation 4: Retrieve data after cloning reduction system accidentally 


Generally, we would save the image file with Ghost for disk partition where system is installed, in order to restore system to previous status when system is destroyed. But sometimes we probably would cover system section not system region when we restore Windows system. For example, Windows is installed in C:, but we restore image file into D:. Or some hard disk is set to restore to all of hard disk default. So after we restore Windows system, only one disk C: is available.

At this time, how to recover deleted data or file in our computer?
  • If you are confused with the first situation, take EasyRecovery Pro to use, which will help you recover data in Windows computer.
  • If you meet the second situation, it is a little difficult, now use Final Data to retrieve computer data and file.
Note: When we restore Windows system, we have to pay attention to that not only choosing the right drive letter, but also whether all the disk partitions are recognized as one disk partition default when restore optical drive. If this happens, don’t use optical drive. Besides, don't save important data in disk partition where Windows system is installed, in purpose of not preventing them from being covered. 

Situation 5: Recover data on disk that can't read and write 


1. Recover data on floppy disk 
If the data in floppy disk are only deleted, we could use the methods introduced in Situation 2. If there are other reasons leading to floppy disk unable to read and write, follow methods below.

1-1 Recover floppy disk data when software track is damaged.
We know that when partition table, file allocation table or track is damaged, we still could access disk, but read and write data on disk couldn’t be finished. Now use NDD to check and recover floppy disk.

1-2 Data recovery when floppy disk shows it is not unformatted
This always happens because of track zero damaged. But only HD-COPY can be used, the problem will be solved.

2. Recover data on optical disk in capable of read/write
Maybe most of us have such experience. When computer is reading an optical disk with information, CD-ROM is working all the time. But after long time, a prompting window pops up told us that optical disk couldn't be read. Even though this happens and it makes you angry, look for BadCopy Pro to help you please.

BadCopy Pro not only could read and recover damaged data on hard disk, optical disk and floppy disk, but also could retrieve file and pictures on ZIP drive and Flash/CF/Smart Media. And it is easy-to-use, so just follow operation wizard to do. 

Related information:

Principles of Hard Disk Data/File Storage and Format


Why we still could restore or retrieve deleted file or data in computer, including file and data you delete or format accidently or because of system partition damage, cloning reduction system or disk data unable to read and write? Please follow and read the principles of hard disk data and file storage, hard disk format to get answers.

1. How to read file in hard disk?

Windows operational system reads file information from directory, including file name, file name extension, file size, modification date and cluster number of first cluster of file in data zone. Now we suppose the first cluster is 0023. Windows will read data from cluster 0023. And find 0023 unit in FAT. If it reads the ending mark, it means the file has been read completely. If not, save the next cluster number of data until Windows finds file ending mark.

2. How to write file in hard disk?

When we prepare to save files in computer, Windows operational system will find an empty zone in DIR to write down file name, file size and creation date etc information. And find empty zone to save file in Data zone. At the same time, write the first cluster of Data zone into DIR zone. Other operations are similar to the file read in hard disk.

3. How to delete file?

When we are going to delete file or data in computer, Win 9X system just change the first character of file in directory and instead it of E5, not delete it from computer completely.

4. How to format hard disk?

Hard disk only could be used after disk partition, disk format and Windows operational system installation are finished. The complete disk data includes five parts, MBR, DBR, FAT, DIR and DATA. There is only one MBR, but other parts could increase following the increasing of partition.
Hard disk format program only rewrites FAT table and modify MBR and OBR when we format disk. Many data on DATA zone have not been changed. This is the reason why hard disk could be recovered.

From the principles of disk format and data deletion, we know data could be recovered if we find the starting location of file. But please pay attention to that you have not covered this file before data recovery.

Related Articles:

January 12, 2014

How to Partition Disk for Windows 8 with Disk Management


Maybe as soon as you hear partition disk in computer, you would feel it must be very difficult for a computer novice. But actually, it is not as difficult as you think. For example, in Windows 7/8 computer, disk partition could be completed with hard disk utility that Windows they provide. And disk partition becomes easy and even you just begin to use computer now, you could partition hard disk for Windows 8 with Disk Management following introduction below.

Step 1: In Win 8 desktop, press Win + X to open Windows 8 system menu. Choose Disk Management option. And then you could enter Win 8 hard disk management.

windows 8 disk management create new disk partition

Step 2: We could see the details of Win 8 computer hard disk partition. Now we can choose one disk whose capacity and free disk is larger. Select and right-click it to choose “Shrink Volume”. In this passage, we take C: disk as example.

windows 8 disk managment shrink volume

Step 3: Now this is the key step of Windows 8 partition disk. We should type in the amount of space to shrink based on the available space to shrink and our need.   

For example, if we want to create one disk with 1G capacity, type in “1024” in “Enter the amount of space to shrink in MB” box. And then click “Shrink”.

set new win 8 disk partition size
After volume shrink, we would find there is one more available disk. But we find it still could not be used as usual like other disk partition now. Go on to the following to finish Win 8 partition disk.

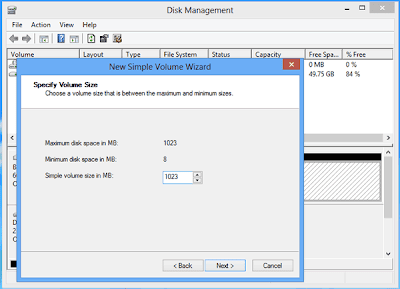
Step 4: Right click the new disk partition and choose “New Simple Volume”. Type in disk space amount and follow “New Simple Volume Wizard” to create new disk partition.

new simple volume creation wizard

The whole process to create new simple volume: 
Choose new partition space amount – Assign a new drive letter – Choose file system for this volume – Click “Finish”

4-1 Choose new partition space amount: Specify Volume Size
specify volume size in windows 8

4-2 Assign a new drive letter for new disk: Assign Drive Letter of Path

assign drive letter or path for new disk

 4-3 Choose file system for this volume and then format partition:


4-4 Click "Finish" button to complete creating new disk partition.

finish windows 8 new disk partitinn

Related Articles: