January 20, 2021

How to Fix iPhone Grey Screen

 My iPhone 7 screen suddenly goes gray. No matter what I do, it does not make responding. How can  I do to get iPhone 7 out of grey screen?”

The iPhone grey screen can lead to the death of an iPhone so it is also called the iPhone grey screen of death. When your iPhone screen turns gray, what you can do to get out of the grey mode? Read this article and you can get the answer.

how to fix iPhone grey screen

Way 1: Force Restart iPhone

When the iPhone fails to turn on and displays a grey screen, the first action you should do is to force restart the iPhone to check whether it works or not:

For the iPhone 8 and above users, you can press and quickly release the volume up button and then do the same to the volume down button. After that, press and hold the side button until you see the Apple logo.

If you are using iPhone 7, you can press and hold both the volume down button and the Sleep/Wake button at the same time until you see the Apple logo. After that, release the buttons.

For iPhone 6 and earlier iPhones, you can press and hold the Sleep/Wake button and Home button until the Apple logo appears.

force restart iPhone

Way 2: Try to restore iPhone in iTunes

When your iPhone screen is gray, you can take iTunes into considering solving the issue. It should be notice that all information and settings on iTunes will be deleted if you choose to restore the iPhone in iTunes with the following procedure:

Step 1: Launch iTunes on your computer and then connect the iPhone with grey screen to the computer.

Step 2: After iTunes detects the iPhone, you can click the icon near the top left of the iTunes to enter your iPhone interface. After that, click Summary on the left panel.

Step 3: On the right panel, click Restore iPhone and then it will pop out a box that asks for your confirmation again. Click Restore to continue.

Step 4: Then, you just need to wait for iTunes to download the software firmware for your iPhone and then restore it to factory settings so that the iPhone grey screen can be fixed.


restore iPhone in iTunes

Way 3: Fix iPhone Grey Screen with iSunshare iOS Repair Genius

If your iPhone is stuck on the grey screen and you cannot turn it on by all possible means, there could be an error in the iOS system. You can use iOS system recovery software, such as iSunshare iOS Repair Genius, to fix the iPhone grey screen and then get iPhone back to normal.

Step 1: Download and install iSunshare iOS Repair Genius on your Windows computer. To enjoy the full functionality of this software, you need to purchase the full version.

Step 2: Launch the software and then choose the Standard Mode.

choose the Standard Mode

Step 3: Next, click the Start button and then connect the iPhone to your computer.

click the Start button

Step 4: After that, click the Next button.

click the Next button

Step 5: Check your iPhone iOS version and the model version in this interface and then click the Download button to get the firmware package for the iPhone. After downloading, the software will start o verify the firmware.

download the firmware package

Step 6: When the firmware has been verified successfully, you will go to the repair window. By clicking the Repair button, iSunshare iOS Repair Genius will automatically fix your iPhone and you should make the iPhone connected during this process.

click the Repair button

In the end, your iPhone will be repaired and there will not be data loss. You can check the iPhone is rebooted and enter the screen lock interface if you have set the screen password.

Related Articles:

  1. 5 Effective Solutions to Fix iPhone White Screen of Death
  2. How to Fix iPhone Screen Goes Black Randomly
  3. Fixed: iTunes Stuck on Waiting for iPhone
  4. 8 Easy Methods to Fix iPhone Keeps Restarting Itself  


December 29, 2020

5 Effective Solutions to Fix iPhone White Screen of Death


“When I tried to update my iPhone 11 from iOS 13 to iOS 14, there was something wrong with my iPhone. I set it aside during the upgrade, and when I took my iPhone again, I found it was stuck on white screen of death. I didn't know what happened. I had tried lots of methods to rescue it but none of them worked. What should I do?”

iPhone white screen of death is a very common and vexed system problem of iOS devices and there are various kinds of reasons for this problem. In this post, you can learn about the cause of iPhone white screen of death and five effective solutions to fix this problem. Even if you are a noob, you can also repair your iPhone with your own hands like a technician after reading this post.

  • Some common causes of iPhone White Screen of Death
  • Solution 1: Hard reset your iPhone
  • Solution 2: Check if Screen Magnification is on
  • Solution 3: The best way to fix iPhone white screen of death without data loss
  • Solution 4: Restore iPhone with Recovery or DFU Mode by iTunes
  • Solution 5: Contact Apple Support

fix iphone white screen of death

Some common causes of iPhone White Screen of Death

1. iOS update failed

This is the main reason for Apple's white screen. Although updating iOS can fix some bugs, the existence of certain conflicts may cause the system fail to update and white screen of death.

2. Software upgrade failed

Sometimes the issue of white screen of death occurs after software upgrade. Some major software may be incompatible with the system after updating.

3. Jailbreak issue

Jailbreak refers to privilege escalation on an Apple device to remove software restrictions. However, if you use some unreliable tool to jailbreak your iPhone, it may fail to jailbreak and damage iOS resulting in iPhone white screen of death.

4. Hardware problem

If iPhone white screen of death appears after it is physically or water damaged, it is likely that one of iPhone components has been broken. So, the iPhone cannot work normally.

7 Effective Solutions to Fix iPhone White Screen of Death

Solution 1: Hard reset your iPhone

When your device encounters a problem, the first choice for most people is to restart it. However, a general restart will not work in most cases. So, you can try a hard restart to fix the issue of iPhone white screen of death. Here’s how to hard reset iPhone of different versions.

iPhone 6 and below

1.      Hold down the Power and Home buttons at the same time.

2.      Keep holding both buttons until the screen turns black and you see the Apple logo.

3.      When the phone goes off, wait for 30 seconds before powering it back on.

iPhone 7

1.      Hold down the Power and Volume Down buttons at the same time.

2.      Keep holding both buttons until the screen turns black and you see the Apple logo.

3.      When the phone goes off, wait for 30 seconds before powering it back on.

iPhone 8 and above

1.      Hold down the Volume Up button, then release it.

2.      Hold down the Volume Down button, then release it.

3.      Press the Power button until the Apple logo appears before releasing it.

Solution 2: Check if Screen Magnification is on

Sometimes, there is a chance that you may turn on Screen Magnification function by accident. In this case, you may be zoomed super close in on something white which makes it look like a white screen. Hence, to fix it, you can follow the steps below.

Steps: Go to Settings > General > Accessibility > Zoom > Off.

screen magnification


Solution 3: The best way to fix iPhone white screen of death without data loss

The best way to fix iPhone white screen of death is to use a powerful tool named iSunshare iOS Repair Genius. It is a powerful and easy-to-use ios repair tool that enables you to fix most of common system issues like white screen of death without any data loss. Here’s a full guide on how to use iOS Repair Genius to fix the problem of white screen of death.

Step 1: Download and install this app on your computer. Open this app and connect your iPhone to computer.

Step 2: Select Standard Mode to fix your iPhone without data loss.

select standard mode

Step 3: Click Start button to continue.

start

Step 4: Make sure that your iPhone is connected to your pc and click Next button to continue.

click next

Notes: If the app can’t detect your iPhone, you need to put it in DFU Mode or Recovery Mode. Just follow the guide on the interface.

Step 5: Click Download button to download a firmware package. You can click Select button to choose the location to store firmware package.

download firmware

Notes: On the bottom of interface, you can also click Copy button to download it in a browser and then click Select button to import it to app.

download firmware in browser

Step 6: Wait for the application to verify the firmware, then click Repair button to start repairing.

repairing

Step 7: It may take some time to wait. Once the process of repair is done, the app will prompt you that the device has been repaired successfully. Click OK to close the window.

repair successfully

Finally, the issue of white screen of death has been solved and your iPhone can work normally again. If not, you can try to fix it with the other repair mode of this app (Advanced Mode). But it will factory reset your iPhone and all the data will be erased.

Solution 4: Restore iPhone with Recovery or DFU Mode by iTunes

When your iPhone is stuck on white screen of death, you can restore it to get it back to normal. However, all the data will be erased. If you don’t care about the data, follow the steps below to fix your device.

Step 1: Open iTunes and connect your iPhone to computer via USB cable.

Step 2: Put your iPhone into Recovery Mode or DFU Mode. You can try the Recovery Mode first and then the DFU Mode. 

Step 3: If you put your device into DFU Mode, you will be asked to restore your iPhone, click OK button to continue.

restore iphone with dfu mode

 Step 4: If you choose to put your device into Recovery Mode, there will be two buttons on the pop-up window, select Restore button and then wait for a while util the whole process finishes.

restore iphone with recovery mode

Step 5: Finally, when iTunes finishes restoring, your iPhone will restart automatically, your iPhone comes back to normal.

Solution 5: Contact Apple Support

If all the ways mentioned above are not workable, it's probably a hardware problem that causes iPhone white screen of death. In this case, you need to contact Apple Support for help. They can offer the best support options to help you solve all kinds of hardware issues.


November 17, 2020

5 Easy Ways to Recover a Corrupted PowerPoint PPTX File


When you are going to open the PowerPoint presentation and make a preparation for a business, there is a message pop out that tells you the pptx.file cannot be opened because there is some error in the content or it is corrupted, how can you do to recover the corrupted PowerPoint file? You can take the following 5 methods as a reference to open the corrupted PPTX file.

  •  Way 1: Change the Location of Your PPTX Presentation 
  •  Way 2: Add Corrupted Slides into a New PowerPoint File 
  •  Way 3: Try to Open the PPTX File in Safe Mode 
  •  Way 4: Open and Repair the Corrupted PPTX 
  •  Way 5: Recover the Corrupted PowerPoint File with PowerPoint Repair Genius


recover corrupted PPTX file

Way 1: Change the Location of Your PPTX Presentation

 Why we need to change the location of your PowerPoint presentation that cannot be opened? As we know, when there is an error in the hard disk, you will probably get into the trouble of opening the files in it. So, taking this into consideration, you can move the PPTX file to another location, such as from hard disk 1 to hard disk 2, from internal disk to external disk, and from removable drive to internal hard disk.

How to change the location of the corrupted PPTX file? So easy! Just go to where your PowerPoint presentation lies and then copy the presentation. After that, navigate to the destination location and then paste the presentation. Finally, open the PPTX file again and check whether the error gets solved or not. If not, keep on reading next solution.

Way 2: Add Corrupted Slides into a New PowerPoint File

Step 1: Launch the Microsoft PowerPoint program and then you will enter a new and blank PPTX file. Click the Home button and then click the arrow of the New Slide option. After that, choose Reuse Slides from the drop-down menu.

choose Reuse Slides

Step 2: Click the Browse button and then choose Browse File.  Then choose your corrupted PPTX file and click the Open button.

click Browse Files


Step 3: If it successfully recovers your slides, right-click any slide and select the Insert All Slides option. 

click Insert all slides


If it pops out the following window, it means that it fails to recover your content. You need to try other solutions.

could not open the file

Way 3: Try to Open the PPTX File in Safe Mode

 The corruption of your PPTX file might result from the add-ins.  You can try to open the corrupted PowerPoint PPTX file in safe mode to get this issue solved.

Step 1: Press Win + R key on your keyboard and you will see the Run dialog box. Then enter powerpnt.exe /safe and press Enter key. After that, you will start MS PowerPoint in safe mode.

open PPTX in safe mode

Step 2: Click File > Open and then select the corrupted PPTX file to open.

click Open

Step 3: If you make it open successfully, the reason for your PPTX file corruption is clear. You need to reinstall Microsoft PowerPoint to prevent this from happening again. If you fail to open the file and still get the error message, you can go ahead to read another solution.

Way 4: Open and Repair the Corrupted PPTX

Microsoft PowerPoint has the built-in repair tool that helps users to open and repair the corrupted presentation. You can have a try.

First of all, you can open MS PowerPoint program and then click the File > Open. Then navigate to the corrupted PPTX file and select it. Finally, click the arrow behind Open button and choose Open and Repair from the menu.  After that, you can just wait for the result.


select Open and Repair


Way 5: Recover the Corrupted PowerPoint File with PowerPoint Repair Genius

If you try all ways above and none of them can help, you can use the professional PowerPoint repair tool—iSunshare PowerPoint Repair Genius to repair the corrupted PPTX file.  This software can help you to open and repair the corrupted or damaged PPTX file in minutes which will not change your presentation structure and formatting.

Step 1: Download and install iSunshare PowerPoint Repair Genius on your computer.


install iSunshare PowerPoint Repair Genius

Step 2: Close the MS PowerPoint program and then run iSunshare PowerPoint Repair Genius. After that, click the Open button to add your PPTX file. When it is added, click the Recover button.


recover corrupted pptx file

Step 3: In no time, the software will start repairing your PowerPoint presentation.


pptx file is repairing

Step 4: When the repairing ends, you will get the notification. Click the OK button and then click the Save button to save the repaired PPTX file into your local computer. You can decide where to save the repaired file.


save the restored PPTX file

Step 5:  In the end, you can select to open and view the repaired content when it is saved successfully.

save successfully

Related Articles:

  1. Solved-- Cannot Open PPTX File in PowerPoint 2010/2013/2016
  2. Fixed: PowerPoint Found a Problem with Content
  3. How to Fix a Corrupted MS PowerPoint Presentation


November 16, 2020

How to Encrypt A USB Flash Drive in Windows 10 – Make It Safer

For more security and privacy, it is highly advisable to encrypt a USB flash drive to prevent any unpredictable and unauthorized access. In this article, we will share with you several easy and effective methods to encrypt a USB flash drive in Windows 10.

how to encrypt usb flash drive in windows 10

Way 1: Encrypt USB flash drive with BitLocker

If you want to encrypt USB flash drive, BitLocker Drive Encryption is your first choice. As a Windows built-in encryption tool, BitLocker Drive Encryption can securely encrypt your data on USB flash drive with industry-standard AES encryption, which is very trustworthy. iSunshare BitLocker Genius for Windows is an assistant tool that can help you encrypt USB flash drive with BitLocker more conveniently and intuitively. The following guide is about how to use this tool to encrypt USB flash drive with BitLocker in ease.

Step 1: Download and install this tool on your computer and insert a pen drive into your computer.

Step 2: Launch this tool. On the interface, right-click the USB drive and select Turn on BitLocker option.

turn on bitlocker

Step 3: Type and confirm a password and then click save to file button to back up a .txt file as recovery key.

save a recovery key

Step 4: Then choose a location to save the new recovery key file and click Save button.

choose where to save recovery key

Step 5: Click Encrypt button to start encrypting. Wait for a while until a window pops up prompting that the encryption is competed.

start encrypting

Step 6: Right-click the hard drive and select Lock Drive option. Finally, the pen drive is encrypted with BitLocker Drive Encryption.

lock drive

Tips: This tool also allows you to change the password and remove BitLocker from USB flash drive. In addition, you can also lock or unlock BitLocker conveniently.

Way 2: Encrypt USB flash drive with iSunshare SafeUSB Genius

iSunshare SafeUSB Genius is the easy to use USB drive encryption software which can help Windows users to password protect USB drive without BitLocker. It offers a more direct way to set the password on USB drive. At the same time, it is secure to protect the USB data as all USB data are invisible after encryption. No one can know you have encrypted all USB data unless you tell them.

Step 1: Download and install this software on your PC and then plug the USB drive into the computer. 

Step 2: Choose your USB flash drive and then click the Encrypt button on the main interface.  

select USB drive and click Encrypt


Step 3: Enter the password twice and then hit on the Encrypt button on the bottom right corner.  

set a password to encrypt USB drive

Step 4: In no time, the software starts encrypting the USB flash drive. You will get the successful prompt soon.   

encrypted successfully

Way 3: Encrypt USB flash drive with DiskCryptor

DiskCryptor has been discontinued since 2014, but it’s still a good solution to encrypt USB flash drive. Its handiness and high speed of encryption are the reasons for recommending it. Follow the steps below to use DiskCryptor to encrypt the USB flash drive.

Step 1: Download and install it on your pc and insert USB flash drive into your pc.

Step 2: Launch it. Right-click the pen drive and select Encrypt option.

encrypt a usb flash drive

Step 3: On a popup window, choose an algorithm and wipe mode and then click Next button.

choose an algorithm

Step 4: Type and confirm a password and click OK button to start encrypting.

enter password

Step 5: Wait for a minute until the encryption process is finished.

wait-for encrypting

Way 4: Encrypt USB flash drive with VeraCrypt

VeraCrypt is a fork of TrueCrypt and is widely acknowledged its successor. It is also one of the most popular and secure disk encryption tools. Here is how to encrypt USB flash drive with VeraCrypt.

Step 1: Download and install this tool on your Windows computer. Then insert your USB drive into your pc

Step 2: Launch it and then click Create Volume button.

create volume

Step 3: Select Encrypt a non-system partition/drive option and then click Next button.

encrypt a non-system partition

Step 4: Select Standard VeraCrypt volume option and then click on Next button.

standard veracrypt volume

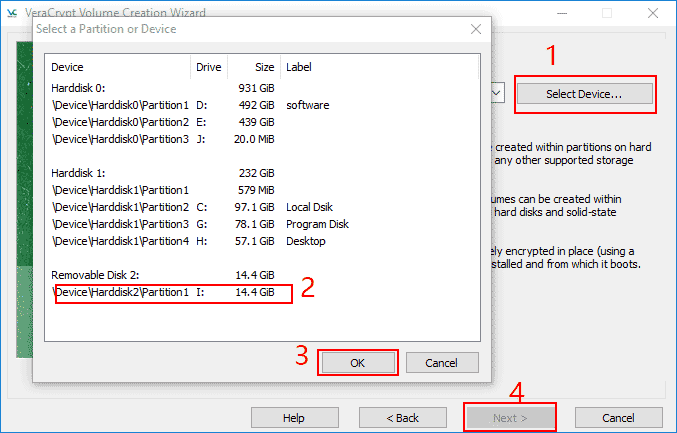
Step 5: Click Select Device button. On a new window, select the USB flash drive and click OK button. Then click Next button.

select device

Step 6: Choose a volume creation mode and click on Next button. If you have data stored on USB drive, choose Encrypt partition in place option. Otherwise, choose the other one.

choose a volume creation mode


Step 7: Choose an encryption and hash algorithm for the encryption and click Next. If you have no idea, it would better to leave the default settings.

choose an encryption and hash algorithm

Step 8: Type and confirm a password and click on Next button.

type password

Step 9: Finally, wait for a while until the interface prompts that the USB drive has been encrypted successfully.

encrypting


Relative Articles: