December 11, 2019

BitLocker for Mac-Access BitLocker Drive on Mac 10.15 Catalina

Apple recently released its new version Mac 10.15 Catalina with more intelligent features, such as the security feature. To protect the users’ privacy, they need to add applications to access data.  And for the BitLocker drive, it is not readable on Mac 10.15 Catalina by default. How can you access the BitLocker drive on Mac computer? You will get the solution here.

Bitlocker for Mac


Does BitLocker work on Mac?

By default, BitLocker encrypted drive only can be opened on Windows with the password and recovery key file. Mac does not provide the solution to enable this feature. And when you check in Disk Utility, the BitLocker drive is detected by the computer, but you are unable to open, view, edit or transfer files on it.

Is it possible to access BitLocker drive on Mac?

Yes, of course. There are some applications that can help you to make the BitLocker drive readable on Mac, especially the Mac 10.15 Catalina. But you need to make sure that the BitLocker drive is healthy and you have the password/recovery key. Otherwise, there is no way to help you with this issue.

About BitLocker for Mac application—BitLocker Genius

As a matter of fact, BitLocker for Mac application/software works as the agent that helps to build the connections between the encrypted drive and Mac, which enables you to mount Windows BitLocker encrypted drives on Mac. Considering the safety, the software supports you to open, read, and write the BitLocker encrypted drive after you enter the right passcode or recovery key. iSunshare BitLocker Genius is such a tool that helps you to open BitLocker protected external hard drives, USB pen drives, SD cards and etc.

How to Access BitLocker Drive on Mac 10.15 Catalina Computer

Step 1: Installed BitLocker Genius on the Mac computer. You can get it from here.

Step 2: Inject the BitLocker Drive into Mac.

Step 3: Click System Preferences and choose Security & Privacy > Privacy >Full Disk Access. Then you can click the plus sign to add iSunshare BitLocker Genius into the list to get authorization to access the data on Mac 10.15 Catalina.

make BitLocker Genius recognize BitLocker drive


Step 4: Launch BitLocker Genius and then select the drive with BitLocker mark and click the Unlock button on the navigation toolbar.

choose the BitLocker drive to unlock


Step 5: Next, you can choose to enter the password to unlock the drive. Or you can use the recovery key file to decrypt the drive. No matter which option you choose, you need to click the Mount button in the end.

two ways to unlock BitLocker drive on Mac


Step 6: After that, your BitLocker drive is unlocked and you can see it on the desktop. Now, it is convenient for you to read, edit and transfer files between drive and Mac.

BitLocker drive is accessible on Mac Catalina


Tips: If you want to disconnect the drive, you need to click the Eject button on the navigation toolbar. In this way, the BitLocker drive data will be protected safely. 

Related Articles:
  1. How to Open BitLocker Encrypted Drive in a Different Computer
  2. How to Password Protect a USB Flash Drive with BitLocker on Windows 10
  3. Solved-BitLocker is Missing from Control Panel in Windows 10 


December 4, 2019

How to Make Google Chrome Faster on Windows 10


Google Chrome is an important web browser widespread used by people all over the world because of its high browsing speed, quick response and user-friendly interface. However, many users complain that Google Chrome becomes slower than before over a period of time due to multiple reasons. Despite all this, you can make Google Chrome run faster by the following simple ways. Look at here and learn How to MakeGoogle Chrome Faster on Windows 10.

make google chrome faster


Way 1: Close Unnecessary Tabs from Google Chrome

If you open too many tabs, Google Chrome will be put under too much pressure and need to work harder than usual. Then the browsing speed will be slowed down. So in order to speed up Chrome browser, it is recommended to close some unnecessary tabs or the tabs that you don’t need any more to relax your Google Chrome. You just need to click the “X” button behind each tab and only open the tabs that you require.

Way 2: Update Google Chrome to the Latest Version

If you are running an older version of Google Chrome, it definitely won’t work as fast as that in a latest version. So if you want to make Chrome run faster, you’d better make sure that you’re using the latest version of Google. Normally Google Chrome automatically updates itself to the latest version in the background when you close and reopen your computer's browser. But just in case, you should have a check.

Step 1: Launch your Google Chrome, enter chrome://help in the search bar to go to Chrome help section.

Step 2: Then you can check for update. Google will detect whether an update is available or not. If it is available, Google will update itself to the latest version automatically. If you are told Google Chrome is up to date, it means that your Google Chrome has already been updated.

Step 3: Relaunch it to check if the browsing speed becomes faster than before or not.

check Google Chrome for update


Way 3: Turn Off or Remove Some Unwanted Extensions

What is Extension? Extensions refer to small programs which can be added to Chrome and let you do more. In order to improve Google Chrome performance and speed up page loading, you can turn off or delete some unwanted extensions from Google.

Step 1: Open Google Chrome on your computer.

Step 2: Go to the three dots at the top right of the interface and then click More tools>Extensions.

Step 3: Then you can choose to disable the extension or click the Remove button to delete unwanted extensions.

turn off extension


Way 4: Stop Unwanted Tasks from Task Manager

There may be many unwanted tasks running on your Google Chrome which occupies a lot of resources but you don’t know or you just ignore this point. This will also slow down your Google Chrome’s performance. You need to stop them to speed up your browser.

Open your Google Chrome, go to the three vertical dots>More tools> Task Manager, select the tasks that you want to stop, and then click End process.

stop unwanted tasks


Way 5: Use a Prediction Service to Load Pages More Quickly

There is another tip on how to speed up Google Chrome on Windows 10. That is to turn on network action predictions, which can make Google Chrome open webpages faster.

Step 1: Click the three vertical dots at the top right corner and then choose Settings.

Step 2: Expand Advanced in the left panel, select Privacy and security and turn on Use a prediction service to load pages more quickly.

use prediction service to load pages


Way 6: Clear Chrome Cache and Browsing Data

You need to regularly clear Chrome cache and browsing data to maintain a good performance. Here is the guidance:

Step 1: Enter chrome://settings/clearBrowserData with your browser.

Step 2: Then the window of “Clear browsing data” will pop up. You can set the Time range to All time to clear more data and then click Clear data.

clear chrome data


Step 3: Restart the Chrome to check the changes.

When you find your Google Chrome has slowed down, you can clean up computer to check if there is any harmful software on your computer and remove it in order to speed up your Chrome. And you can also choose to reset your browser to the default settings to fix the issue. No matter which way you select, first of all launch your Google Chrome, click More (the three vertical dots)>Settings> Advanced>Reset and clean up. And then go on Way 7 and Way 8.

Way 7: Find and Remove Harmful Software on Your Computer

To find and remove harmful software for your computer, you should:


Step 1: Under the section of Reset and clean up, choose Clean up computer.

choose clean up computer


Step 2: Click the Find button so that Chrome can find harmful software on your computer and remove it.

click the Find button


Step 3: Then Google Chrome will start to check for harmful software for your computer. If there is no malware, you will be prompted “No harmful software found”. If some malwares are found out, click Remove to remove them.

Way 8: Return Google Chrome to the Default Settings

To restore Google Chrome settings to their original defaults, you should:

Step 1: Click the option of Restore settings to their original defaults under the part of Reset and clean up.

restore settings to their original defaults


Step 2: Click Reset settings to confirm to reset the Google Chrome.

click Reset settings


Related Articles:
  1. How to Lock Google Search Engine Home Page
  2. 6 Ways to Speed up Google Chrome
  3. How to Fix Google Chrome Not Responding in Windows 10
  4. Fixed-Chrome Sync Bookmarks Not Working 


November 17, 2019

How to Change Apple ID on iPhone without Password

What’s Apple ID? It is the identity for you to use any app or service developed by Apple, such as iCloud, iTunes, App Store on iPhone. To activate your iPhone, you need to enter the right password and Apple ID account. What if you want to get rid of the previous Apple ID on your second-hand iPhone, how to do? How to change the Apple ID on iPhone without password? Here we list 2 solutions for this issue.

Solution 1: Change Apple ID on iPhone without Password with third-party tool

With the password, you cannot sign out of the old Apple ID and register your new one. But the iPhone password unlock software can help you do this. iSunshare iPhone Passcode Genius is one such tool that helps to remove Apple ID from iPhone without the password. It can erase all the related data with that Apple ID and give you a fresh iPhone.  This software supports almost all iPhone: iPhone 4/5/6/7/8/X series phones.


Step 1: Launch iPhone Passcode Genius and connect iPhone to your Windows PC. Remember, you should download and install iTunes on the computer before.

Step 2: Tap the screen passcode and choose the “Trust” option on your iPhone.

Step 3: On iPhone Passcode Genius interface, choose “Remove Apple ID” from the three modules.

select remove Apple ID


Step 4: Then, you will be displayed the Remove Apple ID interface.  You just need to click the Start button.

click the Start button


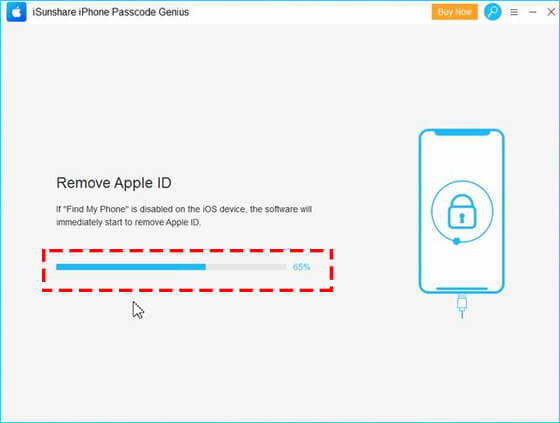
If the Find My iPhone function is disabled by the previous owner, you will get the Apple ID deleted immediately.

remove Apple ID directly


If Find My iPhone function is still enabled on iOS 11.4 or older version, you should take your iPhone and access Settings > General> Reset > Reset All Settings.  After that,  iPhone Passcode Genius will work for you to remove the used Apple ID. 

remove Apple ID after changing the settings


After a few minutes, you will get the successful information. Next, you can disconnect the iPhone set your new Apple ID to the iPhone, and get it activated.

remove Apple ID successfully

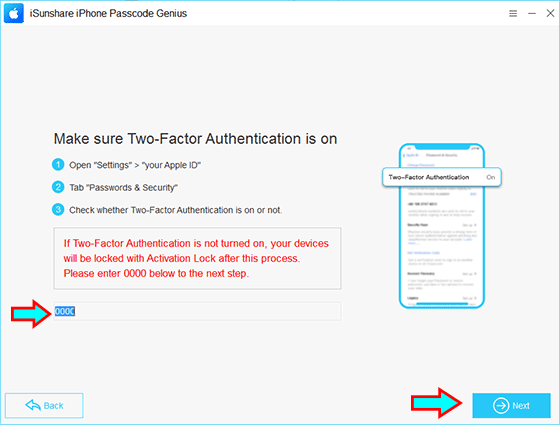
If your iPhone OS is 11.4 or later, you should enable Two-Factor Authentication and screen lock so that the Apple ID can be removed successfully. 

1. The software will ask you to enable the screen lock. Go to have a check and enter 0000. Click Next to proceed. 

make sure screen lock is on

2. Then repeat the same operation to make sure Two-Factor Authentication is on. 

make sure Two-Factor Authentication is on

3. After that, the software requires you to download the firmware package for your iPhone. Click Download and wait. 

download firmware

4. Now, you can click Remove to proceed. 

click Remove

When you see the successful message, click Done and get the operation to conduct on the iPhone.  Yes, you can now input the screen lock to remove the Apple ID on the Activation Lock screen. Thus, you can change to a new Apple ID after sign up. 

unlock Apple ID with screen passcode


Solution 2: Remove Apple ID by Entering Recovery Mode

You can reinstall iOS on your iPhone in recovery mode. But sometimes, you will get stuck in recovery mode. Think twice before you make use of this method.

Step 1: Turn off the iPhone and make it power off.

Step 2: Press the related button to make your iPhone enter recovery mode while connecting it to the PC.  You can refer to the images below to find the right button.

buttons to enter recovery mode for iPhones


Step 3: You will get a window on the computer soon. It tells you “There is a problem with the iPhone that requires it to be updated or restored”.  Click Restore and go ahead.

Click Restore option


Step 4: In the next window, it will remind you that this operation will cause the loss of iPhone data. Click the “Restore and Update” to continue.

click Restore and Update


Step 5: In the end, you will get the iPhone to be restored to the factory setting.  And it is a power cycle. After that, you can change the Apple ID to yours. 

iPhone is restored successfully


Related Articles:
  1. The Fast Way to Get Rid of iPhone Disabled without iTunes
  2. How to Remove Apple ID without Password from iPhone
  3. Solved - iTunes Could Not Restore iPhone Because of Password Was Incorrect


November 11, 2019

How to Disable Screen Time on iPhone iOS12 without Passcode


Screen time limitation prevents you from being addicted to your iPhone. But when you forgot the screen time passcode, how to disable/turn off/get rid of this restriction on iOS 12 iPhone? You can make it done with iSunshare iPhone Passcode Genius. Here you will get the step by step tutorial to remove screen time passcode.

disable screen time on iPhone iOS12 without passcode


About iSunshare iPhone Passcode Genius

This iPhone password remover helps users to get rid of the passcode forgotten issues with three modules: Unlock Lock Screen, Remove Apple ID, and Remove Screen Time Passcode. Besides, you can make good use of iPhone Passcode Genius to hard reset the iPhone.

As for the screen time passcode forgotten issues, iPhone Passcode Genius can help to remove the restriction password only on iOS 12 iPhone.  What’s more, there is no data loss during all processes.


Tutorial to turn off screen time on iPhone without passcode

Step 1: Get the latest iTunes installed on your Windows PC and connect your iPhone to the PC as well as make it trust the computer. Besides, download and install iSunshare iPhone Passcode Genius from the official website.

Step 2: Start the software and choose “Remove Screen Time Passcode”. Then you need to tap your screen passcode to turn on the screen.

click Remove Screen Time Passcode


Step 3: In this interface, you will view your iPhone device type. There is a Start button in the middle of the interface. You can click it to remove the screen time passcode instantly.

Click Start to remove screen time passcode


If the Find My iPhone function is turned on, you should disable it first.

disable Find My iPhone


Step 4: Wait for the process to end.  When it completes successfully, you will get the successful window. Then you remove the screen time password and can turn off the screen time easily.

remove time passcode process


External tips: How to turn off Screen Time with Password

If you have the password, it is much easier to turn off/ disable the screen time. You just need to access Settings and find the Screen Time option. Tap it and choose Turn Off Screen Time Passcode from the pop-up window. After that, you need to enter the password to make the screen time limitation removed.

turn off screen time passcode


Related Articles:
  1. iOS 12: How to Turn off Parental Controls on iPhone without Password
  2. Troubleshooting Guide - Touch ID Not Working on iPhone or iPad
  3. How to Unlock iPhone to Use USB Accessories If Forgot Password
  4. How to Unlock iPhone if You Forgot the Passcode


November 7, 2019

The Fast Way to Get Rid of iPhone Disabled without iTunes


“I entered several passcodes into the iPhone X and made it disabled now. No right passcode is known because it is my late father’s iPhone. How can I get rid of iPhone disabled without iTunes? I know nothing about this iPhone.”

get rid of disabled iPhone without iTunes


If the iPhone is disabled for the unknowing passcode, and you know nothing about the iPhone details (Just as the example the iPhone belongs to his late father), how to get rid of iPhone disabled? Of course, without iTunes, you cannot restore the iPhone to make it unlock. In this situation, you need to find the professional iPhone unlocking software for help.

iPhone Passcode Genius— Good Choice to Unlock Disabled iPhone

iPhone Passcode Genius is developed by iSunshare to help iPhone users remove the passcode in several situations. It is designed with the intuitive using interface so that everyone can make good use of it without technical skills.  It can be used to remove disabled iPhone passcode in iPhone 4/5/6/6s/7/7s/8/8s/X/XS/XR/XSMAX. Besides, you can also utilize this tool to remove the Apple ID and screen time passcode when you forgot the passcode.


Steps to unlock disabled iPhone without iTunes

First of all, although we do not use iTunes to restore the disabled iPhone, it is necessary to get the latest iTunes installed on the computer.

Step-1: Download iPhone Passcode Genius from iSunshare official website. Then double click to run the program and follow the instructions to install it on your computer.

install iPhone Passcode Genius


Step-2: Open the software and connect your disabled iPhone to the computer. After that, you will see three options on the home interface. In order to unlock the disabled iPhone, you should choose “Unlock Lock Screen”.

select Unlock Lock Screen


Step-3: On this interface, it lists several situations that you would need to unlock the lock screen. You can view it and then click the “Start” button.

Click Start


Step-4:  If your iPhone is not right connected, you will see the interface that tells you to make sure the iPhone is connected to PC.  You should connect your iPhone again and click “Next”.

Click Next


Step-5: Then you will go into the firmware download interface. Most people click “Download” to get the firmware package. If you have downloaded it before, you can click “Select” button to add it.

download firmware package for iPhone


Step-6: Next, you get the last step to click “Unlock”. After that, the software will remove the locks from your iPhone automatically, including the 4/6 digits passcode, Face ID and touch ID. You will get a new iPhone in the end.

Click Unlock


Related Articles:

  1. How Do I Remove an Apple ID from My iPhone
  2. I Forgot My Screen Time Password on iOS 12 iPhone-What to Do
  3. Top 3 Ways to Fix iPhone Locked up after Update
  4. How to Unlock iPhone If You Forgot the Passcode 


October 30, 2019

How to Unlock iPhone if You Forgot the Passcode


“My sister forgot her iPhone 7 Plus screen passcode and cannot use the phone. I search online and found there is no way to bypass iPhone locked screen without data loss. So, how to unlock forgotten password on iPhone?”

How to unlock iPhone if you forgot the passcode


Just as what you asked, you cannot find a way to unlock iPhone if you forgot the password with no data loss. When you cannot get into the disabled iPhone for entering the wrong passwords so many times, it is time to remove the forgotten passcode from the iPhone. How can you do that? Here we will share you two ways to unlock iPhone if you forgot the passcode.


Way 1: Bypass iPhone Locked Screen with iPhone Passcode Genius

iPhone Passcode Genius is the newly developed iPhone password tool that enables users to unlock iPhone with various locks. This tool is designed with the intuitive interface and users can remove the lock screen, Apple ID and screen time passcode instantly when they forgot the password.  No matter the iPhone is old, disabled, second-hand, and screen-broken or screen replacement, users can utilize this tool to have it unlocked.


Step-1: Run iSunshare iPhone Passcode Genius and select Unlock Lock Screen from the interface.

choose Unlock Lock Screen


Step-2: Build up the connection between the iPhone and your PC. Then click Start > Next in the coming interface.

Click Start to unlock iPhone


Step-3: After the software loads all your iPhone information, you need to download the firmware package online by clicking “Download”.  Or if you have downloaded this package on your computer, you can click “Select” to add it.

Get the firmware package


Step-4: After the verification, the software will guide you to the unlock interface. With a simple click on “Unlock”, you will be on the passcode removing process.


verifu success and click Unlock


Step-5: The software made your iPhone unlocked successfully. And you can set up new settings for iPhone as the data has been erased.

Unlock iPhone successfully


Way 2: Restore Forgotten Passcode iPhone via iTunes

If you have used iTunes to sync iPhone on the computer, you can restore iPhone with iTunes.

Step-1: Connect iPhone to the PC and run iTunes.

Step-2: In iTunes, click the iPhone icon and choose Summary at the left menu.

Step-3: Click “Restore” or "Restore iPhone" and follow the instructions to finish the process.

Notes:  The iPhone that has Find My iPhone turned on cannot be restored by iTunes.

restore iPhone via iTunes


Related Articles:
  1. 4 Ways to Unlock a Disabled iPhone without Passcode
  2. How to Unlock iPhone without Passcode or Siri
  3. How to Unlock a Second-Hand iPhone X without Passcode
  4. How to Recover iPhone 6 Lost Backup Password  


October 11, 2019

How to Copy/Clone Windows Operating System to New Hard Drive


I want to copy my Windows 7 operating system to a new hard drive. Although now Microsoft does not update Windows 7, I get used to it and want to continue using it in the new hard drive. Is it possible to clone all configurations to the new hard drive and make my PC boot from it?”

When we get used to the old computer with all applications installed, we prefer to keep using it. Yes, you can buy a hard drive with desirable storage space and copy all Windows system settings to it. Also, you can copy other data from the old hard drive to the new hard drive so that you get the same working environment after replacing the hard drive.

Everyone knows that it is impossible to move or transfer the Windows system by simply Ctrl + C and Ctrl + V. If you are going to copy/clone Windows operating system to a new hard drive, you had better download the Windows system clone software which has an intuitive interface and simple steps. iSunshare CloneGo is such the software which enables you to transfer Windows OS to new hard drive with few clicks.

clone Windows OS to new hard drive with CloneGo


How to Clone Windows OS to New Hard Drive

As the most important preparations, you need to download CloneGo on your computer and complete the installation process in advance.

Step 1: Launch CloneGo and specify C drive as the source target. And then select your new hard drive as the destination target. The C drive is the current Windows system partition on your computer.

select source partition and target partition

Step 2: You can check After Finished box if you have no time to wait for the cloning process. There are three options for you: Shutdown, Restart, and Hibernate. Choose the one you need. Or you can leave this option unchecked. 

set After Finished option


Step 3Click “Start” and you will get the notice to format the target disk. Click “Yes” to go ahead.

start copying Windows OS to new hard drive


Step 4: After the copy process is completed, you will get the successful inform. Then, you can reboot your computer form your new hard drive.

clone Windows system successfully

You can repeat these steps to clone other data partition from the old hard drive to new hard drive. After cloning, you can shut down the computer and remove the old hard drive. In the end, install the new hard drive into the computer. Or you can clone the whole disk to the new hard drive by using the Disk Clone function. 

Notice:
  1.          You need to initialize the new hard drive before running CloneGo.
  2.       The new hard drive should have larger space to receive the Windows system data.
  3.       If you want to clone all data from the old hard drive, it is better for you to add multiple volumes to the new hard drive as the copy operation will format the destination target.

Related Articles: