March 30, 2015

How to Personalize Windows 10 Lock Screen

Do you think default Windows 10 lock screen is what you want? Is it shown as you like?

If the answer isn’t sure, it’s time to personalize your Windows 10 lock screen with customized settings. In order to introduce more in details, we will talk about it in in two parts.

Part 1: Customize Windows 10 lock screen background


Generally, Windows 10 lock screen shows Windows default background. Do you want to customize your Windows 10 lock screen? Regardless of the default one, you can choose to display a picture you like, and Microsoft supplies several new background images for the lock screen.

Summary: Go to Settings - Personalization, you can switch from Windows Default to a custom picture or slideshow.

Step 1: Sign in Windows 10 with administrator. Click Start menu at the Windows left bottom side and choose Settings.

choose windows 10 settings

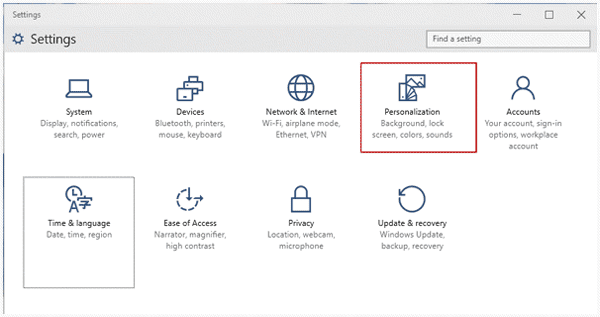
Step 2: Select Personalization in Settings window.

choose windows 10 personalization

Step 3: In Personalization window, you can see Windows default background on lock screen preview. Now if you want to customize Windows 10 lock screen with another picture or slideshow. Browse Background drop-down list and choose "Picture" or "Slideshow".  Then go on with following detailed introductions.

windows 10 background personalization

1. Customize Windows 10 lock screen with a picture

1-1 Select "Picture" from Background drop-down list.

customize windows 10 lock screen with picture

1-2 Several pictures will show under "Choose your picture". So just select one from them and picture will show in lock screen preview. Or if all of them don’t meet your requirements, click "Browse" button to select another image from other folders in Windows 10 computer.

2. Customize Windows 10 lock screen with slideshow: Enable alternate lock screen background

2-1 Select "Slideshow" in Background drop-down list.

customize windows 10 lock screen with slideshow

2-2 There will be a folder Pictures. Choose Pictures for slideshow and make more detailed settings by clicking "Advanced slideshow settings".

windows 10 advanced slideshow settings

Part 2: Add apps to show quick or detailed status on Windows 10 lock screen


In Windows 10 Personalization window, you also can see there is an option for choosing apps to show quick status and choose an app to display detailed status.

Step 1: Click app under "Choose an app to display detailed status". And you can see several apps in pop-up apps list, select one from them and it will be shown on lock screen with detailed settings.

add one app to display detailed status on windows 10

Step 2: Under "Choose apps to show quick status", if there have not been 7 apps, click "Add key" to select app you want to show quick status. Or if there have been 7 apps there, but you want to show other apps on Windows 10 lock screen, click the app you want to remove from app list and choose one you want to show instead of removed one. 

add windows 10 apps to show quick status

Related Articles:

March 24, 2015

How to Start Windows 10 in Safe Mode When Computer Locked or Not

Windows 10 safe mode is undoubtedly good pattern to boot Windows 10, especially when we encounter some problems about Windows systems. Now please learn how to start Windows 10 computer in safe mode when computer is available or locked.

How to start Windows 10 in safe mode when computer is available


1. When your Windows 10 computer is accessible, click Start and Power icon, then press and hold on Shift key, and click Restart at the same time.

restart accessible windows 10 in safe mode

2. As a new window screen appears, choose Troubleshoot, and then select Advanced options.

choose windows 10 troubleshoot

choose advanced options in windows 10 troubleshoot

3. Choose Startup Settings under "Advanced options".

choose startup settings for windows 10

4. In Startup Settings, you can see there are several options for you to change Windows startup settings when you reboot Windows 10 computer again. So now click Restart.

restart windows 10 to change windows options

5. Once you decide to restart Windows 10 with which option enabled or disabled, press corresponding number key to make it done. Now we are going to boot Windows 10 in safe mode. So press F4 and wait for Windows 10 starting in safe mode.

enable windows 10 safe mode to restart

Tips: When Windows 10 reboots and before entering Windows 10 in safe mode, logon screen still asks you to type password. 

login in windows 10 safe mode with user

Because computer is available, so just choose the available user and type password to login Windows 10 in safe mode. The following image shows Windows 10 safe mode.

enter windows 10 safe mode

How to start Windows 10 in safe mode when computer is locked


When Windows 10 password forgot and you are locked out of Windows 10, how can you boot Windows 10 in safe mode, in order to make full use of default administrator to reset Windows 10 forgotten password?

Actually, on Windows 10 logon screen, you can see Power button at the right bottom side, click it and select "Restart" button, at the same time, press and hold on Shift key.

start locked windows 10 in safe mode

Then Windows 10 will enter a new window, where you can choose "Troubleshoot - Advanced options". Following steps will be the same as starting Windows 10 in safe mode when computer is available.

The difference is that there is no available user for logon now when Windows 10 restarts and is going to safe mode if you are really locked out of Windows 10 computer. If you still cannot find a user to access computer, please take Windows 10 installation disc to free enable built-in administrator account on locked computer, or run Windows 10 Password Genius to create another administrator account or reset Windows 10 password for local/Microsoft account.


Once you have available login user, you will be able to successfully start Windows 10 in safe mode.


Is There Available Default Administrator for Windows 10 Logon

If you remember when we forgot password to login windows 8/7/vista/xp, built-in administrator is always used to login Windows computer in safe mode. Believe you would ask whether there would be also available default administrator for Windows 10.

Q 1: Is there default administrator available in Windows 10?

To be honest, there is default administrator for Windows 10, but it is not available default. If we want it available, we have to enable it by ourselves.


Until default administrator is enabled in Windows 10, we can see it on logon screen and choose it to login into Windows 10 without password.

Q 2: When Windows 10 default administrator is available?

When Windows 10 default administrator can be seen even if it is not enabled manually?

It is like previous Windows systems, default administrator is available when Windows 10 is in safe mode. From the point of view, there would be another way resetting Windows 10 password after Windows 10 administrator password forgot. This way is called reset Windows 10 password in safe mode with default administrator.

Q 3: How to make full use of Windows 10 default administrator?

As soon as Windows 10 default administrator is realized and is available, what can we make it do for us during Windows 10 computer use?
  1. Login Windows 10 in safe mode when other user accounts are locked.
  2. Run programs with admin privileges.
  3. Reset Windows 10 user password in safe mode.

March 16, 2015

How to Import Existing Access or SQL Database into Access

SQL Server and Access are undoubtedly two important database services. So import and export data between them are usual. In this passage, we will mainly talk about something about data import, for example, how to import access or sql database into Access.

Part 1: Import existing access database into new Access database


When you are using database in Microsoft Access 2000/2002/2003/2007/2010/2013 etc, you can import tables, queries, and macros from that database into a Microsoft Office Access 2007/2010/2013 database (.accdb). We also can say import data from MDB database file into ACCDB database file.

Step 1: Click the Microsoft Office button, and then click Open.

Step 2: In the Open dialog box, select and open the access database that you want to import the tables, queries, or macros into.

open access database in Access

Step 3: On the External Data tab, in the Import or Import & Link group, click Access.

select external data type access database

Step 4: Click Browse button to specify the source of access database in Get External Data window. Click OK.
specify imported access database location

Step 5: In Import Objects window, tab Tables, Queries, Forms, Reports, Macros and Modules. Select what you want to import into opening access database. Then click OK.

select objects from access database to import

To make additional settings, click Options to specify them.

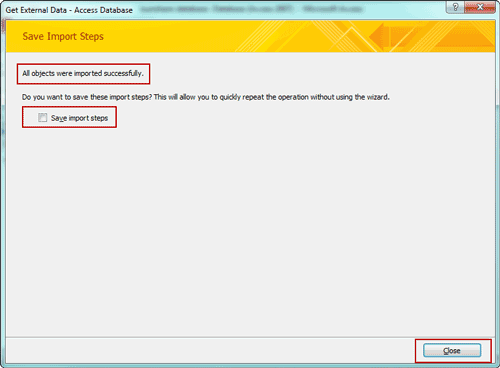
Step 6: You will instantly get a message "All objects were imported successfully".

import objects from access database into access successfully

Click Close directly or check "Save import steps" to save the process of importing access database into Access database. So you can follow the import steps to import data more quickly when you want to import access database again.

After that, you can open and edit import datasheet now in current access database.

import access database into access successfully


Part 2: Import SQL database into Access


Besides access database, there is no doubt that SQL Server database data also can be imported into Access desktop database or Access apps. Now please see how to import sql database into Access desktop database.

Step 1: Open Access desktop database you want to import SQL database in Microsoft Access.

Step 2: On External Data tab, click ODBC Database.

choose imported database type odbc
  
Step 3: When you see "Get External Data" wizard, check "Import the source data into a new table in the current database". Click OK.


Step 4: In pop-up Select Data Source window, if you can find .dsn file, select the file in the list. If not, it will be necessary to create a new .dsn file.

select sql data source

Follow introductions show how to create a new DSN file in details.

1. Click New and go to Create New Data Source.  

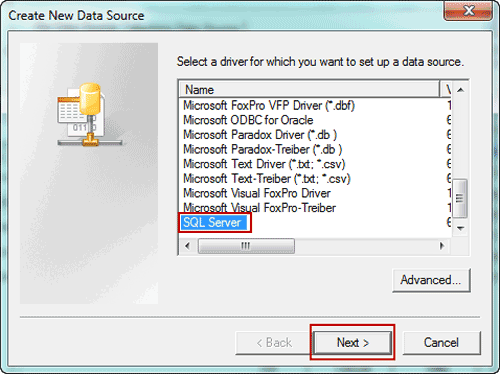
2. Select "SQL Server" in the driver list and click Next.

create new sql data source

3. Type a name for .dsn file and click Browse to save the file in computer.

save new sql data source file

4. Click Next, review the data source information, then click Finish to complete creation wizard.

confirm sql data source information

Then you can see a new dialog "Create a New Data Source to SQL Server". The "Description" is optional. But we have to set the SQL Server we want to connect to.

create an odbc data source to connect to SQL Server

5. Type the SQL Server or select one from Server drop-down list. Click Next.
6. Confirm the authenticity of the SQL Server login ID.
7. If you want to connect to a specific database, ensure that the Change the default database to check box is selected. Then select the database that you want to work with, and then click Next.
8. Click Finish.
9. Review the summary information and click Test Data Source.
10. Review the test results, and then click OK to close the dialog box.

Step 5: Click OK to close the Select Data Source dialog box.

Step 6: In Import Objects dialog box, tab Tables, and click each table or view what you want to import into Access database. Click OK.

Step 7: If the Select Unique Record Identifier dialog box appears, select the field or combination of fields that is unique for each row, and then click OK. If you are not sure, contact to the administrator of SQL Server database.

Step 8: Click Close under Save Import Steps in the Get External Data - ODBC Database dialog box. Access finishes the import operation and displays the new table or tables in the Navigation Pane.

Or check "Save import steps". If you plan to repeat the import operation later, you can check it and easily rerun the same import steps later.

Related Articles:

March 15, 2015

How to Import External Data into Access 2013 App or Desktop Database

While you want Access database referring to your important excel file, the introduction about importing external data into Access 2013 App or desktop database in this passage would tell you how to do. So whether you have such a problem, go on to read.
  • S1: Import external file into an Access 2013 app
  • S2: Import external data into Access 2013 desktop database

S1: Import external file into an Access 2013 app


Available external file type: Excel workbooks, ODBC data sources, text/CSV files, SharePoint lists, and other Access databases.

Preparation: Access 2013 has been installed and opened on your computer and imported files have been prepared on computer or connected storage devices.

Step 1: On the Add Tables page, you can import data from Excel workbooks, ODBC data resources, text/CSV files, SharePoint lists, and other Access databases.

Tips: You can see Add Tables page when creating a new custom app. But if you have already started an app, open it in Access, then click Home - Table.

Step 2: Near the bottom of the Add Tables page, click the type of data source you want to import, and follow the instructions in the Get External Data wizard.

Tips: Imported data is always added to new table with default List and Datasheet views.

S2: Import external data into Access 2013 desktop database


Imported data can be added to existing table. And sometimes, when you couldn’t import data directly into an app, you might be able to import it into a desktop database first, and then import desktop database table into the app.

For example: import external excel file into Access 2013 desktop database

Step 1: Open Access 2013. On the External Data tab, in the Import & Link group, click the file type you want to import.

choose external file type to import into access

Step 2: Follow the instructions in the Get External Data Wizard. For example, click "Browse" button next to "File name" box, to specify the source of the definition of the objects. Now we choose to import Excel file.

specify external data location

Step 3: Follow "Import Spreadsheet Wizard" to do.

3-1 Choose Show Worksheet you like and click Next
3-2 Check "First Row Contains Column Headings" and click Next
3-3 Set "Field Name" and "Data Type"
3-4 Set datasheet primary key
3-5 Set a name for imported Excel file in Access and click Finish
3-6 Exit "Import Spreadsheet Wizard"
or Save Excel import steps
Tips: "Save import steps" will make it confident to import excel file next time again into Access 2013, not needing to follow "Import Spreadsheet Wizard" to do step by step.

Step 4: External Excel file has been successfully imported into Access 2013.

external excel file data imported into access 2013 successfully

Summary:

The beginning of importing different external data into Access is the same. But it would be different after you choose the file type you want to import. For example, if you want to import SQL database into Access database, it would be more complex than importing Excel or access database file into Access.

Related Articles: