May 11, 2023

How to Transfer Windows 11/10 from One SSD to Another

 If your SSD is running out of space and you are going to replace it with a larger one, but you do not want to lose the original Windows OS settings and configurations, what can you do? You can directly transfer Windows 11/10 from one SSD to another without reinstalling.  In this article, you can learn an easy way to do that. 

transfer Windows OS from one SSD to another

Why do you need to upgrade Windows 11 to another SSD? 

When your system runs slowly or suddenly fails to work, you can consider migrating Windows OS to another SSD. We collect the reasons below: 

  1. The old SSD is running out of space. It takes a long time to startup. Also, there is no space to install more apps. 
  2. Windows OS runs slowly on the old SSD. 
  3. You want to upgrade the computer with a larger SSD to get a better experience. 

What to prepare before cloning Windows 11/10 operating system 

First of all, you should find the Windows cloning software to transfer Windows OS to SSD. iSunshare CloneGo is a more efficient tool for you to transfer OS from one SSD to another. After cloning, it keeps the system files and configurations on both SSDs.  To begin with cloning, you need to download it and install it on your Windows computer. 

Besides, you need to get the proper SSD.  As is known to all, SSD is cheaper now. You can buy a new one with enough space. Then you need to use the USB-to-SATA adapter to connect the SSD to your computer and go to disk management to initialize it. The two SSDs should be in the same partition style. After that, you should allocate a new simple volume on the new SSD. If you get an old SSD with a larger space, it is better to back up the data on it in advance. 

Steps to transfer Windows 11/10 to another SSD 

Step 1: Launch the software and select C drive as the source partition. C drive is always the system drive. 

select C drive as source partition

Step 2: Choose the volume of your other SSD as the target partition. 

select SSD volume as target partition

Step 3: Go to click on the Start button in the bottom right corner. Then a message box comes out to inform you that the target partition data will be overwritten. Click Yes to perform the cloning. 

click Start

Wait patiently and you will get the successful prompt at the end. 

How to boot Windows 11/10 from the target SSD

After transferring Windows from one SSD to another, you can try to boot from another SSD. How to do that? Just shut down the computer and then restart it. Keep pressing the boot menu key to enter BIOS settings. Then choose the target SSD to boot. 

change boot order

FAQs about Windows OS Migration to SSD 

1. Why do so many people go to transfer Windows OS to SSD?

SSD is well-known for its excellent read and write speeds, high security, and low power consumption. With Windows OS in SSD, you can work in a faster and smoother environment. 

2. Does Windows 11/10 have the built-in tool to move Windows OS to another drive? 

No, you cannot find the direct Windows migration tool on your PC. But there is a Backup and Restore (Windows 7) utility that can help you to do that. The process is complicated as you need to back up Windows OS first to the external hard drive and then boot the computer from the Windows installation media to restore the backup to another SSD. 

3. Is it possible to clone the entire SSD to another SSD? 

Yes, you can do that with iSunshare CloneGo.  You can choose the Disk Clone feature to clone the whole SSD to another HDD/SSD or USB flash drive. 

Conclusions: 

If you are going to upgrade the Windows hard disk and worry about losing the Windows 11/10 data, you can try this Windows cloning software. It is extremely easy to transfer Windows 11/10 operating system to another SSD using iSunshare CloneGo. 

Related Articles: 

  1. How to Clone Existing Windows to USB and Make it Bootable
  2. How to Migrate Windows 11 to a New Hard Drive or SSD
  3. Easily Clone C Drive to External Hard Drive in Windows PC
  4. How to Clone SSD to Larger SSD in Windows 


March 9, 2023

Solved--Windows Media Player Doubled All My Songs

 “My media player duplicates all the music files in my library when I open it. It is very annoying, can I fix it?” From Microsoft community. 

What to do if the Windows media player doubled all my songs/ music? How can you delete duplicate songs in the Windows media player? In this article, you can learn two effective ways to find supplicate files. 

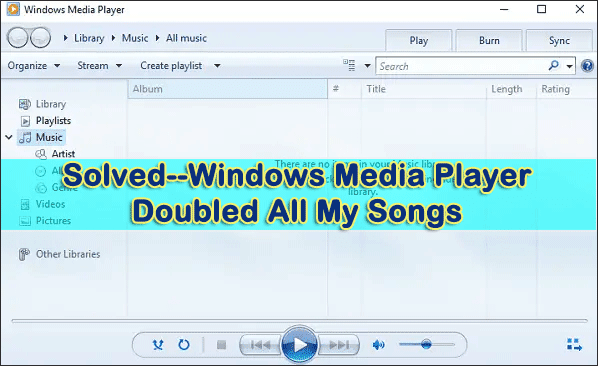
solved-windows media player doubled all my songs

Part 1: Delete Duplicate Songs in Windows Media Player Manually 
Windows Media Player is used to play music or videos from a PC. You can check the songs in Windows Media Player libraries. Of course, you can manage to delete the duplicate songs on it. 

Step 1: Open Windows Media Player and then you can check all songs here. 

Step 2: Click the Title column and then all songs will be listed by Title. You can now compare the names, lengths, sizes, and so on to find duplicate songs. 

list songs by title

Step 3: Go to choose the duplicate one and right-click to choose Delete. Then you can remove duplicate songs one by one. 

delete duplicate songs

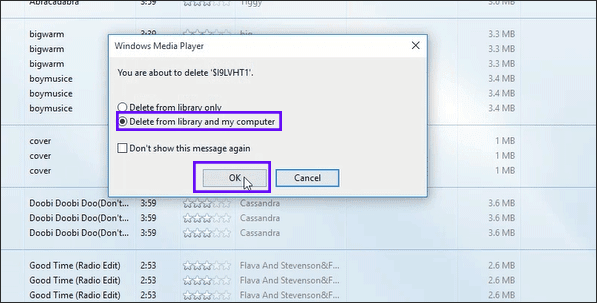
Step 4: You will get the message box to make a choice. Choose Delete from library and my computer and then click the OK button. 

choose delete from library and my computer


Part 2—Delete the repeated songs on your computer with iSunshare DupFiles Genius 

iSunshare DupFiles Genius is the best solution to solve Windows Media Player doubling all my songs. It is developed with the advanced MD5 algorithm so that it can quickly find the same songs for you. With this software, you can scan all different file types on one or more folders/drives, such as images, audio, documents, and so on. Besides, you can scan the external hard drive to find duplicate files to release space. 

Step 1: Choose the location to scan. 

Once launch the software, you can click the plus button to choose a folder or drives in that you want to find the duplicates. You can repeat this operation to add two or more locations. After that, click on the Next button. 

select song location to scan

Step 2: Define the scan settings. 

You can choose the folder to exclude and then choose the file type to scan. As duplicate songs are going to be found, you can choose only audio as the file type to get a more accurate report. Then, click on the Start scanning button. 

define the scan settings

Step 3: After minutes, you will get the duplicate files report. You can scroll down to check all. Then you can check the checkbox next to File Name to select all duplicate songs. Next, click on the Delete button. 

choose all duplicate songs to delete

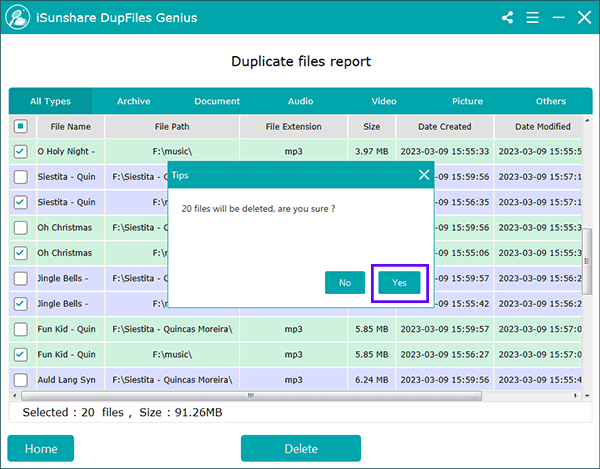
Step 4: A message box will come out to inform you of the number of files to delete. You can click on the Yes button to continue. 

click Yes to delete

You will get a successful message soon. After that, the original songs are kept but the doubled ones is cleaned. 

successfully delete the duplicate songs

Part 3: How to Prevent Windows Media Player Double Songs in Library 

Although we can quickly remove the duplicate songs with iSunshare DupFiles Genius, it will be better if all songs will not be doubled in Windows Media Player. You can change the settings to disable this feature. 

Step 1: Launch Windows Media Player and then click Organize> Options.

Step 2: In the Option box, click on the Player tab and then uncheck the option “Automatically add it to your library when it is played”. 

Step 3: Click on Apply and then the OK button.  After that, the songs will not be doubled to Windows Media Player when played. 

February 20, 2023

iPhone Unavailable No Erase Option-- How to Unlock Unavailable iPhone

 “My iPhone 7 says unavailable but there is no erase option. I only found an emergency option at the center. How can I get out of the unavailable screen on my iPhone?” 

iPhone unavailable no erase option


Generally, when you keep trying the wrong passcode on your iPhone in a row more than 7 times, the Erase iPhone option will appear along with an unavailable or security lockout message.  You can see the Erase iPhone option next to the Emergency option. 

If you find there is no erase option on the iPhone unavailable screen, what’s the problem? First of all, you should check the iOS version on your iPhone. If it is beyond iOS 15.2, you cannot get the Erase option after the iPhone becomes disabled or unavailable. The Erase option will only display on iOS 15.2 and higher versions. Secondly, if there is no SIM card on your iPhone, you cannot see Erase iPhone option sometimes. Finally, there may be a system error on your iPhone, which causes this issue after charging, updating, or resetting your iPhone. 

Thus, how can you unlock the unavailable screen with no erase option? You can get 4 solutions here.  No matter which method you choose, you can only unlock the unavailable iPhone with data loss if there is no data backup. So, create a backup of your iPhone from time to time. 

Now let us deep into the details to unlock unavailable iPhones with no erase option. 


Method 1: Unlock Unavailable iPhone using iPhone Passcode Genius 

iSunshare iPhone Passcode Genius is the professional iPhone unlock software that makes removing the screen lock without any passcode simpler. It can help to unlock unavailable or disabled iPhones on any iOS version. 

Step 1: Free download iSunshare iPhone Passcode Genius on your Windows computer. Then install it and activate it to get full features. 

Step 2: Launch the software and click Unlock Lock Screen section. Click Start to continue. 

click Unlock Lock Screen


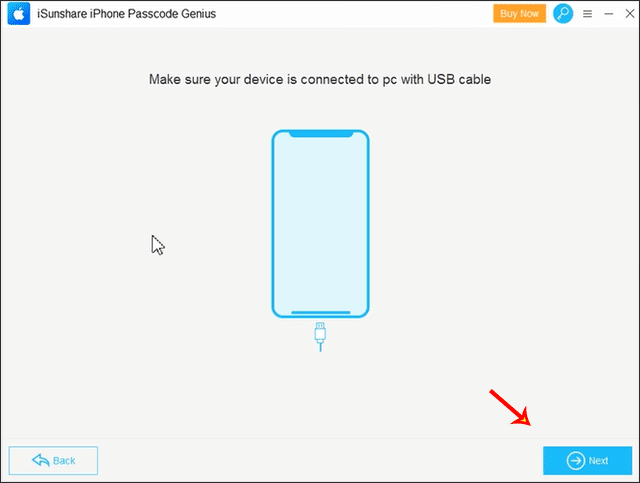
Step 2: Connect the iPhone to your Windows computer via a USB cable. Then put the iPhone into recovery mode.  And click Next on your software interface. 

Click Next

Step 3: After loading your iPhone details, the software guides you to download the firmware package for the iPhone. Click Download to go ahead.  

click Download


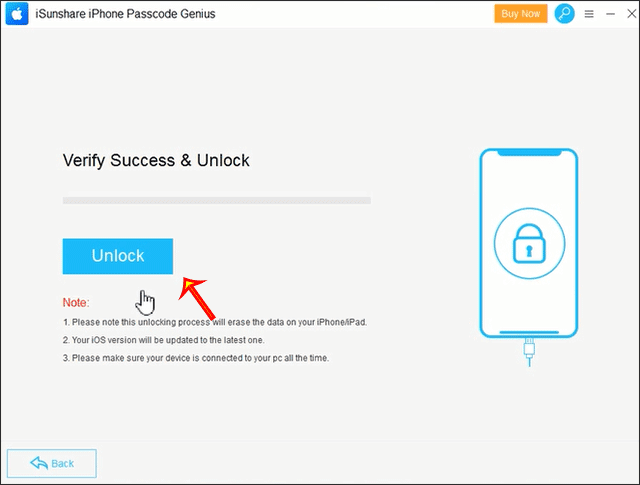
Step 4: After the downloading is completed and verified, you will be on the Unlock interface. Hit on Unlock button and then the iPhone will be unlocked soon. 

click Unlock

Note: After unlocking, all contents on your iPhone will be erased.  You need to set up the iPhone from scratch.


Method 2: Reset Unavailable iPhone via iTunes or Finder

If you have synced the unavailable iPhone to iTunes or Finder, you can connect the iPhone to the Windows or Mac computer to reset your iPhone. Here, iTunes is set as an example. 

Step 1: Put your iPhone into recovery mode and then connect it to your computer.

Step 2: iTunes will automatically run and pop up a dialog box, which tells that the device has a problem so you need to update or restore the iPhone to erase all contents. You need to click Restore. 

click Restore


Step 3: Click the Restore and Update button and keep moving forward as prompted to trigger the process of downloading the latest iOS software and erasing your iPhone unavailable no erase option.

click Restore and Update


Step 4: This process will take a while so you need to wait patiently. You can track the process with the progress bar on your unavailable iPhone.  When it is finished, the iPhone will restart and boot up to the Hello screen which is exactly what you get when you first receive a new iPhone. You can follow up with the setup assistants to quickly set up the phone. 

erase iPhone process


Tips: If you have a backup for your content, Apple enables you to get back the data from the backup in the apps and data screen. When all is set up, you should unlock and regain access to your phone. 

Method 3: Erase Unavailable iPhone via iCloud 

What if your unavailable iPhone has no options for erasing or entering the password or face ID and you don’t have a computer or a USB cable, how do you fix an unavailable iPhone without a computer? You can erase the unavailable iPhone via iCloud.com on another iOS device when Find My iPhone has been activated on the phone before it says unavailable. 

Step 1: Get another device with a stable network and then open any browser on it. 

Step 2: Go to icloud.com and sign in with your Apple ID and password which is the same as your unavailable iPhone. If you have turned on two-factor authentication on your iPhone before, you need to enter the verification code. 

Step 3: You will be on the iCloud dashboard. Then click the Find iPhone icon in the lower right corner. 

iCloud dashboard


Step 4: Click All Devices to get all devices menu and choose your unavailable iPhone. 

choose your iphone


Step 5: Choose Erase iPhone option and click Erase button. iCloud will start erasing your available iPhone and deleting everything on your phone. 

erase iPhone via iCloud


Minutes later, your iPhone will be rebooted and the Hello screen shows up. You can set up the phone from scratch or restore it from iCloud or computer backup. 


Method 4: Fix unavailable iPhone via Find My App 

You can also use the Find My app on other iOS devices to erase the unavailable iPhone. Yes, the Find My iPhone function should have been enabled on the unavailable iPhone before. 

Step 1: Find an iPhone or iPad that you can access. Go to the home screen and tap Find My app. 

Step 2: Log in with the Apple ID and password which is used for the unavailable iPhone. 

Step 3: After logging in, find and choose your unavailable iPhone in the devices tab. Then swipe up and scroll down until you see erase this device option. Click it and enter the Apple ID to erase.  A few minutes later, your unavailable iPhone will be erased and on the Hello screen. You can quickly set it up and restore everything from iCloud backup or iTunes backup.  Finally, you can get into the unavailable iPhone. 


January 14, 2023

Easily Protect a PowerPoint Presentation from Being Copied

 If you have created a PowerPoint presentation and do not want others to copy, edit or modify the content, how can you do that?  Here, you can learn 4 effective ways to protect a PowerPoint presentation from being copied.

protect PowerPoint presentation from copied

Way 1: Set Restrict Access to the presentation

 You can enable Restrict Access function on the PowerPoint presentation so that no one can edit copy or print your file.

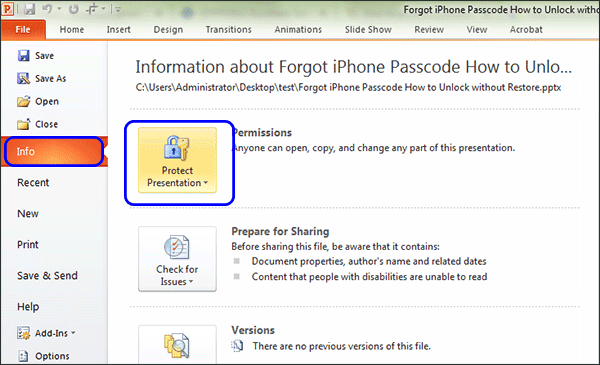
Step 1: Open your presentation and then go to click Info > Protect Presentation.

click Protect Presentation

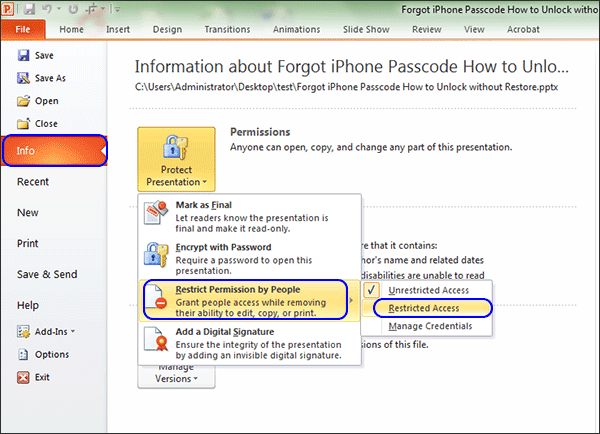
Step 2: Go to Restrict permission by people and choose Restricted Access.  After that, follow the guide to enable the restriction.

choose Restricted Access

In some versions of Microsoft PowerPoint, you can directly get Restrict Access option under Protect Presentation drop-down menu. 

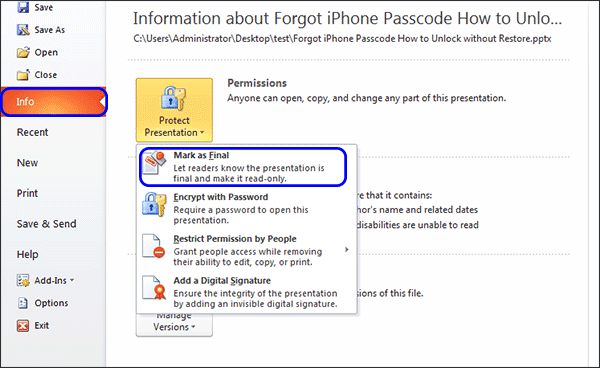
Way 2: Make the presentation read-only

With the read-only setting, others can only view your presentation content but do nothing on it. It is a good way to prevent PPT files from editing.

Step 1: Open your presentation and go to click File> Info.

Step 2: Choose Protect Presentation on the right menu.

Step 3: Click Mark as Final and make your confirmation.

Choose Mark as Final

Way 3: Encrypt the presentation with modify password

If you do not want others to make changes to the PowerPoint presentation, you can add the modify password when saving the PPT file.

Step 1: When your presentation is open, go to click File> Save as.

Step 2: In the Save as window, go to Tools and choose General Options from the drop-down menu.

Click General option

Step 3: Enter the password you want to set in File sharing settings for this document part. After that, click the OK button to apply the change. 

enter password to modify

After that, the presentation cannot be modified without knowing the modify password.

Way 4: Protect your PowerPoint files with iSunshare SafeFile Genius

Sometimes files or folder is easy to set passwords or restrictions, what about a great number of files or folders? You can use iSunshare SafeFile Genius to lock, and hide files or folders, and make files read-only with simple clicks. Once you encrypt the presentations with this software, nobody can open, copy, or edit them.

Step 1: Run iSunshare SafeFile Genius and then click the Encrypt button.

hit on Encrypt

Step 2: Click on the file icon to select your PowerPoint presentation and then hit on the Next button.  If you have mass PPT files to encrypt, you can place the PPT files in a folder first. Then, click the folder icon to choose the folder to add.

select PowerPoint presentation

Step 3: Input the password you want to set for the presentation. You must ensure the password is longer than six. Click the Encrypt button to begin encrypting.

enter password to encrypt

Step 4: Successfully encrypted the PowerPoint presentation. 

successfully encrypt

Related Articles:

  1. How to Encrypt Files or Folders in Windows 10
  2. Fixed—Encrypt Contents to Secure Data is Greyed out in windows 11/10
  3. PPT File Password Reset after Forgot PowerPoint Password
  4. How to Unlock Read-only PowerPoint Presentations 

July 1, 2022

Fixed: Windows 10 Mount ISO Missing

In Windows 10, the Mount ISO option is available by default, just right-click on the ISO file and click on Mount, or you can double-click on the ISO file. But if the Mount option disappears on the context menu, how do you fix it on your Windows 10. In this step-by-step tutorial, we show you how to fix Windows 10 mount ISO missing.

  • Part 1: Fix Windows 10 Mount ISO Missing without software
  • Part 2: Alternative way to Mount ISO in Windows 10 with Freeware iSunshare ISO Genius


Part 1: Fix Windows 10 Mount ISO Missing without software

  • Option 1: Fix Windows 10 Mount ISO Missing from Settings
  • Option 2: Fix Windows 10 Mount ISO Missing Using Control Panel
  • Option 3: Fix Windows 10 Mount ISO Missing from Properties

Option 1: Fix Windows 10 Mount ISO Missing from Settings

Click on the Start menu, then negative to Settings>Apps>Default apps>Set defaults by app, and then scroll down and click the Windows Disc Image Burner option. 

click on Windows Disc Image Burner

In the Windows Disc Image Burner window, make sure you've chosen Windows Explorer as default app. 

Windows Explorer is default app


Option 2: Fix Windows 10 Mount ISO Missing Using Control Panel

Step 1: Search for Control Panel from the Search box on the Taskbar and open it.

open Control Panel

Step 2: Click on the Programs option.

select Programs

Step 3: Click on the Default Programs option.

select Default Programs

Step 4: Continue to click on the Set your default programs option.

select Set your default programs

Step 5: You will then go to the Settings page, all the next steps are the same as Option 1.


Option 3: Fix Windows 10 Mount ISO Missing from Properties

Step 1: Right-click the ISO file and select Properties from the context menu.

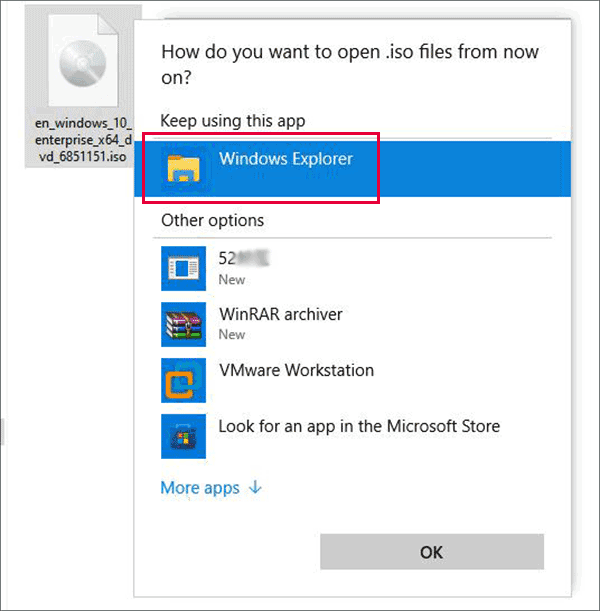
Step 2: Click Change to choose how to open the ISO file.

Step 3: Choose Windows Explorer to open ISO files.

choose Windows Explorer

   Step 4: After that, please click Apply and click OK.

click Apply and OK


Part 2: Alternative way to Mount ISO in Windows 10 with Freeware iSunshare ISO Genius 

If these methods mentioned above still cannot help you fix Windows 10 mount ISO missing, you can try it with free third-party applications such as iSunshare ISO Genius. It is a powerful and time-tested ISO image tool that can help you extract ISO images. With it, you can easily mount an ISO image to open and view the files and folders stored in it. Heres how to fix Windows 10 mount ISO missing with iSunshare ISO Genius for free:

Step 1: Free download and install iSunshare ISO Genius on your computer.

Step 2: Click on the Extract button from the main interface.

click on the Extract button

Step 3: Click on the Folder icon at the top-right corner to select the ISO file. Then check all the files and folders that loaded by default. After that, click on the Export button to decompress files.

select ISO file to decompress

Step 4: Continue to click the "Folder" icon to select a path for decompressing files and click on the Start button to execute.

select a path for decompressing

Step 5: After that, you need to wait for exporting the contents of the ISO file.

exporting the contacts of ISO file

Step 6: After a few minutes, the ISO file will be exported successfully, then you can click View Files to view the contents of the ISO file.

successfully exported the ISO file

Conclusion:

If the Windows 10 mount ISO is missing, there are several ways to help you mount the ISO successfully in Windows 10, you can fix it from Settings, Control Panel, and Properties. Also, if you cannot fix Windows 10 mount ISO missing, iSunshare ISO Genius is the best alternative to help you mount ISO easily to view and open ISO files. iSunshare ISO Genius is a simple and easy-to-use tool for Windows users. It can not only extract ISO files, but also make bootable USB sticks, create ISO files from local files/folders, and convert CD/DVD data to ISO files.

With the tutorial video, yu will see: How to Fix Windows 10 Mount ISO Missing


Related articles