February 20, 2023

iPhone Unavailable No Erase Option-- How to Unlock Unavailable iPhone

 “My iPhone 7 says unavailable but there is no erase option. I only found an emergency option at the center. How can I get out of the unavailable screen on my iPhone?” 

iPhone unavailable no erase option


Generally, when you keep trying the wrong passcode on your iPhone in a row more than 7 times, the Erase iPhone option will appear along with an unavailable or security lockout message.  You can see the Erase iPhone option next to the Emergency option. 

If you find there is no erase option on the iPhone unavailable screen, what’s the problem? First of all, you should check the iOS version on your iPhone. If it is beyond iOS 15.2, you cannot get the Erase option after the iPhone becomes disabled or unavailable. The Erase option will only display on iOS 15.2 and higher versions. Secondly, if there is no SIM card on your iPhone, you cannot see Erase iPhone option sometimes. Finally, there may be a system error on your iPhone, which causes this issue after charging, updating, or resetting your iPhone. 

Thus, how can you unlock the unavailable screen with no erase option? You can get 4 solutions here.  No matter which method you choose, you can only unlock the unavailable iPhone with data loss if there is no data backup. So, create a backup of your iPhone from time to time. 

Now let us deep into the details to unlock unavailable iPhones with no erase option. 


Method 1: Unlock Unavailable iPhone using iPhone Passcode Genius 

iSunshare iPhone Passcode Genius is the professional iPhone unlock software that makes removing the screen lock without any passcode simpler. It can help to unlock unavailable or disabled iPhones on any iOS version. 

Step 1: Free download iSunshare iPhone Passcode Genius on your Windows computer. Then install it and activate it to get full features. 

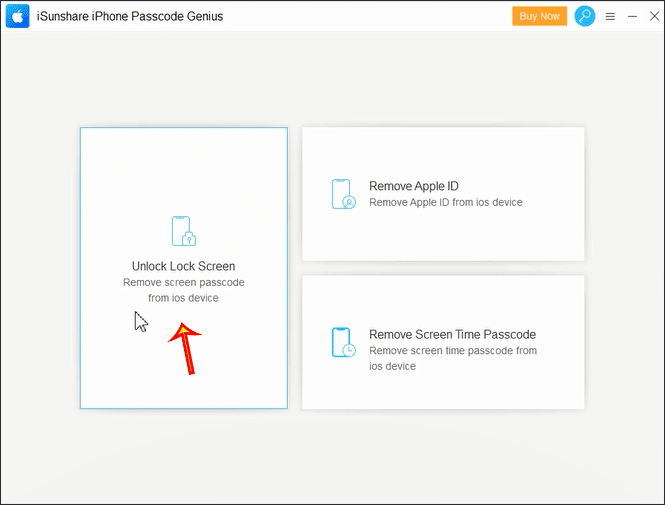
Step 2: Launch the software and click Unlock Lock Screen section. Click Start to continue. 

click Unlock Lock Screen


Step 2: Connect the iPhone to your Windows computer via a USB cable. Then put the iPhone into recovery mode.  And click Next on your software interface. 

Click Next

Step 3: After loading your iPhone details, the software guides you to download the firmware package for the iPhone. Click Download to go ahead.  

click Download


Step 4: After the downloading is completed and verified, you will be on the Unlock interface. Hit on Unlock button and then the iPhone will be unlocked soon. 

click Unlock

Note: After unlocking, all contents on your iPhone will be erased.  You need to set up the iPhone from scratch.


Method 2: Reset Unavailable iPhone via iTunes or Finder

If you have synced the unavailable iPhone to iTunes or Finder, you can connect the iPhone to the Windows or Mac computer to reset your iPhone. Here, iTunes is set as an example. 

Step 1: Put your iPhone into recovery mode and then connect it to your computer.

Step 2: iTunes will automatically run and pop up a dialog box, which tells that the device has a problem so you need to update or restore the iPhone to erase all contents. You need to click Restore. 

click Restore


Step 3: Click the Restore and Update button and keep moving forward as prompted to trigger the process of downloading the latest iOS software and erasing your iPhone unavailable no erase option.

click Restore and Update


Step 4: This process will take a while so you need to wait patiently. You can track the process with the progress bar on your unavailable iPhone.  When it is finished, the iPhone will restart and boot up to the Hello screen which is exactly what you get when you first receive a new iPhone. You can follow up with the setup assistants to quickly set up the phone. 

erase iPhone process


Tips: If you have a backup for your content, Apple enables you to get back the data from the backup in the apps and data screen. When all is set up, you should unlock and regain access to your phone. 

Method 3: Erase Unavailable iPhone via iCloud 

What if your unavailable iPhone has no options for erasing or entering the password or face ID and you don’t have a computer or a USB cable, how do you fix an unavailable iPhone without a computer? You can erase the unavailable iPhone via iCloud.com on another iOS device when Find My iPhone has been activated on the phone before it says unavailable. 

Step 1: Get another device with a stable network and then open any browser on it. 

Step 2: Go to icloud.com and sign in with your Apple ID and password which is the same as your unavailable iPhone. If you have turned on two-factor authentication on your iPhone before, you need to enter the verification code. 

Step 3: You will be on the iCloud dashboard. Then click the Find iPhone icon in the lower right corner. 

iCloud dashboard


Step 4: Click All Devices to get all devices menu and choose your unavailable iPhone. 

choose your iphone


Step 5: Choose Erase iPhone option and click Erase button. iCloud will start erasing your available iPhone and deleting everything on your phone. 

erase iPhone via iCloud


Minutes later, your iPhone will be rebooted and the Hello screen shows up. You can set up the phone from scratch or restore it from iCloud or computer backup. 


Method 4: Fix unavailable iPhone via Find My App 

You can also use the Find My app on other iOS devices to erase the unavailable iPhone. Yes, the Find My iPhone function should have been enabled on the unavailable iPhone before. 

Step 1: Find an iPhone or iPad that you can access. Go to the home screen and tap Find My app. 

Step 2: Log in with the Apple ID and password which is used for the unavailable iPhone. 

Step 3: After logging in, find and choose your unavailable iPhone in the devices tab. Then swipe up and scroll down until you see erase this device option. Click it and enter the Apple ID to erase.  A few minutes later, your unavailable iPhone will be erased and on the Hello screen. You can quickly set it up and restore everything from iCloud backup or iTunes backup.  Finally, you can get into the unavailable iPhone. 


January 14, 2023

Easily Protect a PowerPoint Presentation from Being Copied

 If you have created a PowerPoint presentation and do not want others to copy, edit or modify the content, how can you do that?  Here, you can learn 4 effective ways to protect a PowerPoint presentation from being copied.

protect PowerPoint presentation from copied

Way 1: Set Restrict Access to the presentation

 You can enable Restrict Access function on the PowerPoint presentation so that no one can edit copy or print your file.

Step 1: Open your presentation and then go to click Info > Protect Presentation.

click Protect Presentation

Step 2: Go to Restrict permission by people and choose Restricted Access.  After that, follow the guide to enable the restriction.

choose Restricted Access

In some versions of Microsoft PowerPoint, you can directly get Restrict Access option under Protect Presentation drop-down menu. 

Way 2: Make the presentation read-only

With the read-only setting, others can only view your presentation content but do nothing on it. It is a good way to prevent PPT files from editing.

Step 1: Open your presentation and go to click File> Info.

Step 2: Choose Protect Presentation on the right menu.

Step 3: Click Mark as Final and make your confirmation.

Choose Mark as Final

Way 3: Encrypt the presentation with modify password

If you do not want others to make changes to the PowerPoint presentation, you can add the modify password when saving the PPT file.

Step 1: When your presentation is open, go to click File> Save as.

Step 2: In the Save as window, go to Tools and choose General Options from the drop-down menu.

Click General option

Step 3: Enter the password you want to set in File sharing settings for this document part. After that, click the OK button to apply the change. 

enter password to modify

After that, the presentation cannot be modified without knowing the modify password.

Way 4: Protect your PowerPoint files with iSunshare SafeFile Genius

Sometimes files or folder is easy to set passwords or restrictions, what about a great number of files or folders? You can use iSunshare SafeFile Genius to lock, and hide files or folders, and make files read-only with simple clicks. Once you encrypt the presentations with this software, nobody can open, copy, or edit them.

Step 1: Run iSunshare SafeFile Genius and then click the Encrypt button.

hit on Encrypt

Step 2: Click on the file icon to select your PowerPoint presentation and then hit on the Next button.  If you have mass PPT files to encrypt, you can place the PPT files in a folder first. Then, click the folder icon to choose the folder to add.

select PowerPoint presentation

Step 3: Input the password you want to set for the presentation. You must ensure the password is longer than six. Click the Encrypt button to begin encrypting.

enter password to encrypt

Step 4: Successfully encrypted the PowerPoint presentation. 

successfully encrypt

Related Articles:

  1. How to Encrypt Files or Folders in Windows 10
  2. Fixed—Encrypt Contents to Secure Data is Greyed out in windows 11/10
  3. PPT File Password Reset after Forgot PowerPoint Password
  4. How to Unlock Read-only PowerPoint Presentations 

July 1, 2022

Fixed: Windows 10 Mount ISO Missing

In Windows 10, the Mount ISO option is available by default, just right-click on the ISO file and click on Mount, or you can double-click on the ISO file. But if the Mount option disappears on the context menu, how do you fix it on your Windows 10. In this step-by-step tutorial, we show you how to fix Windows 10 mount ISO missing.

  • Part 1: Fix Windows 10 Mount ISO Missing without software
  • Part 2: Alternative way to Mount ISO in Windows 10 with Freeware iSunshare ISO Genius


Part 1: Fix Windows 10 Mount ISO Missing without software

  • Option 1: Fix Windows 10 Mount ISO Missing from Settings
  • Option 2: Fix Windows 10 Mount ISO Missing Using Control Panel
  • Option 3: Fix Windows 10 Mount ISO Missing from Properties

Option 1: Fix Windows 10 Mount ISO Missing from Settings

Click on the Start menu, then negative to Settings>Apps>Default apps>Set defaults by app, and then scroll down and click the Windows Disc Image Burner option. 

click on Windows Disc Image Burner

In the Windows Disc Image Burner window, make sure you've chosen Windows Explorer as default app. 

Windows Explorer is default app


Option 2: Fix Windows 10 Mount ISO Missing Using Control Panel

Step 1: Search for Control Panel from the Search box on the Taskbar and open it.

open Control Panel

Step 2: Click on the Programs option.

select Programs

Step 3: Click on the Default Programs option.

select Default Programs

Step 4: Continue to click on the Set your default programs option.

select Set your default programs

Step 5: You will then go to the Settings page, all the next steps are the same as Option 1.


Option 3: Fix Windows 10 Mount ISO Missing from Properties

Step 1: Right-click the ISO file and select Properties from the context menu.

Step 2: Click Change to choose how to open the ISO file.

Step 3: Choose Windows Explorer to open ISO files.

choose Windows Explorer

   Step 4: After that, please click Apply and click OK.

click Apply and OK


Part 2: Alternative way to Mount ISO in Windows 10 with Freeware iSunshare ISO Genius 

If these methods mentioned above still cannot help you fix Windows 10 mount ISO missing, you can try it with free third-party applications such as iSunshare ISO Genius. It is a powerful and time-tested ISO image tool that can help you extract ISO images. With it, you can easily mount an ISO image to open and view the files and folders stored in it. Heres how to fix Windows 10 mount ISO missing with iSunshare ISO Genius for free:

Step 1: Free download and install iSunshare ISO Genius on your computer.

Step 2: Click on the Extract button from the main interface.

click on the Extract button

Step 3: Click on the Folder icon at the top-right corner to select the ISO file. Then check all the files and folders that loaded by default. After that, click on the Export button to decompress files.

select ISO file to decompress

Step 4: Continue to click the "Folder" icon to select a path for decompressing files and click on the Start button to execute.

select a path for decompressing

Step 5: After that, you need to wait for exporting the contents of the ISO file.

exporting the contacts of ISO file

Step 6: After a few minutes, the ISO file will be exported successfully, then you can click View Files to view the contents of the ISO file.

successfully exported the ISO file

Conclusion:

If the Windows 10 mount ISO is missing, there are several ways to help you mount the ISO successfully in Windows 10, you can fix it from Settings, Control Panel, and Properties. Also, if you cannot fix Windows 10 mount ISO missing, iSunshare ISO Genius is the best alternative to help you mount ISO easily to view and open ISO files. iSunshare ISO Genius is a simple and easy-to-use tool for Windows users. It can not only extract ISO files, but also make bootable USB sticks, create ISO files from local files/folders, and convert CD/DVD data to ISO files.

With the tutorial video, yu will see: How to Fix Windows 10 Mount ISO Missing


Related articles


June 8, 2022

How to Open and Extract ISO Files on Windows 10

 An ISO image file is an archived document that contains all kinds of content: applications, music, videos, installation files, and so on. You can easily create ISO files from files, folders, and CD/DVDs.  But if you get an ISO file from others, how can you view the contents without burning it to a disk or a drive?  You can get multiple ways to open and extract ISO files on Windows 10 computer.

  • Way 1: Double-click to mount ISO files to view contents
  • Way 2: Mount ISO image from the context menu
  • Way 3: Mount ISO Image from the ribbon menu
  • Way 4: Extract ISO files via WinRAR
  • Way 5: View ISO files contents with iSunshare ISO Genius
extract ISO files on Windows 10


Way 1: Double-click to mount ISO files to view contents

There is a built-in disk image tool in Windows 10 computers so that you can easily mount the ISO image file to a virtual disk. You can easily open the virtual disk to see all contents extracted from the ISO file.

Step 1: Navigate to the folder where the ISO image file is located.

Step 2: Double click on the ISO image file to mount it.

double click ISO file

Step 3: Once mounted, you will be directly guided to a DVD drive under This PC. Here you can view all the files and folders that are stored in the ISO image.  You can directly open the files or folders to get what you want.

ISO image file is mounted


Way 2: Mount ISO image from the context menu

 Alternatively, you can mount an ISO image from the context menu.

Step 1: Go to where your ISO image file is stored. Right-click it and then you can choose the Mount option from the context menu.

Step 2: In no time, you can see all data extracted in a virtual drive. Here, you can easily manage the contents the same as you are on the real disk in Windows 10.

choose Mount option


Way 3: Mount ISO Image from the ribbon menu

You can also open and view the contents of the ISO image from the ribbon menu.

Step 1: Reach the ISO image file on your computer and then choose it.

Step 2: Click the Disc Image Tools on the ribbon menu.

click Disc Image Tools

Step 3: Choose the Mount option. Immediately you can get all contents from the ISO mounted to a virtual disk.

click Mount option


Way 4: Extract ISO files via WinRAR

WinRAR is a popular compression tool as well as an archiver extractor, which needs to pay for usage. But you can enjoy a free trial period to compress and extract the files. This tool can also help to extract files from disk images on Windows 10.

Step 1: Download and install WinRAR on your computer.

Step 2: Navigate to your ISO file. Right-click on it and choose Extract to “filename”.

choose Extract to option

Step 3: Soon, all contents of the ISO image are extracted to a folder with the same name.

ISO image file is extracting


Way 5: View ISO files contents with iSunshare ISO Genius

 iSunshare ISO Genius is the free ISO file extractor for PC that can help you to extract all contents from the ISO file. You can also burn the ISO file to a USB drive and create a unique ISO file with this free utility. If you are running Windows 7 or the lower version, the Windows disk image tool is not available for you. You can free download this software to extract and view ISO file contents. ISO Genius is compatible with all Windows operating systems.

Step 1: Download and install iSunshare ISO Genius on your Windows 10 computer.

Step 2: Run the software and then choose the Extract module.

choose Extract module

Step 3: Click the folder icon to select the ISO file to extract.

choose ISO file to extract

Step 4: Instantly, you can check the files and folders from the ISO file. Until now, it is unavailable for you to open the files. You need to choose the files or folders to export.  After you make the selection, click the Export button on the bottom right corner.

select files to export

Step 5: Select a folder on your Windows 10 computer to save the extracted content.

set the save path

Next, click the Start button to export the extracted contents to your computer.

click the Start button

Step 6: Successfully exported the extracted contents from the ISO image. You can click View Files to open and view the contents. 

click View files

Related Articles:

  1. How to Make Windows 10 Bootable USB from ISO Image 
  2. How to Burn ISO to USB File on Windows 11/10/8/7 Computer
  3. How to Create ISO Files in Windows 10 Computer