November 16, 2020

How to Encrypt A USB Flash Drive in Windows 10 – Make It Safer

For more security and privacy, it is highly advisable to encrypt a USB flash drive to prevent any unpredictable and unauthorized access. In this article, we will share with you several easy and effective methods to encrypt a USB flash drive in Windows 10.

how to encrypt usb flash drive in windows 10

Way 1: Encrypt USB flash drive with BitLocker

If you want to encrypt USB flash drive, BitLocker Drive Encryption is your first choice. As a Windows built-in encryption tool, BitLocker Drive Encryption can securely encrypt your data on USB flash drive with industry-standard AES encryption, which is very trustworthy. iSunshare BitLocker Genius for Windows is an assistant tool that can help you encrypt USB flash drive with BitLocker more conveniently and intuitively. The following guide is about how to use this tool to encrypt USB flash drive with BitLocker in ease.

Step 1: Download and install this tool on your computer and insert a pen drive into your computer.

Step 2: Launch this tool. On the interface, right-click the USB drive and select Turn on BitLocker option.

turn on bitlocker

Step 3: Type and confirm a password and then click save to file button to back up a .txt file as recovery key.

save a recovery key

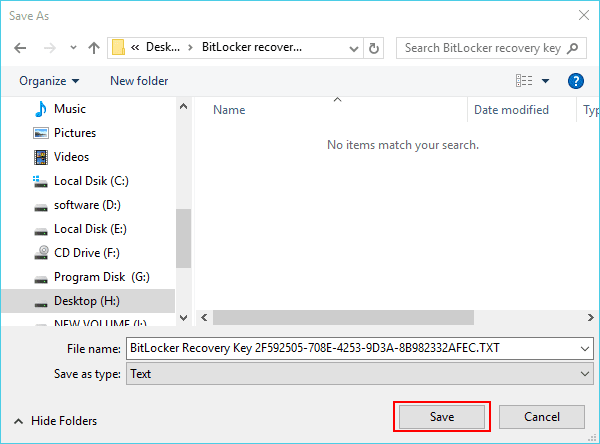
Step 4: Then choose a location to save the new recovery key file and click Save button.

choose where to save recovery key

Step 5: Click Encrypt button to start encrypting. Wait for a while until a window pops up prompting that the encryption is competed.

start encrypting

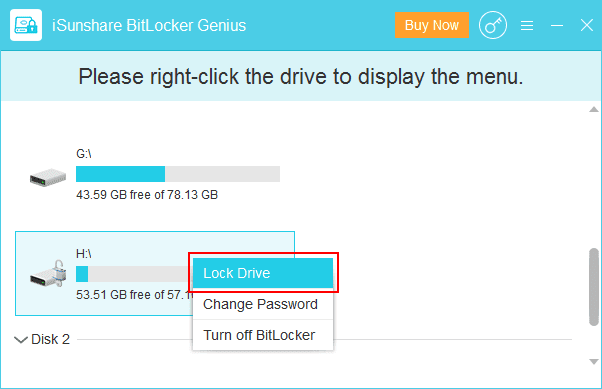
Step 6: Right-click the hard drive and select Lock Drive option. Finally, the pen drive is encrypted with BitLocker Drive Encryption.

lock drive

Tips: This tool also allows you to change the password and remove BitLocker from USB flash drive. In addition, you can also lock or unlock BitLocker conveniently.

Way 2: Encrypt USB flash drive with iSunshare SafeUSB Genius

iSunshare SafeUSB Genius is the easy to use USB drive encryption software which can help Windows users to password protect USB drive without BitLocker. It offers a more direct way to set the password on USB drive. At the same time, it is secure to protect the USB data as all USB data are invisible after encryption. No one can know you have encrypted all USB data unless you tell them.

Step 1: Download and install this software on your PC and then plug the USB drive into the computer. 

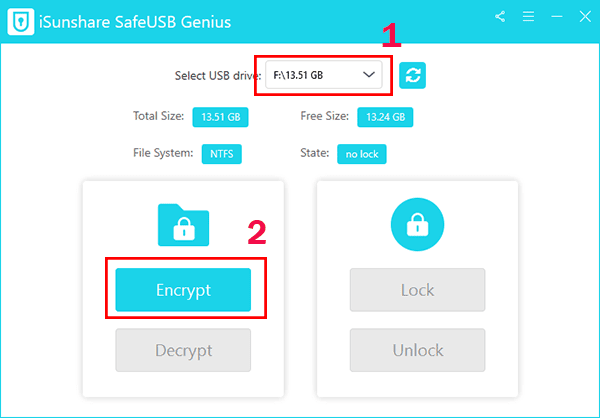
Step 2: Choose your USB flash drive and then click the Encrypt button on the main interface.  

select USB drive and click Encrypt


Step 3: Enter the password twice and then hit on the Encrypt button on the bottom right corner.  

set a password to encrypt USB drive

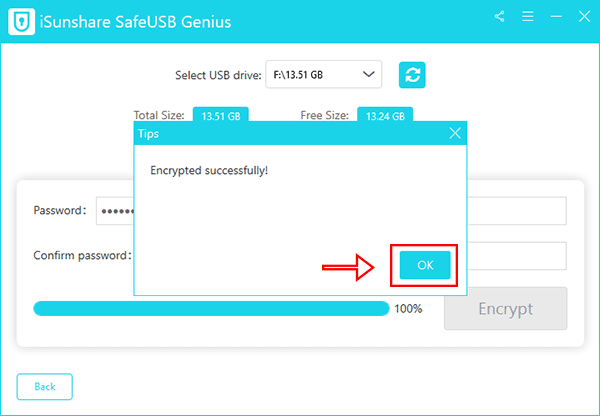
Step 4: In no time, the software starts encrypting the USB flash drive. You will get the successful prompt soon.   

encrypted successfully

Way 3: Encrypt USB flash drive with DiskCryptor

DiskCryptor has been discontinued since 2014, but it’s still a good solution to encrypt USB flash drive. Its handiness and high speed of encryption are the reasons for recommending it. Follow the steps below to use DiskCryptor to encrypt the USB flash drive.

Step 1: Download and install it on your pc and insert USB flash drive into your pc.

Step 2: Launch it. Right-click the pen drive and select Encrypt option.

encrypt a usb flash drive

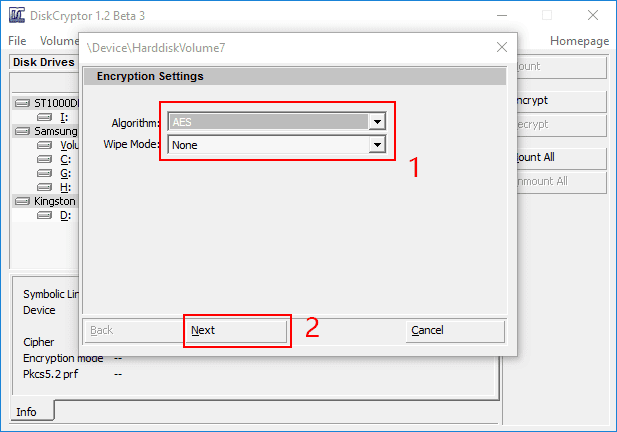
Step 3: On a popup window, choose an algorithm and wipe mode and then click Next button.

choose an algorithm

Step 4: Type and confirm a password and click OK button to start encrypting.

enter password

Step 5: Wait for a minute until the encryption process is finished.

wait-for encrypting

Way 4: Encrypt USB flash drive with VeraCrypt

VeraCrypt is a fork of TrueCrypt and is widely acknowledged its successor. It is also one of the most popular and secure disk encryption tools. Here is how to encrypt USB flash drive with VeraCrypt.

Step 1: Download and install this tool on your Windows computer. Then insert your USB drive into your pc

Step 2: Launch it and then click Create Volume button.

create volume

Step 3: Select Encrypt a non-system partition/drive option and then click Next button.

encrypt a non-system partition

Step 4: Select Standard VeraCrypt volume option and then click on Next button.

standard veracrypt volume

Step 5: Click Select Device button. On a new window, select the USB flash drive and click OK button. Then click Next button.

select device

Step 6: Choose a volume creation mode and click on Next button. If you have data stored on USB drive, choose Encrypt partition in place option. Otherwise, choose the other one.

choose a volume creation mode


Step 7: Choose an encryption and hash algorithm for the encryption and click Next. If you have no idea, it would better to leave the default settings.

choose an encryption and hash algorithm

Step 8: Type and confirm a password and click on Next button.

type password

Step 9: Finally, wait for a while until the interface prompts that the USB drive has been encrypted successfully.
encrypting


Relative Articles:


October 22, 2020

How to Repair an Excel File That Will Not Open

 When you get such error messages, including “Excel found an unreadable content in ‘<filename>’ Do you want to recover the contents of this workbook? If you trust the source of this workbook, click Yes”, “Can’t find project or Library”, “This workbook cannot be opened or repaired by Microsoft Excel because it is corrupted” and “Microsoft Excel has stopped working”, the Excel file is corrupted and cannot be opened. How can you repair the corrupted Excel file? Don’t worry; here are three effective ways for you.

  • Way 1: Open and Repair an Excel File with MS Office Built-in Function
  • Way 2: Change the Calculation Option to Manual
  • Way 3:Use Professional Excel Repair Software
how to repair excel file that will not open

Way 1: Open and Repair an Excel File with MS Excel Built-in Function

 When you get the notification like “Excel found an unreadable content in ‘<filename>’ Do you want to recover the contents of this workbook? If you trust the source of this workbook, click Yes”, MS Excel automatically launches File Recover mode and try to repair the workbook for you. Of course, you can also manually start the Open and Repair utility to repair the Excel file that cannot be opened.

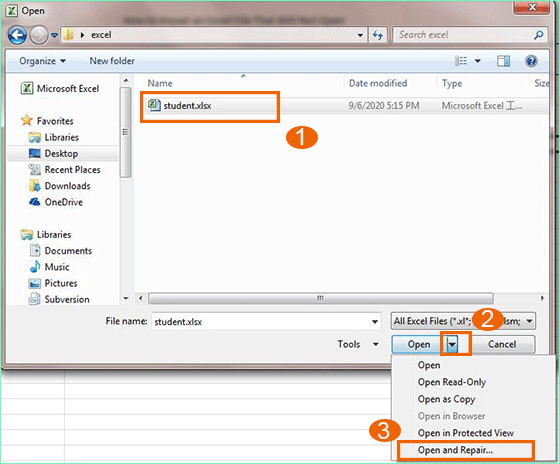
Step 1: Open MS Excel or directly open a blank workbook. Then hit File > Open.

Step 2: Go to the location where the corrupted Excel file stores and then choose it in the Open window.

Step 3: Click the icon behind the Open button, and then you can choose the Open and Repair option.

choose Open and Repair option


Step 4: In the pop-out window, click the Repair button. If it makes no effect, you can try the second option Extract Data.

click Repair

Way 2: Change the Calculation Option to Manual

You can change the calculation option to manual to recover data from the Excel file that will not open.

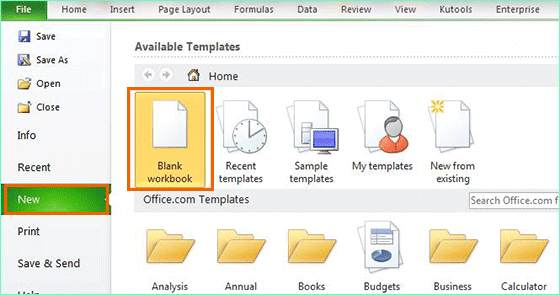
Step 1: Launch the MS Excel and access File > New > Blank Workbook.

open new blank workbook

Step 2:  In the new workbook, click File > Options.

Step 3: In Excel Options window, select Formulas from the left panel and then set the Workbook Calculation option to Manual.  After that, click the OK button to apply the change.

change calculation option to manual

Step 4: Now, you can click File > Open to open the corrupted Excel file.

Way 3: Use Professional Excel Repair Software

 If the above methods cannot help to repair your Excel XLSL file, you can use the professional Excel repair software to repair and restore the corrupted XLSL content. iSunshare Excel Repair Genius is the professional and easy-to-use Excel repair tool that helps to repair the XLSL file without changing its original layout and structures.

Step 1: Download and start the program immediately after finishing the installation.

Step 2: Open the corrupted Excel file and click the Restore button.

restore the corrupted Excel file


Step 3: Once the restore completes, you can see there is a Tips box to inform you. Hit OK to go ahead.

the file is restored prompt


Step 4: Click the Save button and find a location to save the new Excel file with the restored data.

save the restored Excel file


Step 5: The file is saved successfully in seconds. You can open the file by clicking the Yes button.

save restored file successfully

September 23, 2020

How to Recover Damaged or Corrupted Word Document

 When you open a Word document and find that the layout and formatting are in a mess so that it is impossible to read normally, the Word file might be corrupted or damaged. Or when you cannot open the Word file and get the error messages, the file is recognized as a damaged document. There are other abnormal behaviors that can help you to identify the damaged Word file, such as some characters are unreadable, and digital gibberish appears on the document. Now that we know that how to identify a Word file is normal or damaged/corrupted, how can we solve this issue and recover damaged or corrupted Word document? You need a professional Word repair tool.

recover damaged word document

About iSunshare Word Repair Genius

When it comes to the Word repair tool, iSunshare Word Repair Genius is highly recommended. This excellent Word repair tool can help you to repair and recover the Microsoft Word files in DOCX format without any changes to the original structure and content of the document. Besides, you are able to save the restored Word document as another new file and full control of the content. iSunshare Word Repair Genius is compatible with Microsoft Word 2007/2010/2013/2016/2019.

It is secure to recover the damaged or corrupted Word file with iSunshare Word Repair Genius. You can find that everything is identical to the original one, including the text, fonts, images, hyperlinks, and so on.

How to Repair the Damaged or Corrupted Word Document

First of all, you need to make sure Microsoft Word is not in use.

Step 1: Download and install iSunshare Word Repair Genius on your Windows computer.

install iSunshare Word Repair Genius

Step 2: Run the software and hit the Open button to add your damaged or corrupted Word file to the path box.

add the damaged word file

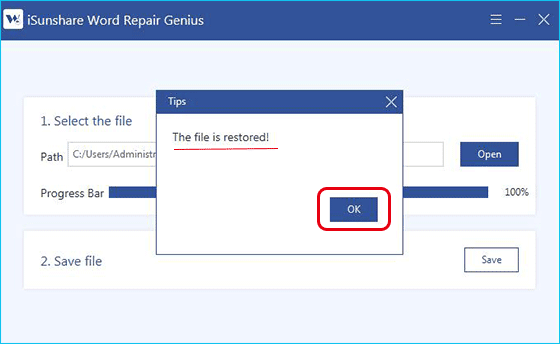
Step 3: Immediately, the file is restored. Click the OK button to continue.

word file is restored

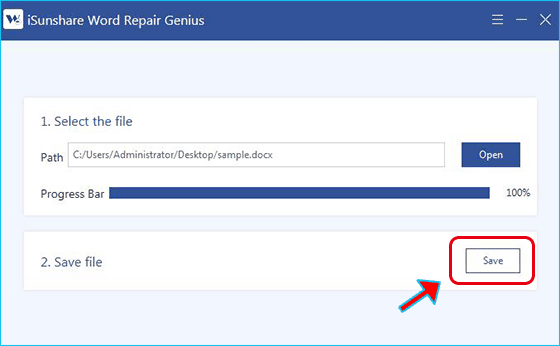
Step 4: Click the Save button and decide the location to store the restored Word file.

save the restored Word file

Step 5: The file is saved successfully. You can open it to digest the content.
open the saved Word file

Related Articles:

  1. Fixed--Microsoft Word File Corrupted and Unreadable
  2. Fixed--the file cannot be opened because there are problems with the content
  3. How to Recover Text from a Damaged/Corrupted Word Document


August 13, 2020

How to Clone HDD to Samsung 860 EVO SSD in Windows 10


Samsung 860 EVO SSD is tested to have the best performance in an SSDs review. If you want to speed up Windows 10 performance, it is a great idea to clone hard drive to Samsung 860 EVO SSD. There are two tools introduced here for you to clone HDD to Samsung SSD in Windows 10: Samsung Data Migration and iSunshare CloneGo.
  • Preparation: Make the Samsung 860 EVO SSD be recognized
  • Part 1: Clone HDD to Samsung 860 EVO using Samsung Data Migration
  • Part 2: Clone HDD to Samsung 860 EVO using iSunshare CloneGo

clone HDD to Samsung 860 EVO SSD


Preparation: Make the Samsung 860 EVO SSD be recognized


It is better for you to connect the Samsung SSD with the computer. Or you can directly install the SSD into the computer if there is an available slot. Besides, you should make the SSD recognized by your Windows 10: Right-click This PC and choose Manage to enter the Disk Management; then a box will pop out to ask for the SSD initialization.


Part 1: Clone HDD to Samsung 860 EVO using Samsung Data Migration


 Yes, Samsung develops its own migration tool—Samsung Data Migration Software (SDM) which enables users to migrate data quickly and safely from the existing storage device to a new Samsung SSD. It can apply to any Samsung SSD product, including 470 Series, 830 Series, 840 Series, 840 PRO & EVO Series, 850 PRO & EVO Series, 860 QVO/PRO/EVO Series, 950 PRO Series, 960 PRO & EVO Series, and 970 EVO/EVO Plus/PRO Series.

You can download this software from Samsung official website to clone the current operating system, application software, and user data to the Samsung SSD.

Step 1: Start Samsung Data Migration and choose Target Drive.

Once you start Samsung Data Migration, it will detect your current Windows OS drive as the source drive. What you need to do is select the Samsung SSD as the Target Drive.

select target drive


Step 2: Select the volume you want to clone from the source drive.

It is available for you to select up to three volumes including the C partition to clone.

select volumes to clone


Step 3: Click the Start button to begin the cloning process.

click the Start button


Step 4: The data is copying from the source drive to Samsung SSD.

Due to the different computer specifications and operating environment, the cloning speed varies. Thus, it is unable to predict how much time it will cost to clone the data. Additionally, when the cloning process ends, your computer will shut down automatically. As a result, it is no need for you to wait for the ending of cloning.
cloning process in Data Migration


Notices:
  • The software cannot clone a hard drive without an operating system in. So, the source drive must be your system drive.
  • The number of volumes in Source Drive chosen to clone should be no more than three.
  • It may not clone the dynamic disk to Samsung SSD. 

Part 2: Clone HDD to Samsung 860 EVO using iSunshare CloneGo


No matter you are going to clone the HDD with the operating system or just all the data to Samsung SSD, no matter how many volumes in the source disk, iSunshare CloneGo can help to migrate everything from the original hard drive to your Samsung 860 EVO SSD. Of course, your SSD should be with enough capacity. As an alternative to Samsung Data Migration Software, iSunshare CloneGo can work as the hard drive cloning software to upgrade your computer quickly and safely.

Step 1: Get iSunshare CloneGo on your Windows 10 computer.

You can free download the software from iSunshare official website. There are three days for you to free test the software. It takes a few minutes to download and install the software.

Step 2: Launch iSunshare CloneGo and set the source & target disk.

You can run the software after it finished the installation. After that, the main interface with four main functions is displayed. You need to select the Disk Clone function. Next, you can scroll down to view all disks & volumes. Afterward, select your Windows 10 computer original hard drive as the source disk and Samsung 860 EVO SSD as the target disk.

set source and target disk


Step 3: Set the After Finished operation

Everyone knows that there are a larger number of data in the hard drive. As a result, the cloning process would take longer than you’re expected. For those users who are very busy and have several computers, they can set the After Finished settings. For example, if you want to the Windows 10 computer to automatically shut down after successful cloning, you can check After Finished box and select the Shutdown option.

set After Finished operation


Step 4: Click the Start button

When everything is ready, you can hit the Start button. A small box will pop out, which tells you that the cloning will format the target disk. Hit Yes to continue.

start disk cloning to Samsung SSD


Step 5: The clone in process

The cloning process will start automatically. It is no need for you to walk through the whole process. Just do other job with another computer or have a meeting with others. The computer will do what you set after the process ends.


Related Articles:

  1. How to Clone Dynamic Disk to SSD in Windows 10  
  2. How to Clone M.2 SATA SSD to M.2 NVMe SSD in Windows Computer
  3. How to Copy Internal Hard Drive to External Hard Drive in Windows
  4. How to Clone SSD to Larger SSD Easily in Windows 11/10/7
  5. How to Clone MBR Disk to GPT Disk in Windows 10 


August 7, 2020

How to Clone USB to Another USB in Windows 10/8/7


“I have an old SanDisk 4G USB flash drive which stores all memories of my school life. Now I want to clone them to a larger Kingston 64GB USB flash drive as I’m afraid that the old USB would not work in the future. Is there any way to finish the USB data migration? Thanks!”

There is no doubt that it is convenient to store the data in USB flash drive or USB hard disk. You can carry it to anywhere, for business, for presentation, for a speech and etc. And in order to avoid the data loss, you need to make a backup of the files in the USB drive. No matter you want to clone the USB data to the larger USB drive, to USB portable hard disk, or SSD, you can get two ways to clone the USB to another USB in Windows 10/8/7.

clone USB to USB in Windows


Way 1: Clone the USB with Copy-and-paste Operation

The copy and paste operation is the most common way when you want to transfer the USB data. For the entire USB data, you can also copy the data and then paste on another USB. First of all, you need to make the two USB drive connected to the Windows computer.

Option 1: Open Computer (In Windows 10, click This PC), and you can find all devices connected to the computer. Right-click the USB device you want to clone and then choose the Copy option. Afterward, you can right-click the target USB device and select the Paste option. Finally, the files in the source USB will be copied to another USB.

copy USB to another USB


Option 2: Access the source USB drive and press Ctrl + A to choose all folders and files. Then press Ctrl +C to copy all selected data. In no time, you can access another larger USB drive and then press Ctrl + V to paste all copied data to the target USB. In the end, you just need to wait for the data migration ends.

copying USB files to another USB


Way 2: Clone USB Drive in Windows Using iSunshare CloneGo

iSunshare CloneGo is the effective disk cloning software that you can make good use to clone the USB data. It is safe to clone USB data to a larger USB without data loss by using this software. You are offered the free trial version.

How to Copy USB to USB in iSunshare CloneGo: 

You can utilize the Copy feature of iSunshare CloneGo to duplicate the USB data to another USB flash drive. But you will lose the data in the target USB as it will help you to format it.

Step 1: Launch the program and select Copy. At the same time, you can view all volumes detected by the software.

Step 2: Select the USB you want to copy as the source partition and another USB as the target partition.

copy USB to another USB using iSunshare CloneGo


Step 3: After that, you can click the Start button and confirm the format operation. The program will start the data cloning immediately.

start USB copying

Related Articles:

  1. How to Access USB Flash Drive with BitLocker Password Protection on macOS 
  2. How to Copy Windows OS to WD Elements SE USB Portable Hard Disk
  3. How to Password Protect a USB Flash Drive with BitLocker on Windows 10 
  4. Fixed—USB Devices Not Recognized on Windows 10
  5. Free 2 Ways to Password Encrypt a USB Flash Drive on Mac