April 23, 2019

Solved--Windows 10 System Clone without Reinstallation

“I upgrade my computer from Windows 7 to Windows 10 a few months ago with the help of my friends. Now the computer runs slowly and I want to replace the old hard drive disk to a better solid state drive. I bought the SSD online but I am hesitated to install it. I am unable to install the Windows 10 by myself and I don’t want to trouble my friend again. What’s more important, I do not want to lose the settings of my Windows 10 operation system. Is there any easy way to clone Windows 10 system from HDD to SSD without reinstallation and no data loss? I really need it!” 
clone Windows system partition to SSD with CloneGo


It is true that we need to clone Windows 10 from HDD to SSD sometimes as to save time and efforts. For example, move Windows 10 from your desktop computer to a new laptop and replace the old HDD with SSD. But most people have no idea about how to make the Windows 10 system clone completely. Due to this reason, we would introduce iSunshare CloneGo—the powerful but easy to use Windows cloning software here as well as show you how to clone Windows 10 system from HDD to SSD within few steps. 

Steps to do Windows 10 System Clone with iSunshare CloneGo 

iSunshare CloneGo is the third-party Windows cloning software which is qualified for system and partition copy and backup. Everyone can free download this program to copy/clone Windows 10 OS easily with no data loss.



CloneGo free download

Step 1: Make your SSD connected with your desktop or laptop computer. Meanwhile, initialize the SSD and add more volumes.

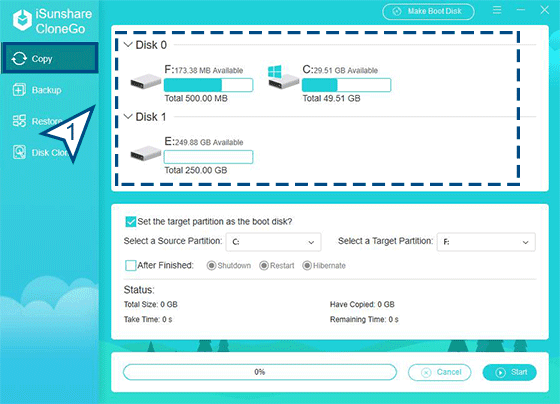
Step 2: Open iSunshare CloneGo and click Copy. The current system partition and your SSD partition will be automatically deleted by the program and get listed on the interface with details. 
iSunshare Copy interface


Step 3: Choose the Windows 10 OS partition as the source target and choose a volume from SSD with enough space to store the Windows 10 system data. 

set the source partition and target partition


Step 4: Click Start and get a text box saying that this operation will format the destination target. You should click Yes when the SSD partition is new with no data.

start copying windows 10 to SSD


The software will help you clone Windows 10 system automatically. When the process ended, you can try to reboot your computer from the SSD. Believe it or not, CloneGo is efficient in hard drive upgrade, system backup, and data transfer. It has the external Backup and Restore features for the Windows system and data. Everyone can try it now for free!

Related Articles:

  1. How to Clone Windows 10 OS to a Smaller SSD
  2. How to Backup Windows 10/8/7 ComputerPartition to a New Hard Drive
  3. Easiest Way to Clone DynamicVolume/Partition to Basic disk in Windows Computer 
  4. How to Clone HDD to SSD in 32/64 Bit Windows Laptop


April 16, 2019

[Free and Safe] How to Clone A Hard Drive in Windows 10/7 to SSD

How does your computer work? Does it meet with your increasing the working requirement? If you feel it is out of date and want to upgrade the hard drive to a new and larger one, how can you deal with the software and data in it? How can you make the new hard drive works smoothly with all the same configurations and settings? You can find the easy and safe solution of clone hard drvie to SSD here.

clone hard drive to SSD


From my point of view, the novices are eager for a safe and convenient way to transfer the Windows 10/7 OS and partition to SSD. So am I! Some people may choose to simply install the new SSD instead of the original hard drive. As a result, they need to reinstall Windows OS and all other tools again, which will waste much time to do the annoying operations for novices. As a matter of fact, I found the much safer, faster and more convenient way to do an exactly hard drive clone to SSD. You just need the free Windows cloning softwareiSunshare CloneGo and a larger SSD.

CloneGO free download

iSunshare CloneGo is the professional disk cloning software for Windows users to clone everything on the hard drive in the partition-to-partition mode. You need to make sure that the target disk is larger than the source disk. And after cloning, the target disk is 100% identical to your source disk. Now let see how fantastic it is.  


Steps to Clone a Hard Drive to SSD in Windows 10/7 

To Clone an old hard drive to SSD, iSunshare CloneGo is one of the best and free choices because of its intuitive interface and powerful functions. 

Step 1: Launch iSunshare CloneGo and click Disk Clone. Next, select your original
disk with the Windows operating system to be the source disk. Of course, the SSD
should be the target disk. 

clone a hard drive to ssd

Tips:
l  You should initialize the SSD if it is new and add simple volume to it. Otherwise, you will see its partition is named as Uninitialized.
l  If there is any data in the SSD, backup it in advance.

l  If your source disk is the dynamic disk, some partitions might not be listed in the system and the two disks can not be presented at the same time after cloning. 

Step 2: Click Start and you will get the format pop-up box. Click Yes and the software will start the disk data cloning to SSD instantly.

start disk cloning

Step 3: When the hard drive is cloned to SSD successfully, you will receive a box and click the OK button.

hard drive clone to SSD successfully


After that, you can go to disk management to see that the two disks have the same partitions. And for the SSD, there is unallocated space which you can use to extend the system drive or add new volumes.

check disk details in disk management after cloning

Of course, you can restart the computer and keep pressing Del key to enter UEFI Bios settings. Then set the computer to boot from SSD. You can now have a check whether the SSD with copied system and partition can work normally or not!

Related Articles: 


April 1, 2019

How to Backup Windows 10/8/7 Computer Partition to A New Hard Drive

Case 1Can I clone system partition to a new drive?

I bought a new SSD and want to upgrade my computer. I added it to my computer a week ago and now I want to clone system partition to SSD. But the problem is if I just copy-and-paste all programs and files, the computer cannot be booted from the SSD. So I want to know if there is partition clone software that can help me to clone the entire system partition.”

Case 2: How can I backup computer partition quickly?

In my working computer, I placed all the needed software and files in a partition. And now the company is going to get a new computer for us. How can I backup or move the working data into a hard drive or transfer it into my new computer? They are so important in my working!”

Case 3: The partition has little space, what can I do for the pictures and videos files?

“As you know, we all have the unforgettable memories. All the photos and videos that can remind me of the happy times are stored on my laptop. I collected them together in one partition. But as time went by, there are little space in the partition and my computer run slowly. I want to back up the partition to my USB mass storage device. How can I do it effectively?”

 Backup Windows 10/8/7 Computer Partition to A New Hard Drive


Are you having a similar issue as the above-mentioned problems? If you want to clone or backup the computer partition to another hard drive, SSD/ HDD or even the USB mass storage devices, just relax and follow the solutions here to clone the partition.

First, download the free partition backup software

To make the partition data clone process easy for you, we highly recommend you a free partition backup softwareiSunshare CloneGo, which can help you to clone/backup the Windows OS and partition with simple clicks. You can download and install it on your PC and enjoy the 7-days free usage for all functions.


Second how to backup Windows computer partition to a new hard drive

No matter you are using the Windows 10/8/7 system on a computer, no matter you are going to backup system partition or other partition, iSunshare CloneGo can help you to do that without any data loss or damage.

Step 1: Run iSunshare CloneGo and enable the Backup feature. You can see in the right menus that all the partitions are listed here. The partitions in different hard drive will be named differently. For example, here, K and L partition are in the disk 4.

click Backup function

Step 2: Select the partition to backup. You should select a volume to backup from the first part of the right menu. 

choose a partition to backup

Step 3: Select the path to save the backup file by clicking Choose button. You can store the backup file in any partition. This compressed icg file can be stored in the internal partition or external partition.


Step 4: Click the Start button to begin the clone process, and then click the Yes button for further confirmation.

start the backup

Step 5: After this, the software will start backing up the partition immediately.


After the backup, if you want to check the backup data, you should restore the data firstly. Take an overview of the Restore process below: Click Restore and select the destination partition to save the backup data; click the Choose button to add the backup file; click the Start button; click Yes to agree on the format. After that, the backed up data will be restored to the target partition soon and you can open and check it if needed.

Tips: What if I do not want to compress the partition data into SSD/HDD

As you can see, if you use the backup feature to back up Windows 10/8/7 data partition to the SSD/HDD, it is impossible for you to view it for details directly. If you want to move the data partition data to another drive without compressing, you can use the Copy function of iSunshare CloneGo. The data copied to the target partition in HDD/SSD will be 100% identical to the partition you want to backup. Besides, you can easily reach the backup data.

Step 1: Launch iSunshare CloneGo and you can view the Copy interface directly.

Step 2: Select the source partition—the partition you want to back up; and the target partition –the partition from SSD/HDD you want to save the backup data.

Step 3: Click the Start button and the software will tell you that this operation will format the target partition. Hit Yes and the copy process will begin.

Step 4: After the cloning process comes to an end, you can close the software and directly open the target partition to check the backup data. It is much convenient for you to access the backup data. 

copy partition data to SSD or HDD for data backup


March 11, 2019

Can I Open/Unlock BitLocker Encrypted Drive in a Different Computer

“I have a data drive with the BitLocker protection. And I do not bring my own Windows 7 laptop here. Can I open/unlock BitLocker encrypted drive in a different computer, such as Mac? I have the BitLocker password now.”


Can I unlock BitLocker drive on a different computer


Now in this article, we will show you the ways to open/unlock BitLocker encrypted drive in a different computer: macOS/Mac OSX and Windows 10 computer. With the BitLocker password, it is quite easy for you to gain access to the data inside the drive.

How to open/unlock BitLocker encrypted data drive on Mac.

If it happens to be a macOS or Mac OSX alongside, you need a third-party tool to make the BitLocker encrypted data drive readable on Mac as you will get the error message “The drive you inserted was not readable by this computer” when you inserted the data drive into Mac. When it comes to the BitLocker unlock tool for Mac, iSunshare BitLocker Genius is highly recommended. This software empowers users to unlock the BitLocker data drive in a quite easy way. For the users who have the BitLocker password, they just need to input the password and make it accessible in seconds.


Step-1: Access the BitLocker Genius after you installed it on your Mac. Meanwhile, insert the BitLocker data drive into Mac and click Ignore button when you see the error message. As a result, in the intuitive user interface of BitLocker Genius, you can see the BitLocker drive in a glance.

Step-2: It is time to get the unlock options. You need to click the BitLocker data drive with “bitlocker” mark and then go to the Unlock button and hit it.

unlock option in the BitLocker unlocl tool for mac


Step-3: Here, the simplest way to unlock the BitLocker drive is to enter the password and click the Mount button. For the users who do not own the password at the emergency time, they can utilize the recovery key file on the condition that you backed up the recovery key file online. In such a case, you can download the file and add it into the software to mount the BitLocker data drive.

two ways to unlock the BitLocker drive on Mac


Step 4: The BitLocker data drive is unlocked on the Mac desktop. Also, in the software interface, you will see there is a new data drive which is labeled with “Unlocked from disk 1s1”. You can open and access the drive on the desktop. Besides, you can copy and share the contents in the drive.


the BitLocker drive is unlocked on Mac desktop


It is worth mentioning that after you successfully deal with the data in the drive, you need to click the Eject button on the software to make the BitLocker disk disconnected.

Two ways to unlock/open BitLocker drive on Windows 10 computer

Here, it is no need to resort to any tool to unlock BitLocker drive if you have the password or recovery key as BitLocker function is the unique feature of Microsoft. In the following, two ways are listed for you to open the BitLocker data drive. Before we move to the specific steps, you need to check whether the Windows 10 edition supports BitLocker encryption or decryption or not.

Way 1: Directly unlock the BitLocker drive with password or recovery key

After your plug the BitLocker data drive on Windows 10, you can find it on your PC and click to get the password option. Enter your password and the whole drive will be unlocked immediately. If you forget the password, you can use click Fewer options to get the recovery key option and then input the 48-digit recovery key. No matter which option you choose, you can make it unlocked at once.

directly open BitLocker drive in Windows10


Way 2: Open the BitLocker data drive via Command Prompt


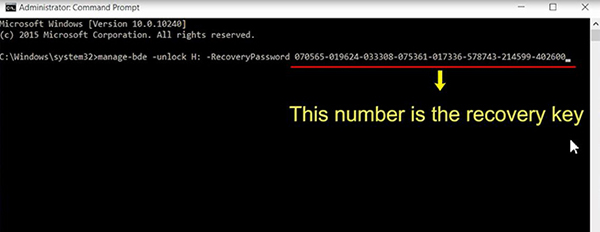
It will be easier for those who are talented in programming. They just need to run the command prompt as an administrator and enter these commands: manage-bde –unlock H: -RecoveryPassword  YOUR-BITLOCKER-RECOVERY-KEY . Here, the character H means the character for your drive and YOUR-RECOVERY-KEY means you need to enter the 48-digits here. After executing the commands, your drive will be unlocked soon. 

using command prompt to unlock BitLocker in Windows 10


Related Articles:


February 26, 2019

Fixed USB Thumb Drive is not Readable by This Computer on MacBook

“When I inserted my SanDisk 4GB USB thumb drive into my MacBook, it tells me that there is an error: the disk you inserted was not readable by this computer. I did not know what happened. I did not want to initialize it as I have important data on it. Is there any solution for this issue? What makes the error happen?”

the disk you inserted was not readable by this computer


When you get the error message “the disk you inserted was not readable by this computer” on MacBook, don’t worry. Firstly, we should know the reasons for this error and find out the solutions. Here, we will discuss both of them together.

Case 1: Reconnect the USB thumb drive

For most of the people, the reason for the unreadable USB thumb drive may be the faulty USB port or cable. So the first thing you should do is to check whether there is a faulty connection or not. Just make the USB thumb drive connected to MacBook in another USB port or cable. If you do not get such message, you can make sure that the error is caused by the faulty USB port/cable.

Case 2: Check the error with Mac in-built repair tool

If there is no faulty in your USB port, you can check the error with Mac in-built repair error: Disk Utility. You need to find and click Applications > Utilities > Disk Utility. After that, choose your own SanDisk USB thumb drive and hit First Aid. The First Aid option will help you check the minor error and repair it.

Case 3: The USB thumb drive is encrypted with BitLocker password.

If your USB thumb drive is still unreadable even after First Aid, in this case, the drive might be encrypted with BitLocker password before in Windows computer. And we are unable to open and read the BitLocker protected USB thumb drive on MacBook directly. In order to solve this issue, you can make good use of the small utility—BitLocker Genius to unlock the drive on MacBook with password or recovery key file.


Step 1: Download, install and register the software on your MacBook. It will cost you a few minutes to do it.

Step 2: Open the software and you can see that your USB thumb drive appears on its interface with “bitlocker” label. Hit the drive and click the Unlock button.

click BitLocker drive and the Unlock button


Step 3: Here, you can either enter the password or add the recovery key file to unlock the BitLocker USB thumb drive. And you can get the USB thumb drive readable on MacBook after clicking Mount button.

Unlock BitLocker drive with password or recovery key


Step 4: Your USB thumb drive is displayed on the MacBook desktop. And now you can open, read and write the drive easily. When you want to disconnect it, just click the Eject button on the software.

Case 4: Format the USB thumb drive

If your USB thumb drive is not protected by BitLocker or you lost the password and recovery key file, the only way you can do it is to format the drive at the cost of data loss. But you can recover the data from unreadable drive firstly on MacBook. How can we get the data from an unreadable USB thumb drive? You will find the Mac data recovery software useful. Search online and find the one that meets your requirement.

After you recover data from the USB thumb drive, you can enter Applications > Utilities > Disk Utility. Then choose your USB drive and click the Erase button. 

Related Articles:


February 18, 2019

3 Methods to Unlock BitLocker USB drive when Password is Lost

Failed to enter the correct password of BitLocker USB? Microsoft has taken this situation into consideration so that it developed the recovery key feature for the BitLocker function. When the password is lost or forgotten, users can use the back-up recovery key or recovery key file to unlock the BitLocker USB drive. Here we summed up 3 methods for users to open the BitLocker USB drive with recovery key.

unlock BitLocker without password


Method 1: Unlock BitLocker USB Drive with Recovery Key Directly in Windows


In Windows default settings, when you insert the BitLocker USB drive and are going to open it, there will be more than one option. If you lost the password, you should get BitLocker recovery key firstly. Then click the drive and choose fewer options to get Enter recovery key option. Next, you need to find the 48-digit recovery key from your backup file and enter it to unlock BitLocker USB drive.

Unlock BitLocker USB drive


Method 2: Open BitLocker USB Drive with Recovery Key File on Mac

If you have no Windows laptop for working and have no BitLocker password, how could you an open BitLocker USB drive with recovery key file on Mac? You only need a helper: iSunshare BitLocker Genius. With iSunshare BitLocker Genius and the recovery key files, you can unlock the BitLocker USB drive with following steps: Launch the software, choose the disk and click Unlock button, add the recovery key file and click Mount Button. Within minutes, you can see that the drive is shown on the Mac desktop.

Open BitLocker drive on Mac with recovery key file


Method 3: Access BitLocker USB with Recovery Key through Command Prompt

If you are a computer professional worker, there is another way for you to unlock the BitLocker USB drive. This way is only for Windows users. You can run the command prompt as an administrator and type the commands: manage-bde -unlock F: -RecoveryPassword YOUR-BITLOCKER-RECOVERY-KEY , press Enter and the drive will get unlocked at last. 

unlock BitLocker drive via command prompt


Related Articles:

February 14, 2019

Read a Windows 7 BitLocker Drive in OSX—Solved

“My brother sent me a MacBook Pro arriving in a few days. And I already backed up my documents on Windows 7 laptop to an external HDD with BitLocker encryption. I did not know that he would buy me OSX laptop and I thought it would be a Windows Notebook which I only need to enter the password to transfer the documents. Now my issue is that how can I make the BitLocker external HDD readable in OSX. My MacBook is big enough to store the documents. Is there any tool out there that will allow me to use this drive with the Windows encryption in OSX?


Do you think is it possible to open and read the HDD drive with Windows 7 BitLocker on MacBook Pro? Yes, now Mac users can unlock the BitLocker encryption external hard drive on Mac with iSunshare BitLocker Genius—the software which opens a door to reach the BitLocker contents safely.

Of course, you can choose to transfer the documents through the network if your Windows 7 computer is alongside. But With iSunshare BitLocker Genius, you can read a Windows 7 BitLocker drive in OSX in minutes with following tutorials.


First of all, you should download and install iSunshare BitLocker Genius on your MacBook Pro. It will take you minutes. Also, you need to register the software to be the paid users so that you can enjoy the intelligent functions.

read BitLocker drive on Macbook

Then, you should connect the external HDD with your Macbook and run iSunshare BitLocker Genius. The software will detect your drive and mark it with a BitLocker text under Encrypt category. Click the drive and choose the Unlock button on the top toolbar interface.


detect BitLocker drive in OSX to unlock


On the continue interface, you will be given two methods to read the Windows 7 BitLocker drive in OSX. The first one is to type the BitLocker password to mount the HDD. It is perfect for the above user to use the drive. The other method is to import the BitLocker recovery key file and unlock the drive. For those who back up the recovery key on the cloud, they can download it on Mac OSX and utilize it to unlock the drive.


mount the Windows 7 BitLocker drive with password


After the important steps, your external HDD will be unlocked and appear on Macbook desktop and you can freely transfer the documents into your Mac. After you finish the transformation, you can click the Eject button to disconnect the external HDD and enjoy your Macbook using experience.