May 29, 2024

Download BitLocker Encryption Software for Windows 11/10 Home to Encrypt a Drive

 “I cannot find Turn on BitLocker option for my drive in Windows 11 Home edition. My friend told me that BitLocker is not supported on Windows Home edition and suggest me to upgrade the Windows 11. I do not want to do that? Is there any BitLocker drive encryption software that can enable me to BitLocker protect the drive in Windows 11 Home PC? Thanks!”

Yes, there is no Turn on BitLocker option on the drop-down menu of a drive in Windows 11/10 Home edition. But you can free download BitLocker drive encryption software, such as iSunshare BitLocker Genius for Windows, to protect the drive. This software makes it easier to encrypt a drive with the BitLocker protection in Windows 11/10 Home PC.

download BitLocker drive encryption software for Windows 11/10 Home

Why Choose iSunshare BitLocker Genius for Windows?

If you are going to search for BitLocker software download, iSunshare BitLocker Genius for Windows is the most reliable and professional BitLocker encryption software, which is compatible with all Windows OS in 32-bit and 64-bit, not limited to Windows 11/10 Home edition. In other words, you can turn on/off, unlock, and lock the drive with this software on your Windows computer.

Similar to the Windows built-in BitLocker, BitLocker Genius offers the BitLocker password and recovery key options for users to unlock and decrypt the drive. Also, you can save the BitLocker recovery key file on any folder when you set up the BitLocker protection for your drive. Besides, it is available to encrypt only used-space on the drive, which can greatly improve the encryption speed.

What’s more, with this BitLocker encryption software, you can easily encrypt the internal data drive, external hard drive and USB flash drive within clicks. Thus, all data can be protected safely from unauthorized access.

download iSunshare BitLocker Genius for Windows

How to Turn on BitLocker for A Drive in Windows 11/10 Home

Step 1: Download iSunshare BitLocker Genius on your computer. Then finish the installation and open the software. If you want to encrypt the USB drive, insert it into the computer.

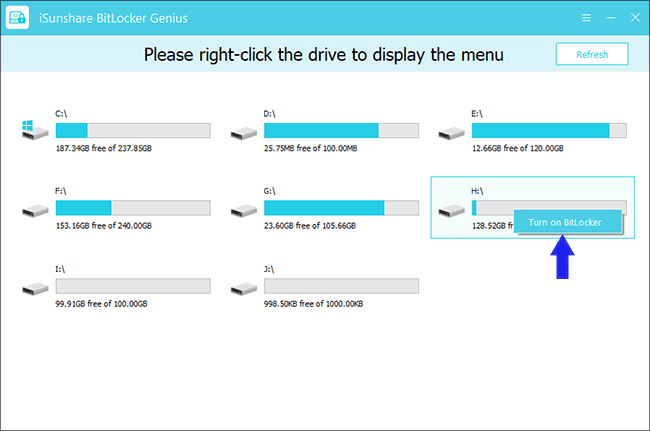
Step 2: Hit the drive and choose Turn on BitLocker option to set BitLocker encryption for the drive.

choose Turn on BitLocker

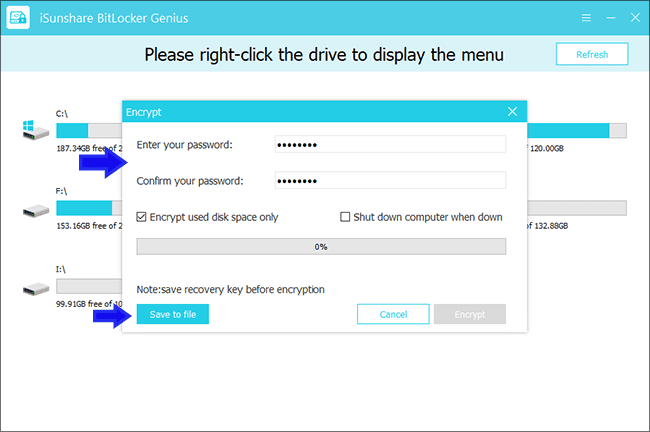
Step 3: Set the BitLocker password to encrypt the drive. After that, hit the Save to file button to save the BitLocker recovery key.

set Password and save recovery key file

Step 4: Hit the Encrypt button to start encrypting the data in the drive. Wait patiently until the process ends.

click Encrypt


Summary:

If BitLocker is unavailable on your Windows 11/10 Home edition PC, you can try iSunshare Bitlocker Genius for Windows to attach BitLocker encryption to a drive. Also, this software can help you quickly remove BitLocker from the drive. 

Related Articles:

  1. How to Encrypt USB Flash Drive in Windows 10 
  2. Fixed—USB Drive is not Readable by This Computer on Macbook
  3. BitLocker is not Available in Windows 10, What to Do?
  4. Does Windows 11 Home Have BitLocker Encryption? 

February 20, 2024

Three Effective Methods to Bypass Google FRP on Your Samsung Galaxy

 The Factory Reset Protection (FRP) feature on Samsung Galaxy devices provides robust security by preventing unauthorized access to personal data. However, if you find yourself locked out of your device due to forgotten Google account credentials, there are ways to bypass the FRP lock. This article will explore three unique methods to bypass Google FRP on a Samsung Galaxy device using iSunshare Android Password Genius, Google Keyboard, and Talkback.

bypass Google FRP on Samsung Galaxy


Method 1: Bypass Google FRP with iSunshare Android Password Genius

The easiest way to bypass Google FRP on Samsung phones is to use FRP lock software, such as iSunshare Android Password Genius. It is compatible with most Samsung models and Android OS versions. Aside from that, it is easy to bypass Google verification on Samsung phones with this software. You can finish the operations in several simple clicks.

Step 1: Get iSunshare Android Password Genius. On a computer, download and install iSunshare Android Password Genius from the official website.

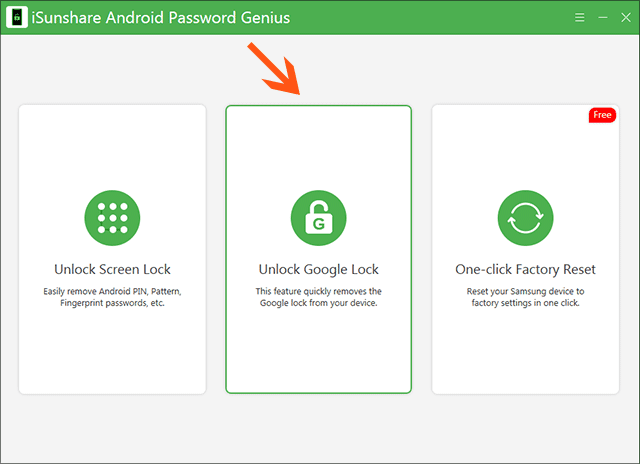
Step 2: Launch iSunshare Android Password Genius and choose the Unlock Google Lock option.  Then select the Samsung brand on the prompt.

choose Unlock Google Lock

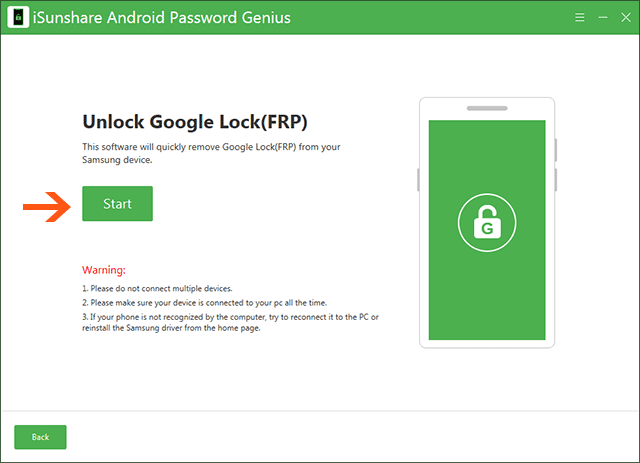
Step 3: Connect Your Samsung Galaxy Device. After that, hit the Start button.

click the Start button

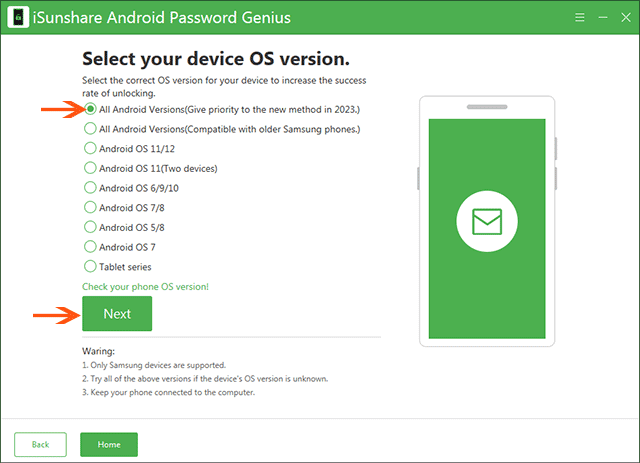
Step 4: Now select the All Android Versions option and click the Next button.

select OS version

Step 5: Soon, the software will detect your Samsung phone and you can follow the on-screen instructions to bypass the FRP lock on your Samsung Galaxy device.

onscreen instructions to bypass frp lock

Step 6: Once the process is complete, you will receive a notification stating that the FRP bypass was successful.

bypass Google FRP successfully

Method 2: Bypass Google FRP with Google Keyboard

If you do not want to pay for the FRP bypass software, you can try to bypass Google lock without PC.  The mentioned method below is free but only works on several Samsung models and Android versions. You can have a free trial.

Step 1: Power on your Samsung Galaxy device and follow the initial setup steps until you reach the Google Account Verification screen. You should connect your device to a Wi-Fi network. Ensure that the network you choose provides a stable internet connection.

Step 2: On the Google Account Verification screen, enter any random text in the username field.

Step 3: Double-tap and hold the entered text to highlight it, then tap on the "Copy" option that appears.

Step 4: Tap on the text input field to make the keyboard appear. Tap and hold the "Settings" gear icon on the keyboard to access keyboard settings.  Then, tap on the "Languages" option.

Step 5: Choose “Add Keyboard" or "Manage Keyboards". After that, select "Google Keyboard."

Step 6: Tap on the "Language" option within Google Keyboard settings. Now you can select any language other than the one currently selected.

Step 8: Return to the Google Account Verification screen. Double-tap on the username field to highlight it. Tap on the "Paste" option that appears. This should paste the text you copied earlier.

Step 9: Proceed to enter any random characters in the password field. Tap on the "Next" button. Finally, you can follow the on-screen instructions to complete the setup process.

Method 3: Bypass FRP with Talkback

Google Talkback method can only help to bypass Google FRP on Samsung phones that run Android 5.0 and Android 7.0. And its success rate is low.

Step 1: On the Google Account Verification screen, draw an "L" shape on the screen using your finger.  Then the Global Context Menu comes.

Step 2: Double-tap on the "Talkback Settings" option. Slide the Talkback switch to the "On" position.

Step 3: On the Talkback screen, you should double-tap on "Settings”>"Accessibility"> "Accessibility Shortcut". Then, select "Talkback" as the shortcut option.

Step 4: Press the physical "Home" button on your device to return to the home screen. Then, you need to triple-tap the screen to open the Talkback tutorial. Afterward, go to swipe right to left using two fingers to access the Talkback Settings. Double-tap on "Pause Feedback" to temporarily disable Talkback.

Step 5: With Talkback paused, swipe right to the left using two fingers to navigate through the home screen panels. Locate and open the YouTube app.

Step 6:  Search for any video and play it. During the video-playing process, you need to tap on the "Share" button below the video.

Step 7: Tap on the "3-dot" menu icon in the Share menu. Select "Gmail" or any other email app installed on your device.

Step 8: In the email app, enter any email address in the "To" field. You should long-press on the entered text to bring up the context menu. Tap on "Assist" or "Google" to open the Google app.

Step 9: In the Google app, search for "Settings." Tap on the "Settings" option from the search results. In the Settings menu, navigate to the "Backup & Reset" or "System" section.

Step 10: In the Backup & Reset or System section, locate and tap on "Factory Data Reset."  Then follow the on-screen instructions to perform a factory reset on your device.

Conclusion

This article explored three unique methods to bypass Google FRP on a Samsung Galaxy device.  With these methods, you can easily unlock the Google lock and access your Samsung Galaxy phone. Among these methods, iSunshare Android Password Genius is the easiest one which can apply to most of Samsung Galaxy phones. It has a high success rate. 

Related Articles:

  1. Can You Use a QR Code to Bypass Google Account Lock
  2. Solved—Samsung Galaxy Stuck in Safe Mode
  3. Solved—I cannot Access My Home Screen on Samsung Galaxy 

December 13, 2023

iPhone Locked to Owner—How to Unlock with or without Computer

 If your iPhone is displaying a message that says “iPhone locked to owner”, it likely means that the iPhone is linked to an Apple ID, and the activation lock feature has been enabled. The Activation Lock feature was introduced with iOS 7 and has been a key security feature since then to prevent unauthorized use of an iPhone/iPad/iPod touch. Thus, how can you resolve the iPhone Locked to Owner issue? You can consider the following methods to unlock the iPhone Locked to Owner with/without a Computer.

unlock iPhone locked to owner


Why Your iPhone Says iPhone Locked to Owner

There are several common scenarios in which this message will appear on the iPhone screen:

1. Your iPhone is second-hand.

If you bought a second-hand iPhone, the Apple ID of the previous owner might not be removed from the device. Therefore, it is necessary to resort to the previous owner to unlock the iPhone locked to the owner with the Apple ID and password.

2. You forgot the Apple ID password

If you are the owner but you forgot the Apple ID password, it is easy to reset the Apple ID password via the official Apple ID website only if you can prove the account belongs to you.

3. The iPhone was reported as lost or stolen

If the original owner has activated Lost Mode through the Find My iPhone feature, the activation lock will be active.  As a result, you will see the iPhone locked to the owner on the lock screen.


How to Unlock iPhone Locked to Owner with Computer

If your device shows an iPhone Locked to Owner screen, you can easily turn off the Activation Lock with a computer in different situations.

Method 1: Contact the Original Owner to Remove Remotely

If you purchased the iPhone secondhand, you can contact the person you bought it from and ask him to remove the device from their Apple ID. The below operations should be conducted by the previous owner with any computer.

Step 1: Sign in to icloud.com and choose the Find My option from the menu.

choose Find My

Step 2: On the left side, select the locked iPhone to enter.

choose the locked iPhone

Step 3:  Choose the option Erase This Device and follow the instructions to erase all data on the iPhone.

click Erase This Device

Step 4: After the iPhone is erased, select Remove This Device to remove the Apple ID from this iPhone.

choose Remove This Device


Method 2: Reset Your Apple ID Password

If you are the owner but you forgot the Apple ID password, you can directly go to the Apple Apple ID reset website and choose Forgot Password option to reset your Apple ID password

click Forgot passcode


Method 3: Unlock iPhone Locked to Owner without Previous Owner and Apple ID

If you cannot contact the previous owner or you failed to reset the Apple ID account, is it possible to unlock the iPhone locked to the owner without an Apple ID? iSunshare iBypass Genius offers you a reliable solution to remove the iPhone locked to the owner screen on almost all iOS, including the latest iOS 16.7. You can perform simple steps to access the iPhone with the below steps:

Step 1: Get iBypass Genius on your computer. Open it and choose Bypass ID on the interface.

choose Bypass ID

Step 2: iSunshare iBypass Genius will perform jailbreaking on the iPhone before removing the activation lock. Thus, you need to read the agreement and warning tips on the Start interface. If you agree with these items, click the Start button to proceed.

click Start

Step 3: Follow the instructions to create Fakefs in iPhone DFU mode.

create Fakefs in DFU mode

Step 4: Put your iPhone into DFU mode to bypass the Activation lock.

enter DFU mode again

Step 5: You got the successful message. And now you can open the iPhone and set up without the linked Apple ID.

bypass iPhone locked to owner successfully

How to Unlock iPhone Locked to Owner without Computer

Is it possible to bypass the iCloud Activation Lock with no Apple ID and no PC? Yes, of course. You can remove the iPhone locked to the owner without a computer with below two options below.

Option 1: Remove iPhone Locked to Owner with Device Password

This method only works on the occasion that you set the screen password before and the iPhone is in iOS 15 or later. Besides, Two-Factor Authentication should be enabled in the locked iPhone.

Step 1: In the iPhone Locked to Owner activation screen, you can see the Unlock with Passcode option. Tap it to continue.

Step 2: Tap the Use Device Passcode option.

Step 3: Enter the correct password which is used to unlock the iPhone before. After that, you can go ahead to set up the iPhone as yours.

remove-activation-lock-with-device-passcode

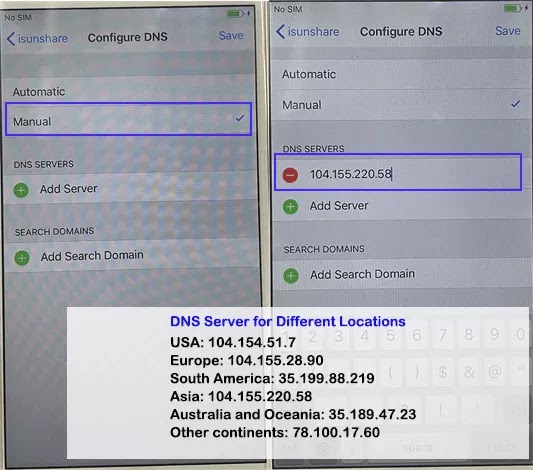
Option 2: Bypass iPhone Locked to Owner via DNS

If your iPhone runs iOS 8 to 10, you can change the DNS settings to bypass the iPhone Locked to Owner screen.  But it is with a low success rate.

Step 1: On the Activation Lock screen, tap the Back icon on the top left corner until you are on the WiFi settings screen.

Step 2: Choose your WiFi and tap the i symbol at the end. If you cannot see the i symbol, you can press the Home button and choose WLAN settings to make it appear.

Step 3: Tap Forget This Network and choose Forget.

tap Forget

Step 4: You will be back to the Choose a Wi-Fi Network settings. Choose the i symbol of your WiFi network again. Now choose the Configure DNS option. 

choose Configure DNS

Step 5: Change to Munal and enter the DNS server IP address to save.

manually add DNS server

Step 6: Tap the Back icon on the top left corner and connect your WiFi. Finally, restart your iPhone and set it up to check whether the Activation Lock is bypassed or not.

Related Articles:

  1. How to Bypass iPhone Locked to Owner
  2. How to Remove MDM from iPhone or iPad
  3. How to Unlock iCloud Locked iPhone without Apple ID 

November 17, 2023

How to Remove MDM from iPhone or iPad

 Mobile Device Management (MDM) is a technology that is widely used by organizations and companies to manage the mobile devices of their employees. MDM software allows companies to ensure security compliance, push software updates, control access to company data, and enforce company policies. While MDM software provides a secure and efficient way to manage corporate devices, there may be instances when its presence is unwanted. For individuals who want to remove MDM from an iPhone/iPad, this article provides a step-by-step guide.

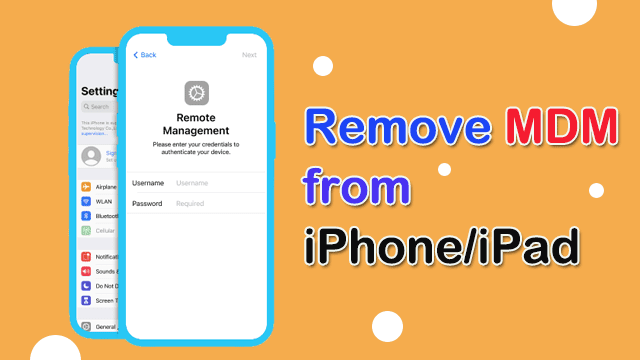
remove MDM from iPhone or iPad


Part 1: Check Your Permissions

Before attempting to remove MDM, it’s essential to check your permissions. If your iPhone/iPad is managed by an organization or your employer, you may not have the authority to remove MDM. Therefore, it’s best to contact the IT department or system administrator for assistance.

Part 2: Remove the MDM Profile

You can try to remove the MDM profile from your iPhone/iPad to get rid of the remote management.  The actions will vary on different iOS versions and your iPhone/iPad models.

Step 1: Open the “Settings” app on your iPhone.

Step 2: Tap “General” and look for “Device Management,” “Profile,” “Profiles & Device Management” or “VPN & Device Management.” It depends on your iOS version.

Step 3: Tap on the MDM profile and select “Remove” , “Delete Profile” or “Remove Management”

Step 4: It will ask you to enter the password to process. Finally, tap “Delete” to confirm your removal of the profile.

remove MDM from iPhone settings


Part 3: Use MDM Bypass Software to Remove MDM Lock

If there is no option to remove the MDM profile on your iPhone/iPad, how can you delete the MDM lock from your iPhone/iPad? The professional MDM bypass software can help you. iSunshare iPhone Passcode Genius is one such tool that can help you remove MDM from iPhone/iPad without credentials.  

Even if you reset the iPhone/iPad, the remote management screen will also stop you from accessing the iPhone/iPad if you are without the login username and password. iSunshare iPhone Passcode Genius can help you bypass remote management without a username and password, even without jailbreak. It is 100% safe to get your iPhone/iPad out of supervision.

Step 1: Download, install, and run iSunshare iPhone Passcode Genius on your Windows or Mac computer. After that, connect your device to the computer and make it detected. Now, you can select the “Remove or Bypass MDM” feature on the software interface.

select Remove or Bypass MDM


Step 2: After your iPhone/iPad is successfully detected, you can click “Start” to remove MDM.

click Start


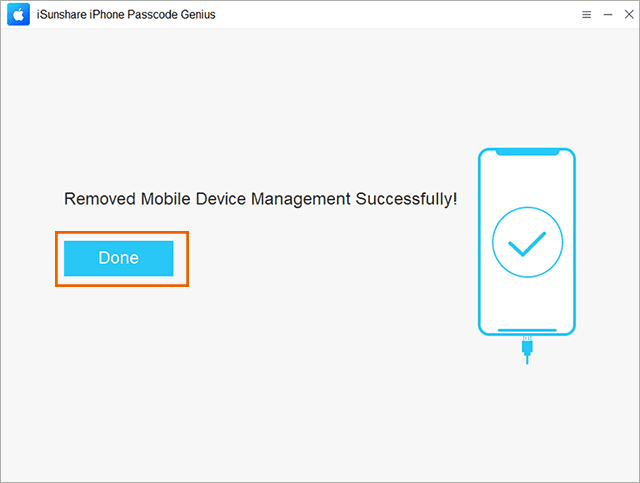
Step 3: In minutes, the MDM is removed successfully. And your iPhone/iPad restarts with no MDM restrictions.

remove MDM successfully


Part 4: Remove MDM Lock from iPhone/iPad via Jailbreak

You can also remove the MDM lock from your iPhone/iPad by jailbreaking it. However, the process is complicated and also may not work in every scenario. You can check operations here to jailbreak the iPhone.


In Conclusion

Removing MDM from an iPhone can be a lengthy and somewhat complicated process, especially if the MDM profile is locked by a powerful configuration. It’s always crucial to check your permissions before attempting to remove MDM. If you are unsure or do not have the required permissions, contact your IT department or system administrator for assistance. Or you can use iSunshare iPhone Passcode Genius to remove MDM with a simple click.

By following the steps provided in this guide, you can remove MDM from an iPhone/iPad, and have full control of your device. 

Related Articles: 

  1. Solved--No Option to Remove MDM Profile on iPhone or iPad
  2. How to Remove Device Supervision from iPhone/iPad
  3. No option for Forgot Screen Time Passcode 
  4. iPhone Unavailable No Erase Option-- How to Unlock Unavailable iPhone

September 4, 2023

How to Downgrade iOS 17 to 16 without Losing Data

 Apple has released the iOS 17 beta for a few months. Many iPhone users are curious about the new functions, so they downloaded and installed iOS 17 beta on their iPhones. Since iOS 17 is still in testing, bugs are still developing. So, many people prefer to use the previous iOS and want to revert iOS 17 back to 16. Can we downgrade iOS 17 to iOS without losing data? Yes, you can learn two simple ways in this article.

downgrade iOS 17 to 16

Pre-downgrade: Back up iPhone Data  

To prevent iPhone data loss, it is essential to back up your iPhone data before downgrading the iOS. You can choose a way to back up iPhone data: iTunes/iCloud or other third-party tools, such as iSyncGenius.  After that, perform the iPhone backup immediately.

Reference

  1.  Easily Backup iPhone to a Windows Computer 
  2. How to Back up iPhone/iPad/iPod 

Way 1—Downgrade iOS within Clicks via iSunshare iOS Repair Genius

If you have created the backup of your iPhone, you can choose iSunshare iOS Repair Genius to uninstall the iOS 17 and reinstall the signed IPSW. With this software, you can easily downgrade iOS 17 to 16 with clicks.

Step 1: Download, install, and launch iSunshare iOS Repair Genius. Then choose iOS Upgrade/Downgrade> Downgrade iOS.

choose Downgrade iOS

Step 2: Connect your iPhone to the computer. If it asks for your commission to trust the computer, tap Trust on your phone and then enter the screen passcode.  After that, click the Next button to load iPhone details.

click Next

Step 3: In no time, you are on the Download the Firmware Package Online interface. Here, your current iOS version is shown. And in the firmware version section, you can get the available iOS version you can go back to. Besides, you can click the Select button on Save path section to define the location to save the downloaded firmware software. Now, click the Download button to go ahead.

download firmware package


Step 4: The downloading is in process. You just need to wait patiently.  Minutes later, you are on Verify success & ready interface. Hit the Start button and there is a pop-out to tell you that the operation will erase the data. Click OK and then the software will start downgrading your iPhone iOS to a previous one.


click Start

Way 2—Downgrade iOS 17 to 16 with iTunes

If you have installed iOS 17 beta, iTunes can also help you to get back to the latest stable iOS version. This way works on both Windows and Mac computers, only for the beta version.

Step 1: Connect your iPhone to the computer. Then put the iPhone into recovery mode.

Step 2: Open iTunes on your computer and you will see a prompt. Click Restore on the prompt to proceed.

Step 3: Click Restore and Update. Then iTunes will install the latest published release of iOS 16 to your iPhone.


restore iPhone in recovery mode

 After-downgrade: Restore backup to iPhone

No matter which way you use to downgrade the iOS 17 version on your iPhone, you will get a brand-new iPhone that starts from the Hello screen. You can get the option to restore the iPhone data from iTunes or iCloud. If you use the third-party tool to back up iPhone, you can restore it back with the third-party tool after it is setup. 

FAQs about Downgrading iOS 17 Beta

1.       Will I lose data after downgrading iOS 17 beta?

It depends. If you do not create the iPhone backup before downgrading the iOS 17 beta, you will, of course, lose the iPhone data. But if there is an iPhone data backup you created before, you can restore the iPhone backup after going back to iOS 16.

2.       Is it possible to downgrade iOS 17 to 16 without computer?

Maybe, but it is difficult to do it. As iOS 17 gets more and more tests, it is not an easy job to downgrade the iOS 17 beta without a computer. But you can still have a try if you are a tech expert.

3.       Can I downgrade iOS 17 beta to any iOS version?

No, you cannot. Most iPhones that can download and install iOS 17 beta can only downgrade to iOS 16 because Apple only allows you to install the signed IPSW on the iPhone.

Conclusions:

iTunes and iSunshare iOS Repair Genius can help you to downgrade iOS 17 beta to iOS 16. Both ways can work successfully to get your iOS 17 Beta back to the original iOS 16. iTunes will be easier but it only works on beta version now. If you want to downgrade iOS version to any older version, iSunshare iOS Repair Genius can help you.

Related Articles:

  1. iOS Beta Bugs or Issues with Fixes
  2. How to Remove iOS 17 Beta from iPhone without iTunes or PC
  3. How to Restore iOS Device Data with iTunes/iCloud
  4. How to Download iOS 17 Developer Beta on Your iPhone 


May 11, 2023

How to Transfer Windows 11/10 from One SSD to Another

 If your SSD is running out of space and you are going to replace it with a larger one, but you do not want to lose the original Windows OS settings and configurations, what can you do? You can directly transfer Windows 11/10 from one SSD to another without reinstalling.  In this article, you can learn an easy way to do that. 

transfer Windows OS from one SSD to another

Why do you need to upgrade Windows 11 to another SSD? 

When your system runs slowly or suddenly fails to work, you can consider migrating Windows OS to another SSD. We collect the reasons below: 

  1. The old SSD is running out of space. It takes a long time to startup. Also, there is no space to install more apps. 
  2. Windows OS runs slowly on the old SSD. 
  3. You want to upgrade the computer with a larger SSD to get a better experience. 

What to prepare before cloning Windows 11/10 operating system 

First of all, you should find the Windows cloning software to transfer Windows OS to SSD. iSunshare CloneGo is a more efficient tool for you to transfer OS from one SSD to another. After cloning, it keeps the system files and configurations on both SSDs.  To begin with cloning, you need to download it and install it on your Windows computer. 

Besides, you need to get the proper SSD.  As is known to all, SSD is cheaper now. You can buy a new one with enough space. Then you need to use the USB-to-SATA adapter to connect the SSD to your computer and go to disk management to initialize it. The two SSDs should be in the same partition style. After that, you should allocate a new simple volume on the new SSD. If you get an old SSD with a larger space, it is better to back up the data on it in advance. 

Steps to transfer Windows 11/10 to another SSD 

Step 1: Launch the software and select C drive as the source partition. C drive is always the system drive. 

select C drive as source partition

Step 2: Choose the volume of your other SSD as the target partition. 

select SSD volume as target partition

Step 3: Go to click on the Start button in the bottom right corner. Then a message box comes out to inform you that the target partition data will be overwritten. Click Yes to perform the cloning. 

click Start

Wait patiently and you will get the successful prompt at the end. 

How to boot Windows 11/10 from the target SSD

After transferring Windows from one SSD to another, you can try to boot from another SSD. How to do that? Just shut down the computer and then restart it. Keep pressing the boot menu key to enter BIOS settings. Then choose the target SSD to boot. 

change boot order

FAQs about Windows OS Migration to SSD 

1. Why do so many people go to transfer Windows OS to SSD?

SSD is well-known for its excellent read and write speeds, high security, and low power consumption. With Windows OS in SSD, you can work in a faster and smoother environment. 

2. Does Windows 11/10 have the built-in tool to move Windows OS to another drive? 

No, you cannot find the direct Windows migration tool on your PC. But there is a Backup and Restore (Windows 7) utility that can help you to do that. The process is complicated as you need to back up Windows OS first to the external hard drive and then boot the computer from the Windows installation media to restore the backup to another SSD. 

3. Is it possible to clone the entire SSD to another SSD? 

Yes, you can do that with iSunshare CloneGo.  You can choose the Disk Clone feature to clone the whole SSD to another HDD/SSD or USB flash drive. 

Conclusions: 

If you are going to upgrade the Windows hard disk and worry about losing the Windows 11/10 data, you can try this Windows cloning software. It is extremely easy to transfer Windows 11/10 operating system to another SSD using iSunshare CloneGo. 

Related Articles: 

  1. How to Clone Existing Windows to USB and Make it Bootable
  2. How to Migrate Windows 11 to a New Hard Drive or SSD
  3. Easily Clone C Drive to External Hard Drive in Windows PC
  4. How to Clone SSD to Larger SSD in Windows 


March 9, 2023

Solved--Windows Media Player Doubled All My Songs

 “My media player duplicates all the music files in my library when I open it. It is very annoying, can I fix it?” From Microsoft community. 

What to do if the Windows media player doubled all my songs/ music? How can you delete duplicate songs in the Windows media player? In this article, you can learn two effective ways to find supplicate files. 

solved-windows media player doubled all my songs

Part 1: Delete Duplicate Songs in Windows Media Player Manually 

Windows Media Player is used to play music or videos from a PC. You can check the songs in Windows Media Player libraries. Of course, you can manage to delete the duplicate songs on it. 

Step 1: Open Windows Media Player and then you can check all songs here. 

Step 2: Click the Title column and then all songs will be listed by Title. You can now compare the names, lengths, sizes, and so on to find duplicate songs. 

list songs by title

Step 3: Go to choose the duplicate one and right-click to choose Delete. Then you can remove duplicate songs one by one. 

delete duplicate songs

Step 4: You will get the message box to make a choice. Choose Delete from library and my computer and then click the OK button. 

choose delete from library and my computer


Part 2—Delete the repeated songs on your computer with iSunshare DupFiles Genius 

iSunshare DupFiles Genius is the best solution to solve Windows Media Player doubling all my songs. It is developed with the advanced MD5 algorithm so that it can quickly find the same songs for you. With this software, you can scan all different file types on one or more folders/drives, such as images, audio, documents, and so on. Besides, you can scan the external hard drive to find duplicate files to release space. 
Step 1: Choose the location to scan. 

Once launch the software, you can click the plus button to choose a folder or drives in that you want to find the duplicates. You can repeat this operation to add two or more locations. After that, click on the Next button. 

select song location to scan

Step 2: Define the scan settings. 

You can choose the folder to exclude and then choose the file type to scan. As duplicate songs are going to be found, you can choose only audio as the file type to get a more accurate report. Then, click on the Start scanning button. 

define the scan settings

Step 3: After minutes, you will get the duplicate files report. You can scroll down to check all. Then you can check the checkbox next to File Name to select all duplicate songs. Next, click on the Delete button. 

choose all duplicate songs to delete

Step 4: A message box will come out to inform you of the number of files to delete. You can click on the Yes button to continue. 

click Yes to delete

You will get a successful message soon. After that, the original songs are kept but the doubled ones is cleaned. 

successfully delete the duplicate songs

Part 3: How to Prevent Windows Media Player Double Songs in Library 

Although we can quickly remove the duplicate songs with iSunshare DupFiles Genius, it will be better if all songs will not be doubled in Windows Media Player. You can change the settings to disable this feature. 

Step 1: Launch Windows Media Player and then click Organize> Options.

Step 2: In the Option box, click on the Player tab and then uncheck the option “Automatically add it to your library when it is played”. 

Step 3: Click on Apply and then the OK button.  After that, the songs will not be doubled to Windows Media Player when played.